🧢 Beautiful ✨ Detailed πŸ’ Adorable

Ostin The Octopus Amigurumi Pattern

Ostin The Octopus Amigurumi Pattern
4.6β˜… Rating
8-10 Hours Time Needed
3.1K Made This
βœ‚οΈ

Intermediate Level

Ideal for those with basic crochet experience, featuring slightly more advanced stitches and techniques to expand your skills.

⏱️

All-Day Adventure

Requires 8-10 hours, ideal for a full day of immersive crocheting.

🧸

Cute Companion

An adorable friend to cherish, handcrafted with love to bring comfort and joy for years to come.

About This Ostin The Octopus Amigurumi Pattern

This pattern creates Ostin, a soft plush octopus with eight curly tentacles and cute facial details. It uses plush yarn for the body and contrasting plush for tentacle suction cups to create a playful look. You will crochet tentacles as two-layer details and assemble them to the body for a neat, durable finish.

Ostin The Octopus Amigurumi Pattern crochet pattern - detailed view of completed project

Techniques include working in magic ring, puff stitches for suction cups and attaching tentacles directly during Round 33. The instructions contain clear round-by-round steps and assembly notes for best results.

Why You'll Love This Ostin The Octopus Amigurumi Pattern

I absolutely love this pattern because it combines soft plush yarn with playful tentacle shaping to create a characterful toy that both kids and adults adore. I enjoyed designing the tentacles as two-layer details so they bend naturally and look full of personality. I also love how the puff stitch suction cups add tactile interest and make the octopus fun to touch. The assembly method of attaching tentacles during crocheting gives a secure result I always trust.

Ostin The Octopus Amigurumi Pattern step 1 - construction progress Ostin The Octopus Amigurumi Pattern step 2 - assembly progress Ostin The Octopus Amigurumi Pattern step 3 - details and accessories Ostin The Octopus Amigurumi Pattern step 4 - final assembly and finishing

Switch Things Up

I love how many ways you can customize Ostin β€” swap the main color to lavender, mint or grey for a different mood.

You can make a tiny keychain version by using thinner yarn and a smaller hook for a mini octopus that fits in the palm of your hand.

Try bulky plush yarn with a larger hook if you want a chunkier, squishier octopus with softer tentacles.

I often change the suction cup color to a contrasting shade for a bolder effect or to match nursery decor.

For a more realistic look, use tonal yarns and reduce the number of puff stitches to soften the texture of the tentacles.

I sometimes add small felt accessories like a hat or bow to give personality and create themed characters.

Use embroidery variations for eyes and smile β€” longer lashes or a surprised mouth will completely change Ostin’s expression.

Try adding a loop at the top of the head and turn Ostin into a hanging mobile toy for a nursery.

If you want posable tentacles, insert thin wire inside before closing the end so they can hold shapes and poses.

I recommend experimenting with stuffing density β€” slightly firmer stuffing in the head but softer in tentacles gives the best shape and drape.

Common Mistakes & How to Fix Them

βœ— Skipping stitch markers during tentacle assembly can cause uneven spacing and mismatched attachments; place markers on the body where each tentacle will attach and check spacing before stitching. βœ— Overstuffing the head and body makes shaping difficult and can distort the facial placement; stuff gradually while shaping and keep stuffing moderate so tentacles bend naturally. βœ— Using a hook that is too large for the plush yarn will create loose stitches and visible gaps; choose the recommended 3.5 mm hook for plush yarn and a smaller hook for semi-cotton eye details. βœ— Not working into side loops of tentacles when attaching can leave gaps between the tentacles and body; insert the hook through both the tentacle side loops and body stitches as instructed in Round 33 to secure them properly.

Ostin The Octopus Amigurumi Pattern

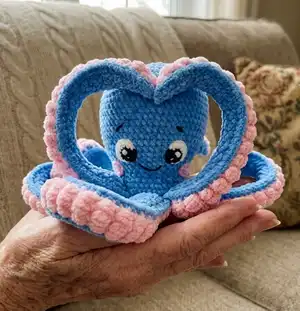
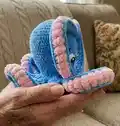
Make your own cuddly Ostin the Octopus with this complete crochet pattern. Follow clear step-by-step rounds for the head, body, tentacles, eyes and finishing touches so you can create a charming plush toy. The pattern uses plush yarn for a soft finish and includes assembly tips so your octopus will be sturdy and adorable. Perfect for an engaging weekend crochet project.

Intermediate 8-10 Hours

Materials Needed for Ostin The Octopus Amigurumi Pattern

β€” Main Fabric

  • 01
    Plush yarn (120 m/100 gr.) (Himalaya Dolphin Baby, YarnArt Dolce) - consumption 1.5-2 balls of each color
  • 02
    Color: Blue (main color) - approx 1.5-2 balls
  • 03
    Color: Pink (tentacles, blushes) - approx 1.5-2 balls
  • 04
    Semi-cotton yarn (~330 m/100 gr.) for eyes, smile, eyebrows (Gazzal Jeans, YarnArt Jeans, Alize Cotton Gold) - small amounts in black and white
  • 05
    Small amounts of black and white semi-cotton for eyes and details

β€” Tools Required

  • 01
    Crochet hook size 3.5 mm (for plush yarn, body and tentacles)
  • 02
    Crochet hook size 3.75-4 mm (optional for plush variations)
  • 03
    Crochet hook size 2 mm (for semi-cotton eyes and details)
  • 04
    Needles for sewing eyes and blushes
  • 05
    Stitch markers
  • 06
    Scissors
  • 07
    Fiber filling (polyester stuffing)
  • 08
    Pins for assembly
  • 09
    Yarn needle for sewing and embroidery

Progress Tracker

0% Complete

β€” Tentacles :

Item Name (Inner Part - 8 details) :

*pink plush yarn, 3.5 mm hook. *make a turn and work a turning CH at the end of each row.

Round 0 :

Chain 9;

Round 1 :

start in the 2nd chain from the hook: 8 SC;

Round 2 :

2 SC, 4 PS, 2 SC (8);

Round 3 :

FLO: skip the St, 7 SC (7);

Round 4 :

skip the St, SC, 4 PS, SC (6);

Round 5 :

FLO: skip the St, 5 SC (5);

Round 6 :

SC, 3 PS, SC (5);

Round 7 :

FLO: 5 SC (5);

Round 8 :

SC, 3 PS, SC (5);

Info :

then repeat the combination of Rows 7 and 8 12 more times up to Row 32;

Round 33 :

FLO: skip the St, 4 SC (4);

Round 34 :

skip the St, SC, PS, SC (3);

Round 35 :

FLO: skip the St, 2 SC (2);

Info :

fix and cut the thread; fix thread ends between the loops on the wrong side.

Item Name (Outer Part - 8 details) :

*blue plush yarn, 3.5 mm hook. *make a turn and work a turning CH at the end of each row.

Round 0 :

Chain 9;

Round 1 :

start in the 2nd chain from the hook: 8 SC;

Round 2 :

8 SC;

Round 3 :

skip the St, 7 SC (7);

Round 4 :

skip the St, 6 SC (6);

Round 5 :

skip the St, 5 SC (5);

Round 6 - 32 :

27 rounds 5 SC;

Round 33 :

skip the St, 4 SC (4);

Round 34 :

skip the St, 3 SC (3);

Round 35 :

skip the St, 2 SC (2);

Info :

fix and cut the thread; fix thread ends between the loops on the wrong side.

Info :

ASSEMBLY: attach two details and crochet them around together with SC, at the end of the tentacle work 2 SC in each 2 stitches on the top; stuff in process of assembling not tight, so that the tentacles bend and twist; don’t work in the upper edge stitches of the tentacle; tie the ends of the threads together and hide inside, so that they do not comes out.

β€” Head-Body :

Info :

*blue plush yarn, 3.5 mm hook. *stuff in process, not tight. Do you know that if the magic ring made of plush yarn couldn’t be tightened, you can use 2 CH instead it, working first 6 SC in the second chain from the hook?

Round 1 :

8 SC in MR;

Round 2 :

8 INC (16);

Round 3 :

(SC, INC)*8 (24);

Round 4 :

(2 SC, INC)*8 (32);

Round 5 :

(3 SC, INC)*8 (40);

Round 6 :

(4 SC, INC)*8 (48);

Round 7 :

(5 SC, INC)*8 (56);

Round 8 :

(6 SC, INC)*8 (64);

Round 9 - 20 :

12 rounds 64 SC;

Round 21 :

(14 SC, DEC)*4 (60);

Round 22 :

(13 SC, DEC)*4 (56);

Round 23 :

(12 SC, DEC)*4 (52);

Round 24 :

(11 SC, DEC)*4 (48);

Round 25 :

(10 SC, DEC)*4 (44);

Round 26 :

(9 SC, DEC)*4 (40);

Round 27 :

(8 SC, DEC)*4 (36);

Round 28 :

(7 SC, DEC)*4 (32);

Round 29 :

(3 SC, INC)*8 (40);

Round 30 :

(4 SC, INC)*8 (48);

Round 31 :

(5 SC, INC)*8 (56);

Round 32 :

(6 SC, INC)*8 (64);

Info :

in Round 33 we are going to attach the tentacles; work SC inserting the hook simultaneously into the both sides of the tentacle and the body; also, work into side loops of the tentacle; if there are missed loops on the sides and gaps, then work the side loops of the first and second tentacles with the body together;

Round 33 :

(8 SC together with tentacle)*8 (64);

Info :

*change thread color to pink

Round 34 :

(6 SC, DEC)*8 (56);

Round 35 :

(5 SC, DEC)*8 (48);

Round 36 :

(4 SC, DEC)*8 (40);

Round 37 :

(3 SC, DEC)*8 (32);

Round 38 :

(2 SC, DEC)*8 (24);

Round 39 :

(SC, DEC)*8 (16);

Round 40 :

8 DEC (8);

Info :

tighten the hole, fix the thread and hide the end inside.

β€” Blushes :

Info :

(2 details) *pink plush yarn, 3.5 mm hook

Round 1 :

6 SC in MR; - fix the thread and leave a long end for sewing.

β€” Eyes :

Info :

(2 details) - if you crochet the octopus of semi-cotton yarn, you may use the same thread of black color divided in half and use a smaller hook; look for more information on the yarn thickness and hook size on page 6. *start with black semi-cotton yarn, 2 mm hook

Round 1 :

6 SC in MR;

Round 2 :

6 INC;

Round 3 :

(SC, INC)*3, change thread color to white, BLO: (SC, INC)*3 (18);

Round 4 :

BLO: SC, INC, SS, turn (4);

Round 5 :

skip SS of the previous round, 2 SC, 7 INC HDC, 2 SC (18);

Info :

fix the thread, leave long ends of black and white threads for sewing, and embroidering the glare; embroider the glare with white thread end.

β€” Final Assembly :

Info :

fix the eyes on the head between Rounds 20 and 25 at the distance of 5 SC in the middle of the eyes; sew them along the contour (you may glue them with non-toxic glue);

Info :

embroider eyebrows (you may also embroider eyelashes); embroider the smile, stretching the thread under the pins and fixing the curve (2 bottom points) with thread;

Info :

sew blushes with thin pink cotton thread.

Assembly Instructions

  • Attach tentacles by inserting the hook through both the tentacle side loops and the body stitches in Round 33, working SC simultaneously into the tentacle and body to secure each tentacle evenly.
  • Join inner and outer tentacle details by crocheting them together with SC; at the top end of the tentacle work 2 SC in each 2 stitches to finish the edge.
  • Fix eyes between Rounds 20 and 25, spacing them 5 SC apart in the middle of the faces, then sew along the contour and secure with non-toxic glue if desired.
  • Embroider eyebrows, eyelashes and the smile after eyes are fixed; use pins to mark smile curve and stitch under the pins to shape the smile.
  • Sew blushes with thin pink cotton thread and hide all thread ends inside the toy, tying and tucking ends so they do not come out.

Important Notes

  • πŸ’‘Yarn thickness ratio should be 2:1 β€” yarn for the body should be twice as thick as yarn for the eyes.
  • πŸ’‘Hook for the eyes should be 1.5 mm smaller than for the body (for example, 3.5 mm - 2 mm).
  • πŸ’‘Depending on your crocheting density, thread tension and method (tight/mixed/cross), choose the correct hook size to meet the gauge.
  • πŸ’‘Stuff in the process of assembling but not tight, so that the tentacles bend and twist naturally.

This adorable Ostin the Octopus pattern is crafted to make a soft, playful friend with curly tentacles and sweet facial details. Take your time assembling the tentacles during Rnd 33 for a secure finish and a professional look. Whether as a gift or for your own collection, this handmade octopus will bring joy and charm to any shelf or nursery. 🧢✨🧑

You ask,

we answer.

FAQs

What size will the finished piece be?

The toy measures approximately 18 cm / 7" without tentacles and about 42 cm / 15.5" including tentacles when made with the recommended yarn and hook sizes.

Can I use different yarn weights for this pattern?

Yes, you can, but maintain the recommended yarn thickness ratio (2:1) and adjust hook sizes accordingly; changing yarn weight will affect final size and may require different stuffing amounts.

Do I need prior crochet experience for this pattern?

This pattern is rated Intermediate β€” basic amigurumi techniques plus puff stitches and attaching details are needed, so some experience with crocheting in rounds and simple shaping is recommended.

How long does this project typically take to complete?

Most crocheters complete this project in about 8-10 hours, depending on experience, yarn type and how long you spend on assembly and embroidery details.