🧢 Beautiful ✨ Detailed πŸ’ Adorable

Minimals Mouse Amigurumi Pattern

Minimals Mouse Amigurumi Pattern
4.4β˜… Rating
2-4 Hours Time Needed
2.0K Made This
βœ‚οΈ

Intermediate Level

Ideal for those with basic crochet experience, featuring slightly more advanced stitches and techniques to expand your skills.

⏱️

Bite-Sized Project

Finishes in 2-4 hoursβ€”perfect for an afternoon of creative relaxation.

🧸

Cute Companion

An adorable friend to cherish, handcrafted with love to bring comfort and joy for years to come.

About This Minimals Mouse Amigurumi Pattern

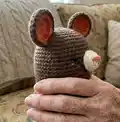
This pattern creates a small, stylized mouse amigurumi from the Minimals series by Bigbebez. It uses worsted weight yarn and single crochet rounds with colorwork guided by symbol charts. The design includes head, body, legs, ears, arms, and a stitched snout for a sweet expression. Clear photos and diagrams show placement for facial features and parts assembly.

Minimals Mouse Amigurumi Pattern crochet pattern - detailed view of completed project

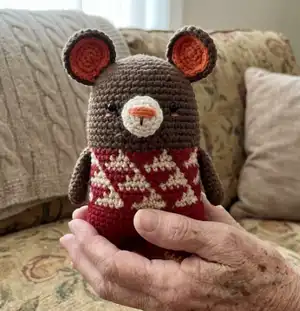
Color changes for the sweater and leg details are shown in the symbol patterns on page 1. The written instructions focus on stitch counts and shaping; follow the charts for color placement.

Why You'll Love This Minimals Mouse Amigurumi Pattern

I absolutely love this pattern because it distills personality into a very small, lovable shape with simple techniques. I adore the graphic colorwork on the body which gives lots of visual interest without complicated stitches. The pattern is satisfying to make quickly yet still offers finishing details like the snout and ear edging that make the doll feel handmade and special. Sewing the parts together and seeing the face come to life is always one of my favorite moments.

Minimals Mouse Amigurumi Pattern step 1 - construction progress Minimals Mouse Amigurumi Pattern step 2 - assembly progress Minimals Mouse Amigurumi Pattern step 3 - details and accessories Minimals Mouse Amigurumi Pattern step 4 - final assembly and finishing

Switch Things Up

I love how easily you can customize this pattern by changing sweater colors or motifs to match seasons or personalities.

I sometimes replace the red sweater with pastel shades to make a softer, baby-friendly version of the mouse.

I recommend trying a smaller yarn and hook to create a tiny keychain version that still keeps all the details.

I often embroider different facial expressions (a smile, a surprised mouth) to give each mouse its own character.

I like adding tiny crocheted accessories like a scarf or hat to personalize a gift for a friend.

I sometimes swap the plastic eyes for safety eyes of a different size, or embroider eyes for a fully handmade look.

I suggest experimenting with variegated yarn for the sweater for an instant color palette without many color changes.

I occasionally insert a small length of wire into the arms for a bit of posability if I want the mouse to hold tiny props.

I recommend blocking the body lightly or using wooden pegs in the feet as shown in the tip section to help the doll stand straight.

I always label my finished mice with a tiny tag or note so each one feels special when gifted.

Common Mistakes & How to Fix Them

βœ— Skipping stitch markers when dividing the legs can cause misaligned leg placement; place markers at the division points and mark the 31st stitch of round 36 to ensure accurate leg starts. βœ— Pulling yarn too tight when working color changes will distort the motif and make seams pucker; change colors smoothly and carry yarn neatly or cut and weave ends to maintain even tension. βœ— Forgetting to stuff gradually during shaping makes lumps and uneven body shape; stuff little by little, especially before decreasing rows, to maintain a smooth silhouette. βœ— Not flattening the arms as instructed can cause bulky or misshapen limbs; flatten the arm pieces and do not stuff so they sit flat when sewn to the body, then whipstitch securely. βœ— Neglecting to weave the long tails through front loops when closing legs will leave gaps; use a yarn needle to weave the tail through remaining front loops and pull tight to close the hole securely.

Minimals Mouse Amigurumi Pattern

Make a charming Minimals mouse amigurumi with clear, step-by-step rounds and assembly notes. This pattern uses simple single crochet rounds and color changes to create a cozy little character you can gift or display. Follow the symbol charts for color placement and use the supplied tips for neat finishing. Perfect for crocheters who enjoy small, detailed projects.

Intermediate 2-4 Hours

Materials Needed for Minimals Mouse Amigurumi Pattern

β€” Main Fabric

  • 01
    Worsted weight yarn (#4) - Beige yarn (for sweater motif)
  • 02
    Worsted weight yarn (#4) - Yellow yarn (for feet/leg tips)
  • 03
    Worsted weight yarn (#4) - White yarn (for snout)
  • 04
    Worsted weight yarn (#4) - Brown yarn (main body and head)
  • 05
    Worsted weight yarn (#4) - Orange yarn (ear inner color)
  • 06
    Worsted weight yarn (#4) - Red yarn (body/sweater)

β€” Tools Required

  • 01
    Crochet hook size 5/0 (3mm)
  • 02
    Yarn needle for sewing and weaving ends
  • 03
    Scissors
  • 04
    Stitch markers
  • 05
    Fiberfill for stuffing
  • 06
    Glue to attach eyes (optional)
  • 07
    5mm black plastic eyes x2

Progress Tracker

0% Complete

β€” Head :

Rnd 1 :

scx6 in the yarn loop, tighten the loop [6 sts]

Rnd 2 :

(2-sc inc) x 6 [12]

Rnd 3 :

(scx1, 2-sc inc) x 6 [18]

Rnd 4 :

(scx2, 2-sc inc) x 6 [24]

Rnd 5 :

(scx3, 2-sc inc) x 6 [30]

Rnd 6 :

(scx4, 2-sc inc) x 6 [36]

Rnd 7 :

(scx5, 2-sc inc) x 6 [42]

Rnd 8 :

(scx6, 2-sc inc) x 6 [48]

Round 9-36 :

sc in all 48 st [48]

Info :

*Change the color of the yarn according to the SYMBOL PATTERNS on page 1. Changing the yarn color is not mentioned in the descriptive design below. Do not forget to change the color as shown in the illustration.

β€” Divide the Legs :

Info :

To make a leg, identify the center space between the legs by the 6 stitches, and each leg identifies the other by 18. (Use stitch markers to help.) Sc at the 31th st of the Rnd 36. *1 This sc is the first st of the first leg (left leg). Continue working on the first leg (left leg).

β€” Legs :

Rnd 37-40 :

sc in all 18 st [18]

Rnd 41 :

(scx1, sc2tog) x 6 [12]

Rnd 42 :

(sc2tog) x 6 [6]

Info :

Fasten off, leaving a long tail. Stuff the leg. Using a yarn needle, weave the yarn tail through the front loop of each remaining st and pull tight to close.

Second Leg (Right leg) :

Rejoin the Red yarn to 7th back unworked st of Rnd 36. *2 This sc is the first st for the second leg (right Leg). Continue working the second leg (right leg) the same way as the first leg (left leg), from Rnd 37-42. Using a yarn needle, sew the 6 sts between the legs. *3

β€” Arms :

Rnd Use the Brown yarn to make MAGIC RING :

scx5 in the yarn loop, tighten the loop [5 sts]

Rnd 2 :

(2-sc inc) x 5 [10]

Rnd 3-11 :

sc in all 10 st [10]

Info :

Fasten off, Leaving a long tail for sewing. Flatten the ARM, do not stuff.

β€” Snout :

Rnd Use the White yarn to make 4 chains :

scx1 in second ch from hook ,scx1 in the next chain, scx3 in the bottom chain, Working up the other side-scx1, scx2 in the next chain, slst [8 sts]

Rnd 2 :

ch 1, 2-sc inc, scx1, (2-sc inc) x 3, scx1, (2-sc inc) x 2, slst [14]

Rnd 3 :

ch 1, 2-sc inc, scx3, 2-sc inc, scx2, sc2tog, scx1, sc2tog, scx2, slst [14]

Rnd 4 :

ch 1, sc in all 14 st, slst [14]

Info :

Fasten off, Leaving a long tail for sewing. Fill in some stuffing to the snout. And then make a nose and mouth on the snout. Eyes Location Between Rnd 13 and 14. Section for the snout stitching on the face.

β€” Ears :

Rnd Use the Orange yarn to make MAGIC RING :

scx6 in the yarn loop, tighten the loop [6 sts]

Rnd 2 :

(2-sc inc) x 6 [12]

Rnd 3 :

(scx1, 2-sc inc) x 6 [18]

Rnd 4 :

(scx2, 2-sc inc) x 6 [24]

Info :

Fasten off, and make another Orange ear, two Brown ears by the same way.

Rnd 5 (Edging) :

Locate orange colored ear part on the brown ear, and then SC together with brown yarn. (Orange: the stitches only through backloop/ Brown: go through both loops). [24]

Info :

Fasten off, Leaving a long tail for sewing. Complete face details and doll assemblies by referring to illustrations showing location for each part and pictures in the following description.

Assembly Instructions

  • Attach the snout to the front of the head and embroider or crochet the nose and mouth; position snout centered between rounds 13 and 14 before stitching.
  • Position and glue or sew the 5mm black plastic eyes between rounds 13 and 14, spacing 8 stitches apart as indicated in the diagram, then secure firmly.
  • Sew arms to the sides of the body between rounds 20 and 21 using the long tails left from the arms; flatten arm pieces and sew flat without stuffing for a natural look.
  • Attach ears to the head: place ears so the inner-ear orange sections face forward; refer to the diagram showing ear placement (between rounds 3-6 positions) and sew each ear using the long tails.
  • After finishing both legs and sewing the 6 stitches between them, weave in tails securely and close any remaining holes by pulling tails through front loops and stitching in place.

Important Notes

  • πŸ’‘Use stitch markers to mark the 31st stitch of round 36 and to help divide the legs accurately.
  • πŸ’‘Stuff firmly but gradually as you shape the head and legs for a smooth, even silhouette.
  • πŸ’‘Flatten the arms and do not stuff them; leaving them unstuffed gives a neater attachment and natural arm shape.
  • πŸ’‘Follow the symbol pattern on page 1 for all color changes; the written description does not call out each color change.
  • πŸ’‘Weave in ends as you go and leave long tails for sewing parts together to make assembly easier.

This Minimals Mouse is a lovely pocket-sized companion that makes a perfect handmade gift. The pattern combines simple single crochet shaping with fun colorwork motifs for a delightful finished doll. Enjoy the stitching, assembly, and the warm smiles this little mouse will bring! 🧢🧡

You ask,

we answer.

FAQs

What size will the finished piece be?

The finished amigurumi measures approximately 15 cm (5.9 inches) when using the recommended worsted yarn and 3mm hook.

Can I use different yarn weights for this pattern?

Yes, you can use different yarn weights, but the final size will change; use a suitable hook for your yarn and adjust stuffing accordingly.

Do I need prior crochet experience for this pattern?

This pattern is rated intermediate; basic knowledge of single crochet, increases, decreases and working in the round is recommended for best results.

How long does this project typically take to complete?

Most crocheters complete this project in 2-4 hours, though time may vary depending on experience level and colorwork familiarity.