About This Mini Christmas Hat Amigurumi Pattern
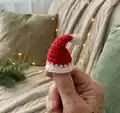
This pattern creates a tiny crocheted Christmas hat approximately 2.76 inches (7 cm) long, perfect for ornaments or decorating amigurumi. It features simple rounds, quick color changes, and a small pompom or hanging loop option. The instructions are concise and ideal for crocheters who want a fast, festive make.

Worked in continuous rounds starting with a magic ring, the hat changes colors for the brim and tip to create a classic Santa-hat look. Detailed rounds and finishing notes are included so you can complete it quickly.
Why You'll Love This Mini Christmas Hat Amigurumi Pattern
I absolutely love this pattern because it turns just a few rounds into a charming holiday accent that fits in the palm of your hand. I enjoy how quickly the hat comes together — it is satisfying to finish in a single sitting and perfect for mass-making ornaments. I also love the simple color-change technique that gives a big festive impact with very little yarn. Making these little hats always brightens my crafting space and makes delightful, handmade gifts for friends and family.
Switch Things Up
I love how easily you can customize this mini hat by changing yarn colors; try pastel shades for a soft, modern take or metallic yarn for a sparkly holiday version.
You can make the hat larger or smaller by switching yarn weight and hook size; bulky yarn with a larger hook makes a chunky ornament while finer yarn makes a tiny keychain charm.
I sometimes add a little pompom at the tip instead of the small bulb shown to give the hat a playful look and extra volume.
Try embroidering tiny stars or dots on the body of the hat for added detail; contrasting embroidery thread really pops against the background yarn.
For a practical variant, make a looped hanger directly into the top of the hat so it can be hung on a tree or used as a gift tag accessory.
I also enjoy turning several hats into a garland by stringing them on a ribbon — a quick and festive decoration for mantels or doorways.
If you want a more vintage look, use a heathered or tweed yarn instead of solid colors to add texture and depth.
Consider gluing or sewing tiny beads, bells, or sequins onto the brim for extra sparkle — just make sure they are securely attached if the piece will be handled by children.
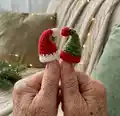
I often pair this hat with a tiny amigurumi head or cone to create miniature characters — simply sew the hat onto the toy for a cozy, finished look.
Don't be afraid to experiment with stitches; replacing some rounds with textured stitches or puff stitches can produce interesting, decorative effects.
Common Mistakes & How to Fix Them
✗ Not using a stitch marker to mark the beginning of rounds causes you to lose track of where each round starts; place a stitch marker at the first stitch and move it up after each round to stay on track.
✗ Switching colors without securing the ends can cause loose tails and unraveling later; when you change color, weave in or secure the yarn tail properly and work the first few stitches over the tail if possible.
✗ Crocheting too loosely will make the hat floppy and show gaps between stitches; use a smaller hook than recommended on the yarn label and maintain firm, even tension for a tight gauge.
✗ Skipping stitch counts after increases or decreases leads to an incorrect stitch total and distorted shaping; count your stitches after each increase/decrease round to ensure the correct stitch count.
✗ Forgetting to fasten off and weave ends neatly results in a messy finish that can come undone; cut the yarn and fasten off securely, then weave in ends with a yarn needle for a clean result.