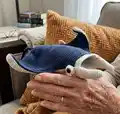
🧢 Beautiful ✨ Detailed πŸ’ Adorable

Jacque the Manta Ray Amigurumi Pattern

Jacque the Manta Ray Amigurumi Pattern
4.8β˜… Rating
5-7 Hours Time Needed
3.2K Made This
βœ‚οΈ

Intermediate Level

Ideal for those with basic crochet experience, featuring slightly more advanced stitches and techniques to expand your skills.

⏱️

Weekend Treat

Takes 5-7 hours, making it an enjoyable project to finish over a couple of days.

πŸ₯

Charming Critter

Delightful animal designs with sweet details that capture the essence of your favorite woodland and farmyard friends.

About This Jacque the Manta Ray Amigurumi Pattern

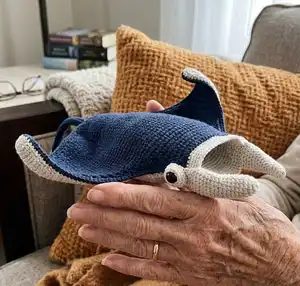
This pattern creates Jacque, a realistic manta ray amigurumi with a shaped body, flat wings and a flexible tail. You will make two mirrored body/wings pieces that are seamed together, add a tailored mouth, cephalic fins, eyes and an optional handkerchief. The design focuses on clean shaping using turning rows and continuous rounds for the smaller parts.

Jacque the Manta Ray Amigurumi Pattern crochet pattern - detailed view of completed project

Includes full materials list, abbreviations, stitch counts by row and step-by-step assembly photos. Suitable for crocheters comfortable with increases, decreases and seaming pieces.

Why You'll Love This Jacque the Manta Ray Amigurumi Pattern

I absolutely love this pattern because it balances sculptural shaping with simple stitch work to create a striking manta ray. I enjoy how the two-piece body construction gives a smooth, even fabric with a professional finish. The pattern allowed me to experiment with colorblocking for the underside and wing edge which gave Jacque a lot of character. I also love that the tail can be optionally wired for display or left soft for play, giving makers flexibility.

Jacque the Manta Ray Amigurumi Pattern step 1 - construction progress Jacque the Manta Ray Amigurumi Pattern step 2 - assembly progress Jacque the Manta Ray Amigurumi Pattern step 3 - details and accessories Jacque the Manta Ray Amigurumi Pattern step 4 - final assembly and finishing

Switch Things Up

I love how easy it is to customize Jacque by changing yarn colors β€” try pastel shades for a softer, nursery-friendly version or bright contrasting colors for a playful look.

You can make Jacque larger or smaller by switching yarn weight and hook size; using a bulkier yarn and larger hook gives a chunky display piece while fingering weight creates a delicate collectible.

I often add wire to the tail for display pieces, but leave it out for toys intended for younger children; the wire gives a nice poseable tail when used carefully.

Swap safety eyes for embroidered eyes if you need a fully child-safe toy, or use smaller safety eyes for a cuter scale and proportion.

Try embroidery or duplicate stitch to add markings on the wings or a little smile inside the mouth to give Jacque more personality.

Use variegated or hand-dyed yarn for the upper wings to create a unique watery gradient effect without any extra colorwork.

Make a whole ocean set by crocheting matching sea friends using the same yarn palette β€” squid, octopus and jellyfish all pair beautifully with Jacque.

I sometimes add a tiny crocheted life-ring or removable handkerchief accessory in complementary colors to personalize each manta ray as a gift.

For a more rustic, eco-friendly version use recycled cotton yarns and recycled stuffing like the Hoooked filling suggested in the pattern for sustainable crafting.

If you want a travel-friendly mini, use lighter yarn and a smaller hook, reduce the mouth round counts proportionally and use 6-8mm safety eyes for tiny, palm-sized cuties.

Common Mistakes & How to Fix Them

βœ— Not counting stitches after increase rows will leave your piece asymmetrical; count at the end of each increase row and compare to the chart so your stitch counts match. βœ— Skipping the stitch marker placements when joining pieces can lead to mismatched seams; place markers where instructed and pin pieces together before seaming. βœ— Understuffing the body cavity will result in a floppy midsection; stuff firmly and shape the V-shaped cavity as described to maintain structure. βœ— Using a crochet hook that is too large for the yarn weight makes gaps appear and stuffing show through; use the recommended hook or one size smaller to keep stitches tight. βœ— Failing to flatten cephalic fins before sewing will make them sit awkwardly; press and flatten the fins and sew with the long tail left for neat attachment.

Jacque the Manta Ray Amigurumi Pattern

Create Jacque, a soft and snuggly manta ray amigurumi you can make at home. This pattern walks you through shaping the wide wings, tail and adorable mouth with clear step-by-step instructions and photos. Perfect for gifting or adding a sea-themed friend to your toy collection. Youll love the clean lines and simple seaming that give Jacque a polished, handmade look.

Intermediate 5-7 Hours

Materials Needed for Jacque the Manta Ray Amigurumi Pattern

β€” Main Fabric

  • 01
    Stylecraft Naturals Organic Cotton (100% Organic Cotton, Weight: 3/Light Worsted) - Indigo Wash (navy blue): x3 balls
  • 02
    Stylecraft Naturals Organic Cotton (100% Organic Cotton, Weight: 3/Light Worsted) - Dove (gray): x2 balls
  • 03
    Deramores Studio Organic Cotton DK (substitution option - DK weight)
  • 04
    Rico Essentials Organic Cotton DK (substitution option - DK weight)
  • 05
    Paintbox Yarns Cotton DK (substitution option - DK weight)
  • 06
    Rowan Handknit Cotton (substitution option - DK weight)
  • 07
    Rowan Summerlite DK (substitution option - DK weight)
  • 08
    Debbie Bliss Cotton DK (substitution option - DK weight)
  • 09
    Scheepjes Linen Soft (cotton/linen/acrylic - substitution option)
  • 10
    Paintbox Yarns Simply DK (acrylic - substitution option)
  • 11
    Stylecraft Bamboo & Cotton Blend (substitution option)
  • 12
    Sirdar Stories DK (cotton/acrylic - substitution option)
  • 13
    Valley Yarns Haydenville DK (wool/acrylic - substitution option)
  • 14
    Hoooked 100% Recycled Fluffy Cotton Filling (used for stuffing)

β€” Tools Required

  • 01
    Crochet hook size 3.00 mm / US C
  • 02
    Tapestry needle
  • 03
    Stitch markers
  • 04
    Scissors
  • 05
    Safety eyes size 12 mm (2 pieces)
  • 06
    Stuffing (Hoooked 100% Recycled Fluffy Cotton Filling or equivalent)
  • 07
    Optional: 14 gauge craft wire (to stiffen tail)
  • 08
    Optional: electrical tape (to soften wire ends)

Progress Tracker

0% Complete

β€” Body / Wings :

Infos :

The body/wings are worked in turning rows - chain 1 and turn at the end of each row unless otherwise stated. Make 2 - one in navy blue and one in gray (or your choice colors). The 2 pieces will be seamed together to create the body

Round 1 :

Row 1: ch 7. sc in the 2nd back bump from hk and in each of the next 5 [6]

Round 2 :

Row 2: inc 2, sc across until the last 2 st of row, inc 2 [10]

Round 3 :

Row 3: sc in each st across [10]

Round 4-45 :

Row 4-45: repeat rows 2 & 3. As needed, refer to the chart at right as you go along to be sure your rows have the correct stitch count. Each increase row will increase by 4 stitches.

Round 46 :

Row 46: inc 3, sc across until the last 3 st of row, inc 3 [100]

Round 47 :

Row 47: sc in each st across [100]

Round 48-53 :

Row 48-53: repeat rows 46 & 47. As needed, refer to the chart at right as you go along to be sure your rows have the correct stitch count. Each increase row will increase by 6 stitches. FASTEN OFF. PHOTO 01

Round 54 :

Row 54: count 25 stitches in from each wingtip and place a stitch marker there. Slip knot onto hook and rejoin in the 26th stitch from where you fastened off. Sc in next 67 st across (up to where you stitch marked on the other side) [67] PHOTO 02

Round 55 :

Row 55: dec 2, sc across until the last 4 st of row, dec 2 [63]

Round 56 :

Row 56: sc in each st across [63]

Round 57-72 :

Row 57-72: repeat rows 55 & 56. As needed, refer to chart at right as you go along to be sure your rows have the correct stitch count. Each decrease row will decrease by 4 stitches.

Round 73 :

Row 73: dec, sc 27, dec [29]

Round 74 :

Row 74: sc in each st across [29]

Round 75 :

Row 75: dec, sc 25, dec [27]

Round 76-82 :

Row 76-82: sc in each row across [27]

Round 83 :

Row 83: sc in each stitch around the entire piece, up to the opposite side of the mouth. Fasten off. PHOTO 03

β€” Tail :

Infos :

Make 2 pieces - one in navy blue and one in gray (just as you did the body/wings). To start the tail, find the most narrow end of the body which has a count of 6 st across PHOTO 04

Round 1 :

Row 1: Slip knot onto your hook and rejoin the yarn to the body by making a sc in the 3rd stitch from the right (4th stitch from the left). Sc in the next st, ch 1, turn [2] PHOTO 05

Round 2 :

Row 2: dec the two stitches you just made [1] PHOTO 06

Round 3 :

Row 3: fsc 50 [50] Fasten off. PHOTO 07

β€” Mouth :

Infos :

The mouth is crocheted in continuous rounds using the gray yarn. You will begin by making a chain and will crochet around the chain - making an oval shape.

Round 1 :

Rnd 1: ch 9, sc in 2nd ch from hook and in next 6 st, inc in last st. Continue on the other side of chain - sc in next 7 st, inc in last st [18]

Round 2 :

Rnd 2: inc, sc 7, inc 2, sc 7, inc [22]

Round 3 :

Rnd 3: inc, sc 9, inc 2, sc 9, inc [26]

Round 4 :

Rnd 4: inc, sc 11, inc 2, sc 11, inc [30]

Round 5 :

Rnd 5: inc, sc 13, inc 2, sc 13, inc [34]

Round 6 :

Rnd 6: inc, sc 15, inc 2, sc 15, inc [38]

Round 7 :

Rnd 7: inc, sc 17, inc 2, sc 17, inc [42]

Round 8 :

Rnd 8: inc, sc 19, inc 2, sc 19, inc [46]

Round 9 :

Rnd 9: inc, sc 21, inc 2, sc 21, inc [50]

Round 10 :

Rnd 10: inc, sc 23, inc 2, sc 23, inc [54] PHOTO 08

Round 11-20 :

Rnd 11-20: sc in each st around [54] PHOTO 09

Info :

Fasten off and weave in ends. Flip inside out so the wrong side will be facing the inside of the body and you will be looking into the mouth on the right side of the fabric. PHOTO 10

β€” Cephalic Fins :

Infos :

The cephalic fins are crocheted in continuous rounds using the gray yarn - make 2. They will be flattened and then sewn on to the mouth

Round 1 :

Rnd 1: st 6 in a magic circle [6]

Round 2 :

Rnd 2: inc in each st around [12]

Round 3 :

Rnd 3: (sc in next st, inc in next st) x6 [18]

Round 4-20 :

Rnd 4-20: sc in each st around [18]

Info :

Fasten off with a sl st, leaving a long tail for sewing on. Flatten the cephalic fins. PHOTOS 11 & 12

β€” Eyes :

Infos :

The eyes are crocheted in continuous rounds using the gray yarn - make 2. Use 12mm safety eyes

Round 1 :

Rnd 1: st 6 sc in a magic circle [6]

Round 2 :

Rnd 2: inc in each st around [12]

Round 3 :

Rnd 3: (sc, inc) x6 [18]

Round 4-5 :

Rnd 4-5: sc in each st around [18]

Info :

Fasten off with a sl st, leaving a long tail for sewing on. Insert safety eyes into the middle of the magic circle. Stuff eyes lightly. PHOTOS 13 & 14

β€” Handkerchief :

Infos :

The handkerchief is crocheted in rows using yellow and light blue yarn. Chain 1 and turn after each row up to and including row 26

Round 1 :

Row 1: ch 2, sc in 2nd ch from hook [1]

Round 2 :

Row 2: inc [2]

Round 3 :

Row 3: inc 2 [4]

Round 4 :

Row 4: inc, sc across until the final st of the row, inc [6]

Round 5-26 :

Row 5-26: repeat row 4, alternating colors every 2 rows. You will begin and end each row with an increase stitch, therefore each row will increase by 2 stitches. Row 26 will end with 50 stitches. PHOTO 15 at row 12

Round 27 :

Row 27: with yellow, inc in next st, sc in next 50 st, ch 36, turn photo 16

Round 28 :

Row 28: sc in 2nd chain from hook and in next 35 chains. Continue along the long edge of the handkerchief with 49 st, ch 36, turn

Round 29 :

Row 29: sc in 2nd ch from hook and in next 35 chains, continue down along the left 'v' edge of the handkerchief and up the other side of the 'v', weaving in ends as you go or crocheting over the ends so as to tuck them into the border. PHOTO 17 Fasten off with a sl st to the top corner.

Info :

Weave in ends. PHOTO 18

β€” Assembly :

Info :

JOIN THE BODY/WINGS/TAIL: Put blue and gray sides on top of each other, with the wrong sides together (inside). With the blue yarn, slip knot onto your hook. Insert your hook into the first stitch at the left corner of the mouth from top to bottom - with the blue color being the top. PHOTO 19 Single crochet around the entire body and tail - up to the opposite side of the mouth.

Info :

To assist you, I recommend using stitch markers at regular intervals around the body before you start to crochet around. PHOTO 20 This will hold the two pieces together and ensure your stitch counts are the same on each piece so it will crochet together evenly and so you can address any discrepancies in stitch count (increase or decrease) as you go along.

Info :

Fasten off and weave in ends. PHOTO 21

Info :

ADD WIRE TO THE TAIL (optional): Use a 14 gauge craft wire, cut to length and push into the tail to make it rigid. Use electrical tape on each end to soften the tips. Curl one end which will rest at the base of the tail to prevent the wire from slipping out the tip of the tail or down into the body of the ray. PHOTOS 22, 23, & 24

Info :

SHAPE & STUFF THE BODY: The middle part of the body is stuffed and the wings remain flat. In order to do this, we create a V-shaped cavity to stuff. Find a straight instrument (I used a stuffing dowel) and lay it across the top of the body from edge of tail to edge of mouth PHOTO 25. Place 5 stitch markers along the length of the dowel which is where you will place 5 small stitches to join the top and bottom of the wings in order to create the cavity. Do this on the other side of the mouth/tail. Using blue yarn, create small stitches through the body at the stitch markers. PHOTO 26 You have now created the cavity. Stuff the body cavity.

Info :

JOIN MOUTH TO BODY: Place mouth inside of the opening of the body where the mouth goes. Use the gray yarn for joining the mouth to the body as follows: Rnd 1: Beginning at the corner of the mouth, insert your hook top to bottom (outside to inside) and crochet around through both layers [54] PHOTO 27 & 28

Round 2-4 :

Rnd 2-4: sc in each st around to extend the mouth [54] Fasten off and weave in ends.

Info :

SEW ON CEPHALIC FINS: Sew on the cephalic fins to the sides of the mouth where the gray meets the blue. PHOTO 29, 30, 31 & 32

Info :

SEW ON EYES: Sew on the eyes to the sides of the mouth/body over where you just sewed on the cephalic fins. PHOTO 33, 34 & 35

Info :

Tie the handkerchief around Jacque's neck. Well done! Admire your incredible crochet skills and enjoy this adorable Manta Ray.

Assembly Instructions

  • Put blue and gray body/wings pieces right sides together (wrong sides facing) and single crochet around the entire body and tail with blue yarn, joining the two pieces and leaving the mouth opening as directed.
  • Use stitch markers at regular intervals before crocheting around to align the two body pieces and correct any stitch count differences as you join the pieces.
  • Create a V-shaped cavity by placing a dowel across the body (tail to mouth) and mark five positions; join top and bottom of each wing at those markers with small stitches to form the cavity, then stuff the cavity firmly.
  • Insert optional 14 gauge craft wire into the tail, tape each end with electrical tape and curl the base to prevent the wire from slipping; this will stiffen the tail for display.
  • Place the mouth inside the body opening and join with gray yarn by inserting your hook top-to-bottom and crocheting around both layers for 1 round, then sc 2-4 rounds to extend and secure the mouth.
  • Sew on flattened cephalic fins to the sides of the mouth with long tails left for neat sewing, then attach eyes at the sides of the mouth/body over the sewn fins and weave in all ends.

Important Notes

  • πŸ’‘Use stitch markers to keep track of your rows and to align the two body pieces before seaming to ensure even joining.
  • πŸ’‘Stuff the body cavity firmly but not overly tight to maintain shape; overstuffing can distort the wings and seams.
  • πŸ’‘Flatten cephalic fins before sewing them to the mouth to ensure a neat, even attachment and natural-looking shape.
  • πŸ’‘When adding optional wire to the tail, cover wire tips with electrical tape and curl the wire end to secure it inside the tail safely.
  • πŸ’‘Weave in ends as you go or crochet over them in the handkerchief border to keep finishing neat and avoid bulky knots.

This Jacque the Manta Ray amigurumi is designed to be a timeless sea friend you can make and love. The two-piece body and tailored mouth create a clean, sculpted look while staying friendly for play or display. Make one for your shelf, a nursery, or a thoughtful handmade gift. 🧢🌊🧡

You ask,

we answer.

FAQs

What size will the finished piece be?

The manta ray will end up approximately 16 inches from wingtip to wingtip and 10 inches from tip to tail when using the recommended yarn and hook size.

Can I use different yarn weights for this pattern?

Yes, you can substitute other DK/Light Worsted weight yarns listed in the substitution section, but final size and gauge will change so choose an appropriate hook for your yarn.

Do I need prior crochet experience for this pattern?

This pattern is rated intermediate, so a working knowledge of single crochet, increases, decreases, continuous rounds and basic seaming is recommended.

How long does this project typically take to complete?

Most crocheters complete this pattern in 5-7 hours, depending on experience, finishing speed and whether you add optional details like wiring the tail.