🧢 Beautiful ✨ Detailed πŸ’ Adorable

Holly Baby Amigurumi Pattern

Holly Baby Amigurumi Pattern
4.5β˜… Rating
5-7 Hours Time Needed
2.6K Made This
βœ‚οΈ

Intermediate Level

Ideal for those with basic crochet experience, featuring slightly more advanced stitches and techniques to expand your skills.

⏱️

Weekend Treat

Takes 5-7 hours, making it an enjoyable project to finish over a couple of days.

🧸

Cute Companion

An adorable friend to cherish, handcrafted with love to bring comfort and joy for years to come.

About This Holly Baby Amigurumi Pattern

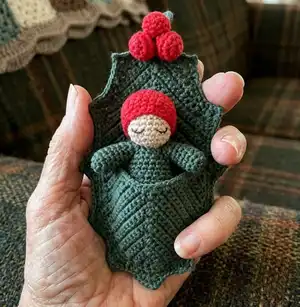
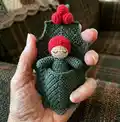
This pattern creates a tiny Holly Baby amigurumi snug inside a decorative holly leaf cradle, complete with a red cap and three holly berries. You will work the baby and berries in continuous rounds and the leaves back-and-forth using a chart for shaping. The pattern includes clear rounds, tips for decreases, and photo guidance to help you assemble the final scene.

Holly Baby Amigurumi Pattern crochet pattern - detailed view of completed project

Perfect as a small holiday gift or ornament, this project uses cotton yarn and a small 2.0 mm hook for crisp stitch definition. Detailed charts and instructions make the leaf shaping and thorned edging straightforward with careful counting.

Why You'll Love This Holly Baby Amigurumi Pattern

I absolutely love this pattern because it captures a tiny seasonal scene in such a compact and heartfelt way. The combination of amigurumi rounds for the baby and the flat charted leaves is a satisfying mix of techniques I enjoy teaching. I adore how the little red cap and berries pop against the deep green of the leaf cradle, making it feel festive and handmade. The pattern is detailed enough to guide you through the tricky parts, but still allows for personal touches in colour and finishing.

Holly Baby Amigurumi Pattern step 1 - construction progress Holly Baby Amigurumi Pattern step 2 - assembly progress Holly Baby Amigurumi Pattern step 3 - details and accessories Holly Baby Amigurumi Pattern step 4 - final assembly and finishing

Switch Things Up

I love changing colors to give each Holly Baby a different personality β€” try pastel greens and pinks for a softer, whimsical version.

To make the doll larger or smaller, change your yarn weight and hook size; a bulkier yarn and larger hook produces a chunky seasonal decoration while thin yarn makes a tiny keychain-friendly doll.

I often swap the red cap for a tiny striped hat or add a contrasting edge to the leaf to highlight the texture of the stitches.

If you want more texture, try using a sport weight cotton or a slightly fuzzy yarn for the body to give the doll a cozy appearance.

I sometimes embroider tiny freckles or a mouth to change facial expression β€” different eye placement creates awake or sleeping looks.

For extra durability if used as an ornament, sew in a small disc of cardboard into the base of the cradle before final stitching to help it sit flat.

I recommend practicing the thorn picot on a scrap before adding it to the leaf; it makes the edges look professionally finished when consistent.

Try making a family set with different colored caps and matching berries for a themed display or gift set.

Attach a loop of thread to the top of the leaf to hang the piece on a tree, or add a small magnet for a fridge decoration.

If you like posing, add a piece of thin wire inside the arms to make them slightly poseable β€” just be sure to wrap the wire so it is fully encased in yarn.

I also enjoy combining this piece with other small crochet snowflakes or garlands for a beautiful seasonal arrangement on a mantel.

Experiment with metallic embroidery thread for tiny accents on the berries to catch the light and add a festive sparkle.

Common Mistakes & How to Fix Them

βœ— Skipping counting stitches during the leaf charts can make later rows not align; carefully check each row count against the chart and mark your row ends while working. βœ— Overstuffing the head or body leads to distortion of the silhouette; stuff gradually, using small amounts to achieve a smooth, slightly soft finish. βœ— Failing to pull the initial tail between rounds when crocheting circles can make counting rounds harder; pull the initial thread end out between rounds 2 and 3 to use as a marker. βœ— Sewing arms too far apart or at uneven heights makes the doll look lopsided; pin parts in position before stitching and check symmetry from multiple angles. βœ— Working decreases incorrectly (not following the note on dec technique) results in messy decreases; use the three-loop decrease method described in NOTE#1 for neat shaping. βœ— Not checking the leaf chart for rows that start and end differently will break the pattern flow; follow the chart closely and note where rows require a turn or special set.

Holly Baby Amigurumi Pattern

Crochet a tiny Holly Baby nestled in a holly leaf cradle β€” a sweet and festive amigurumi perfect for holiday decor or a pocket-sized gift. The pattern includes step-by-step rounds, leaf charts, berries and clear assembly photos so you can follow along easily. With an intermediate level challenge, you will enjoy shaping the leaf cradle and stitching the tiny details to bring this little character to life.

Intermediate 5-7 Hours

Materials Needed for Holly Baby Amigurumi Pattern

β€” Main Fabric

  • 01
    Cotton yarn Alpina Lily (50 g / 175 m) - Beige (for head and face) - quantity: small skein
  • 02
    Cotton yarn Alpina Lily (50 g / 175 m) - Red (for cap and berries) - quantity: small skein
  • 03
    Cotton yarn Alpina Lily (50 g / 175 m) - Dark green (for body, arms, leaves, cradle) - quantity: one small skein
  • 04
    Embroidery thread for sewing and embroidery - Beige, Red, Dark green, Black - small amounts for facial details and sewing
  • 05
    Any synthetic or organic filler for stuffing - small amount for head, body, arms and berries

β€” Tools Required

  • 01
    Crochet hook size 2.0 mm
  • 02
    Sewing needles and pins
  • 03
    Tapestry needle
  • 04
    Scissors
  • 05
    Stitch markers (optional)
  • 06
    Polyester stuffing (or any synthetic/organic filler)
  • 07
    Thin embroidery thread for facial features and berry sewing

Progress Tracker

0% Complete

β€” Head :

Round 1 :

6 sc into magic ring (6 sts)

Round 2 :

(inc) X 6 (12 sts)

Round 3 :

(1 sc, inc) X 6 (18 sts)

Round 4 :

(2 sc, inc) X 6 (24 sts)

Round 5-9 :

(5 rounds): sc around (24 sts)

Round 10 :

(2 sc, dec) X 6 (18 sts)

Round 11 :

(1 sc, dec) X 6 (12 sts)

Info :

After R11 stuff the head tightly.

Round 12 :

(dec) X 6 (6 sts)

Infos :

Leave a tail. In remaining 6 sc sew 6 stitches from inside to outside in sequence, pull the yarn, secure and hide it.

β€” Cap :

Round 1 :

6 sc into magic ring (6 sts)

Round 2 :

(inc) X 6 (12 sts)

Round 3 :

(1 sc, inc) X 6 (18 sts)

Round 4 :

(2 sc, inc) X 6 (24 sts)

Round 5-9 :

(5 rounds): sc around (24 sts)

Round 10 :

(2 sc, dec) X 6 (18 sts)

Info :

Leave a tail and make clean fastening off.

Info :

How to do clean fastening off: insert the yarn into the first stitch after your last stitch. Insert the yarn back into this last stitch and repeat. Secure the yarn and hide inside.

β€” Body&Arms :

Info :

Dark green yarn. First make 2 arms:

Round 1 :

6 sc into magic ring (6 sts)

Round 2 :

(inc, 2 sc) X 2 (8 sts)

Round 3 :

(inc, 3 sc) X 2 (10 sts)

Round 4-5 :

(2 rounds): sc around (10 sts)

Round 6 :

(dec, 3 sc) X 2 (8 sts)

Round 7-8 :

(2 rounds): sc around (8 sts)

Info :

Make 1 sl st more and leave short tail.

Info :

Body:

Round 1 :

6 sc into magic ring (6 sts)

Round 2 :

(inc) X 6 (12 sts)

Round 3 :

(1 sc, inc) X 6 (18 sts)

Round 4 :

(2 sc, inc) X 6 (24 sts)

Round 5 :

(inc, 11 sc) X 2 (26 sts)

Round 6 :

sc around (26 sts)

Round 7 :

(inc, 12 sc) X 2 (28 sts)

Round 8-11 :

(4 rounds): sc around (28 sts)

Round 12 :

(dec, 12 sc) X 2 (26 sts)

Round 13 :

(dec, 11 sc) X 2 (24 sts)

Round 14 :

(2 sc, dec) X 6 (18 sts)

Round 15-16 :

(2 rounds): sc around (18 sts)

Info :

Now place the one arm closely to the body and join them together with 2 sc *. For the arm use its last stitch and the next following stitch. Work 7 sc and join the second arm with 2 sc, when 7 sc again. Now you have round 17. *These inner connecting sc will not be used in the next rounds.

Round 17 :

(6 sc of the arm, 7 sc of the body) X 2 (26 sts)

Round 18 :

(2 sc, dec, 2 sc; (1 sc, dec) X 2, 1 sc) X 2 (20 sts)

Round 19 :

(dec) X 10 (10 sts)

β€” Doll Assembly :

Info :

Stuff the body and arms is not very tight, it should be a little flat. Fasten and hide the tail. Place the head onto the body, pin it. Note - the initial, neater part of the head will be at the bottom, where the neck is (the less neat part of the head will be covered by the cap). Carefully sew on the head with fine stitches with thin beige thread.

Info :

Put the cap on the head of the doll (it is not so easy) and sew it with thin red thread.

Info :

Face: Embroider the eyes a few stitches with thin black thread, as shown further in the pictures. It is difficult to embroider eyes, it is better to practice beforehand on a piece of cloth.

β€” Leaf-Cradle :

Info :

consist of 2 leaves - big and small worked back-and-forth in rows. Dark green yarn.

Big leaf - Row 1 :

2 ch, 1 sc, 1 dc, 2 sc into magic ring (6 sts), turn...

Big leaf - R2 :

2 ch, 1 sc, (1 sc,1 dc,1 sc in one loop – hereafter I refer to this set as "sds" for convenience, but it counts as three stitches!), 2 sc (8 sts)

Big leaf - R3 :

2 ch, 2 sc, sds, 3 sc (10 sts)

Big leaf - R4 :

2 ch, 3 sc, sds, 4 sc (12 sts)

Big leaf - R5 :

2 ch, 4 sc, sds, 5 sc (14 sts)

Big leaf - R6 :

2 ch, 5 sc, sds, 6 sc (16 sts)

Big leaf - R7 :

2 ch, 6 sc, sds, 7 sc (18 sts)

Big leaf - R8 :

2 ch, 7 sc, sds, 8 sc (20 sts)

Big leaf - R9 :

2 ch, 8 sc, sds, 9 sc (22 sts)

Big leaf - R10 :

2 ch, 9 sc, sds, 10 sc (24 sts)

Big leaf - R11 :

2 ch, 10 sc, sds, 10 sc (25 sts)

Big leaf - R12 :

2 ch, 10 sc, sds, 11 sc (26 sts)

Big leaf - R13 :

2 ch, 11 sc, sds, 11 sc (27 sts)

Big leaf - R14 :

2 ch, 11 sc, sds, 12 sc (28 sts)

Big leaf - R15 :

2 ch, 12 sc, sds, 12 sc (29 sts)

Big leaf - R16 :

2 ch, 12 sc, sds, 13 sc (30 sts)

Big leaf - R17 :

2 ch, 13 sc, sds, 13 sc (31 sts)

Big leaf - R18-25 :

(8 rows): 2 ch, 13 sc, sds, 12 sc, 1 dec (31 sts)

Big leaf - R26 :

2 ch, 13 sc, sds, 10 sc, 2 dec (30 sts)

Big leaf - R27 :

2 ch, 12 sc, sds, 10 sc, 2 dec (29 sts)

Big leaf - R28 :

2 ch, 12 sc, sds, 7 sc, 3 dec (27 sts)

Big leaf - R29 :

2 ch, 10 sc, sds, 7 sc, 3 dec (25 sts)

Big leaf - R30 :

2 ch, 10 sc, sds, 3 sc, 4 dec (22 sts)

Big leaf - R31 :

2 ch, 7 sc, sds, 3 sc, 4 dec (19 sts)

Info :

Make 1 ch more and leave short tail.

Info :

At the finish sharp end of the leaf (blue arrow in the photo), attach a new yarn and work the leaf in a round with a edging of sc with thorns. The thorn is crocheted according to the chart: hdc; in one loop: 2-dc cluster, ch-3 picot, 2-dc cluster; hdc.

Info :

I got: 5 sc, thorn, 5 sc, thorn, 7 sc, thorn, 7 sc, thorn, 5 sc, thorn, 3 sc, thorn. And on the other side of the leaf - 3 sc, thorn, 5 sc, thorn, 7 sc, thorn, 7 sc, thorn, 5 sc, thorn, 5 sc. Then work chain of 15, connect the round with sl st and make 2 sl st more. Leave a tail and make clean fastening off, hide the tail inside.

Info :

Turn the leaf left and work it in a round with a edging of sc. (I got 74 sc) Leave long tail for stitching.

Small leaf - Row 1 :

2 ch, 2 sc, 1 dc, 3 sc into magic ring (8 sts), turn...

Small leaf - R2 :

2 ch, 2 sc, sds, 3 sc (10 sts)

Small leaf - R3 :

2 ch, 3 sc, sds, 4 sc (12 sts)

Small leaf - R4 :

2 ch, 4 sc, sds, 5 sc (14 sts)

Small leaf - R5 :

2 ch, 5 sc, sds, 6 sc (16 sts)

Small leaf - R6 :

2 ch, 6 sc, sds, 7 sc (18 sts)

Small leaf - R7 :

2 ch, 7 sc, sds, 8 sc (20 sts)

Small leaf - R8 :

2 ch, 8 sc, sds, 9 sc (22 sts)

Small leaf - R9 :

2 ch, 9 sc, sds, 10 sc (24 sts)

Small leaf - R10 :

2 ch, 10 sc, sds, 11 sc (26 sts)

Small leaf - R11-12 :

(2 rows): 2 ch, 11 sc (13 sts)

Small leaf - R13 :

2 ch, 10 sc (12 sts)

Small leaf - R14 :

2 ch, 9 sc (11 sts)

Small leaf - R15 :

2 ch, 8 sc (10 sts)

Small leaf - R16 :

2 ch, 7 sc (9 sts)

Small leaf - R17 :

2 ch, 6 sc (8 sts)

Small leaf - R18 :

2 ch, 5 sc (7 sts)

Small leaf - R19 :

2 ch, 4 sc (6 sts)

Small leaf - R20 :

2 ch, sc3tog (3 sts)

Info :

Make 1 ch more and leave short tail. Now attach a new yarn according to the chart and work second side: R11: 2 ch, 11 sc (13 sts). R12-13 (2 rows): 2 ch, 10 sc (12 sts). R14: 2 ch, 9 sc (11 sts). R15: 2 ch, 8 sc (10 sts). R16: 2 ch, 7 sc (9 sts). R17: 2 ch, 6 sc (8 sts). R18: 2 ch, 5 sc (7 sts). R19: 2 ch, 4 sc (6 sts). R20: 2 ch, sc3tog (3 sts). Make 2 ch, don’t cut the yarn!

Info :

Turn the leaf left and work it in a round with a edging of sc. Leave long tail for stitching.

β€” Berries (make 3) :

Round 1 :

6 sc into magic ring (6 sts)

Round 2 :

(inc) X 6 (12 sts)

Round 3-4 :

(2 rounds): sc around (12 sts)

Round 5 :

(dec) X 6 (6 sts)

Info :

Leave a tail. Stuff the berry tightly. In remaining 6 sc sew 6 stitches from inside to outside in sequence, pull the yarn and secure it. Don’t cut the tail.

β€” Cradly Assembly :

Info :

Iron the leaves gently through a damp cloth. Put a smaller leaf on top of a large, pin five pins. Carefully sew them together with small stitches over the sc. At the very beginning and finish, sew firmly, making several stitches on top of each other.

Info :

Tie the berries tightly together with a few knots. Stick the tails into a tapestry needle and hide them inside the berries, trim the ends. Use a thin red thread to sew the berries tightly together.

Info :

Stitch the finished berries neatly with a thin green thread on a cradle leaf at the base of a large loop.

Info :

Your cute Holly baby is ready! Congratulations!

Assembly Instructions

  • Stuff the body and arms moderately β€” they should be a little flat rather than overstuffed; fasten and hide the tail before attaching other parts.
  • Place the head onto the body and pin it in position so the neater part of the head is at the bottom; sew on the head with fine beige thread using small even stitches.
  • Position the cap on the head and sew it neatly with thin red thread, securing the edge and hiding ends inside the cap.
  • Sew the small leaf on top of the large leaf, pinning five points first, then sew the edges together with tiny stitches; reinforce the beginning and end with extra stitches.
  • Tie and stitch the three berries together with a few tight knots, hide the tails inside the berries, then sew the berry cluster to the large loop at the top of the cradle using thin green thread.

Important Notes

  • πŸ’‘Use the crochet chart carefully for the leaves: some rows start and end differently, so check each row against the chart as you work.
  • πŸ’‘Follow NOTE#1 for decreases (three-loop decrease) to keep decreases neat and consistent throughout rounds.
  • πŸ’‘Leave tails as instructed for sewing and clean fastening off; pulling the initial thread out between rounds 2 and 3 will help you count rounds.
  • πŸ’‘Iron the leaves gently through a damp cloth to shape them before assembly for a crisp finished cradle.
  • πŸ’‘Pin parts in place before sewing to ensure symmetry and a neat final assembly.

This tiny Holly Baby is a charming seasonal project that fits in the palm of your hand and brightens any holiday display. Handcrafted with cotton yarn and small hooks, it combines amigurumi rounds with flat charted leaves for a delightful mix of techniques. Make it as an ornament, gift, or keepsake β€” each one is uniquely yours! 🧢✨

You ask,

we answer.

FAQs

What size will the finished piece be?

The finished amigurumi measures approximately 7.5 cm (3 in) for the doll and the leaf-cradle is about 13.5 cm (5.3 in) high when using the recommended yarn and hook size.

Can I use a different yarn or hook size?

Yes, you can change yarn weight and hook size, but this will change the final size and stitch gauge; use a larger hook and bulkier yarn for a chunkier version, or thinner yarn and smaller hook for a mini version.

Do I need to read the leaf chart to make the leaves?

Yes, the leaves are worked back-and-forth following a chart; some rows start and end differently so it is important to check the chart as you work each row for correct shaping.

How long does this project typically take to complete?

Most crocheters finish this project in 5-7 hours, depending on experience and how much time is spent on blocking and assembly.