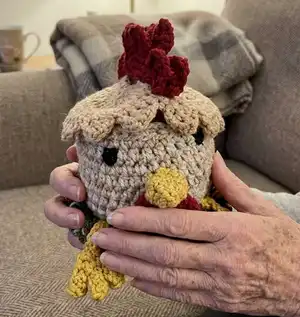
Create a charming chicken-themed coaster set that doubles as a playful nesting display. This pattern guides you step-by-step through coasters, an egg coaster set, a cozy nest mat, and a tiny chicken head with cute details. Perfect for gifting or brightening your kitchen, it uses common stitches and clear photos to help you along. Dive in and enjoy making a whimsical handmade set that stacks neatly and looks delightful on display.
Progress Tracker
0% Complete
— Chicken Comb / Coaster :
Round 1 :
Create MC, 6 sc into MC (6)
Round 2 :
2 sc into each st around (incr) (12)
Round 3 :
*Sc into next st, 2 sc into next (incr)*; repeat around (18)
Round 4 :
*Sc into next 2 sts, 2 sc into next (incr)*; repeat around (24)
Round 5 :
Sc into next 2 sts, 2 sc into next (incr), *sc into next 3 sts, 2 sc into next (incr)*; repeat around ending in 1 sc (30)
Round 6 :
*Sc into next 4 sts, 2 sc into next (incr)*; repeat around (36)
Round 7 :
Sc into next 3 sts, 2 sc into next (incr), *sc into next 5 sts, 2 sc into next (incr)*; repeat around ending in 2 sc (42)
Round 8 :
*Sc into next 6 sts, 2 sc into next (incr)*; repeat around (48)
Round 9 :
*Sc into next 5 sts, ch 1, turn. Sc into 4 sts, ch 1, turn. Sc together (decr) 2 times, ch 1, turn. Sc together (decr), ch 1, turn. 2 sc into the same st and next st. Sl st into the next 2 sts*; repeat to form scallops creating 4 scallops on each side as instructed.
Info :
We will be making the fourth scallop using the same steps as above, but we need to add an extra stitch at the base in this one. Sc into the next 2 sts, 2 sc into the next st, sc into the next st; ch 1, turn. Now repeat the same steps as above to complete the scallop: Sc into the next 4 sts, ch 1, turn. Sc together (decr) 2 times, ch 1, turn. Sc together (decr), ch 1, turn. 2 sc into the same st, 2 sc into the next st. Sl st into the next 2 sts.
Info :
We will now skip a space where the next scallop would be. Sc into the next 5 sts. Now start another set of 4 scallops repeating the same process as above to create the second gap. Sc into remaining sts to create the second gap. Fasten off and sew in any loose ends.
— Top of Chicken Head (Hair) / Coaster :
Notes :
To create this coaster we will make 2 half circles separately and then join them together. We adjust technique: consider the turning chain our first dc in each round after Round 1.
Round 1 :
Create MC, chain 2, 6 dc into MC (7 = 6 dc + ch 2). To make the turning chain: ch 2, insert hook into 2nd ch from hook, pull up a loop. Turn your work to continue completing a dc.
Round 2 :
Insert hook into space below your st and pull up a loop, yarn over, pull through 2 loops, yarn over, pull through 2 loops (this st now counts as your first dc). *2 dc into the next sp*; repeat to end (12 = 11 dc + 1 turning ch).
Round 3 :
Repeat the same steps as beginning of Round 2 (make a turning ch and 1 dc into the same sp). Then, *dc into next sp, 2 dc into next sp (incr)*; repeat around (17 = 16 dc + 1 turning ch).
Round 4 :
Repeat the same steps as beginning of Round 2 (make a turning ch and 1 dc into the same sp). Then: Dc into next 2 sps. Hdc into the next sp. *Sc into the next 2 sps, 2 sc into the next (incr)*; repeat 1 more time. Sc into the next 2 sps. Hdc into the next sp. Dc into the next 2 sps. 2 dc into the last sp (20 = 19 sts + 1 turning ch).
Info :
Fasten off your first half circle. Repeat Rounds 1-4 for your second half circle. After Round 4 we will continue to Round 5 to join them together.
Round 5 :
In the next 2 rounds, insert the hook into proper stitch placement (not the space below). Continuing the yarn from your second half circle, *Sc into the next 3 sts [on the first half circle we made], 2 sc into the next st (incr)*; repeat 4 times. Sc into the next 2 sts, 2 sc into the next st. You should now be joining the opposite side of the half circle. Continue going around: *Sc into the next 3 sts, 2 sc into the next st (incr)*; repeat 4 times. Sc into the next 2 sts, 2 sc into the next (48).
Round 6 :
We will now make a scalloped edge using a similar technique as the Chicken Comb coaster. This will require us to turn the work a few times. We will end up with 6 scallops on each side of the circle. *Sc into the next 4 sts, ch 1, turn. Sc together (decr) 2 times, ch 1, turn. Sc together (decr), ch 1, turn. 2 sc into the same st, 2 sc into the next st. Sl st into the next 2 sts*; repeat around to form scallops. Fasten off and sew in any loose ends.
— Egg Coaster (make 2) :
Notes :
Working in continuous rounds. We are starting with the middle of the yolk. Colours: Lemon, Winter White. Rounds 1-8: Repeat steps from Chicken Comb Coaster. Change yarn colour to white at the end of Round 3 using a sl st.
Round 9 :
Sc into next 4 sts, hdc into the next st, dc into the next, 2 tc into the next st, dc into the next, hdc into the next, sc into the next 2 sts, sl st into the next st. Hdc into the next st, 2 dc into the next st, tc into the next 4 sts, dc into the next 3 sts, hdc into the next st, sc into the next st, sl st into the next st.
Round 9 cont :
Sc into the next 3 sts, 2 sc into the next st, sc into the next 5 sts, hdc into the next st, dc into the next 2 sts, 2 tc into the next st, dc into the next st, sc into the next 3 sts, sl st into the next. Follow photo references to shape the uneven rounded edges.
Round 10 :
Hdc into the next st, sc into the next st, sl st into the next 2 sts, hdc into the next 2 sts, 2 dc (incr) into the next 3 sts, 2 hdc (incr) into the next st, sl st into the next 3 sts. Sc into the next, 2 sc (incr) into the next 2 sts, hdc into the next, 2 sc (incr) into the next 6 sts, sc into the next st, sl st into the next 2 sts.
Round 10 cont :
Sc into the next 8 sts, ch 1, turn. Sc together (decr), sc into the next 3 sts, sc together (decr), ch 1, turn. Sc into the next 5 sts, ch 1, turn. Sc together (decr), sc in next st, sc together (decr), ch 1, turn. Sc together (decr), sl st in same st, fasten off leaving ~10" tail. We will use this tail to sew the coaster into the egg shell. Sew in any other loose ends.
— Egg Shell: Bottom (make 1) :
Notes :
To make the bottom & top of the egg shell, use 2 strands of yarn at the same time and a 5.5 mm hook. Your crochet tension for the egg shell should be quite tight as we want it to hold its shape once complete. Colour: Skylight. If you do not have 2 skeins of yarn in the same colour, cut a strand of yarn measuring approximately 50-feet for the second piece of yarn.
Round 1 :
Create MC, 6 sc into MC (6)
Round 2 :
2 sc into each st around (incr) (12)
Round 3 :
*Sc into next st, 2 sc into next (incr)*; repeat around (18)
Round 4 :
*Sc into next 2 sts, 2 sc into next (incr)*; repeat around (24). Flip your work inside out so you are working the rounds from the outside.
Round 5-9 :
Sc around (24)
Round 10 :
*Sc in the next 3 sts, sc together (decr)*; repeat 4 times total, ending in sc in last 4 sts (20). Fasten off and sew in any loose ends.
— Egg Shell: Top (make 1) :
Notes :
Use 2 strands of yarn at the same time and a 5.5 mm hook. We will be starting from the opening end (bigger part) of the egg and working towards the top. Colour: Skylight. If you do not have 2 skeins of yarn in the same colour, cut a strand of yarn measuring approximately 48-feet for the second piece of yarn.
Round 1 :
Ch 24, sl st to beg first ch to close loop (24)
Round 2-5 :
Sc in each st around (24)
Round 6 :
*Sc into next 6 sts, sc together (decr)*; repeat around (21)
Round 7 :
*Sc into next 5 sts, sc together (decr)*; repeat around (18). Flip your work inside out so you are working the rounds from the outside.
Round 8 :
*Sc into next 4 sts, sc together (decr)*; repeat around (15)
Round 9 :
*Sc into next 3 sts, sc together (decr)*; repeat around (12)
Round 10 :
Sc together 3 times. Fasten off and use tail to sew remaining top of the egg closed. Sew in any remaining loose ends.
Item Name (Egg Assembly) :
Sew each of the egg coasters into one side of the egg shell (top & bottom) using the long tail we left. Attach the coaster far into the bottom and top of the egg shell so when the coaster is rolled up inside, there is some room remaining around the perimeter of each egg shell to close it together. To close the egg, gently twist the top and bottom together.
— Chicken Head :
Notes :
To make the head, use 2 strands of yarn at the same time. Colours: Almond, Topaz.
Round 1 :
Create MC, ch 2 (counts as hdc). 9 hdc into the MC. Join with sl st into top of ch 2 to close round (10).
Round 2 :
Ch 2 (counts as hdc). Hdc into same st. 2 hdc (incr) in each st around. Join with sl st into top of ch 2 to close round (20).
Round 3 :
Ch 2 (counts as hdc). Hdc into same st. *2 hdc (incr) in next st. Hdc in next st* repeat around ending with 1 hdc. Join with sl st into top of ch 2 to close round (30).
Round 4 :
Ch 2 (counts as hdc). Hdc into same st. *2 hdc (incr) in next st. Hdc in next 2 sts* repeat around ending with 1 hdc. Join with sl st into top of ch 2 to close round (40).
Round 5-6 :
Ch 1. Hdc in each st around. Join with sl st into ch 1 to close off round (40).
Round 7 :
We will now begin to make the opening on the back of the head for a mug handle. To do this, we will not be stitching all the way around and instead will flip our work in Rounds 7-11. Ch 1. Hdc in next 36 sts, ch 1, turn.
Round 8 :
Hdc in each 36 sts, ch 1, turn.
Round 9 :
In Round 9 & Round 11: insert your hook below the regular stitch location and catch the stitch below. Otherwise you will end up with a visible horizontal line running along the head. Hdc in each 36 sts, ch 1, turn.
Round 10 :
Hdc in each 36 sts (insert hook in normal st location). Ch 1, turn.
Round 11 :
Hdc in each 36 sts (insert hook below regular st location as you did in round 9). Ch 1, turn.
Round 12 :
We will close the gap at the top of the head in this round and stitch all the way around. Hdc in each st, when you get to the opening / gap, ch 1 and sc into the first st on the other side. Then sc together (dec) once. *Sc in next 2 sts, sc together (decr)*; repeat around. When you get to the opening again, sc into the ch 1 where the gap is, and another sc into the next st. Then sl st into the next st. Fasten off and sew in any loose ends.
— Chicken Beak :
Colour :
Gold. Start with a long tail approximately 10" long. This will be used to sew the beak onto the head. We are starting from the base of the beak.
Round 1 :
Ch 12, sl st to first ch 1 (12)
Round 2 :
*Sc into the next 4 sts, sc together (decr)*; repeat twice (10)
Round 3 :
Sc in each st around. Turn piece inside out and work the rounds from the outside.
Round 4 :
*Sc into the next 3 sts, sc together (decr)*; repeat twice (8)
Round 5 :
*Sc into the next 2 sts, sc together (decr)*; repeat twice (6)
Round 6 :
Sc together 2 times. Fasten off. Sew onto head directly opposite from the vertical opening.
— Chicken Wattles (make 2) :
Round 1 :
Create MC, 4 sc into MC (4)
Round 2 :
*Sc into the next st, 2 sc into the next*; repeat around (6)
Round 3-4 :
Sc into each st around. Turn piece inside out and work the rounds from the outside. (6)
Round 5 :
*Sc together (decr)* repeat 3 times. Fasten off leaving approximately 10" tail to sew onto head.
Info :
Sew onto head just slightly below the left & right side of the beak.
— Chicken Feet (make 2) :
Bottom of Foot - Round 1 :
Create a MC, ch 2 (counts as first dc), 3 dc into MC (4). Ch 1, turn.
Round 2 :
Sc across (4). Ch 1, turn.
Round 3 :
We will now make the first toe. *Sc into next st, chain 4. Sc into second ch from hook, and into next 2 sts down the chain. Sc in bottom of chain (make sure to grab both yarns)*; repeat another 2 times to make 3 toes total.
Row 1 (Leg) :
Make 6 foundation chains. Fasten off leaving ~10" tail to sew it onto the bottom of the foot.
Assembling the Feet :
Using a yarn needle, sew the foundation chain to the bottom of the foot using a whipstitch. Make sure the toes are facing / curling away from the leg.
Info :
Sew each leg onto the bottom of the chicken head.
— Eyes :
Info :
Use black embroidery thread or yarn and a yarn needle to sew on eyes to the head.
— Mat / Nest :
Notes :
To make the nest, use 3 strands of yarn at the same time. Colours: Fern, Chocolate Brown, Dark Sage.
Round 1 :
Create MC, 6 sc into MC (6)
Round 2 :
2 sc into each st around (incr) (12)
Round 3 :
*Sc into next st, 2 sc into next (incr)*; repeat around (18)
Round 4 :
*Sc into next 2 sts, 2 sc into next (incr)*; repeat around (24)
Round 5 :
*Sc into next 3 sts, 2 sc into next (incr)*; repeat around (30)
Round 6 :
*Sc into next 4 sts, 2 sc into next (incr)*; repeat around (36)
Info :
In Round 7 & 8 we will be using a method called a Loop Stitch. It can be tricky at first but keep trying! The effect in the end is worth the effort.
Round 7 :
Using a loop stitch, *sc in next 5 sts, 2 sc in next st (increase)* repeat around (42)
Round 8 :
Using a loop stitch, *sc in next 6 sts, 2 sc in next st (increase)* repeat around (48)
Info :
If you would like to increase the size of the nest, continue after Round 8 adding in one more sc in between your 2 sc (incr) sts. (Ex. Round 9: *sc in next 7 sts, 2 sc in next st*; repeat around).
— Final Assembly :
Step 1 :
Fold in each side of the egg coasters. Roll them up and push them inside the egg shell. Make sure there is some room around the perimeter of each shell. Gently twist the top and bottom shells together to close the egg.
Step 2 :
Fold the chicken comb coaster in half and push the top part through the opening of the hair coaster. Insert red comb through opening of hair coaster as shown in photos.
Step 3 :
Place the chicken head on the mat, the egg inside the head, and the hair on top of the head. Arrange wattles, beak and legs and sew securely. Weave in any remaining ends. Happy Creating!
This Hennifer Chicken coaster set brings playful charm to your home with a cozy nest, foldable egg coasters and a delightful chicken head nest. The set stacks neatly and makes an adorable handmade gift or kitchen accent. Enjoy crocheting every textured detail and the clever assembly that hides the egg coasters inside. 🐔🧶✨