🧢 Beautiful ✨ Detailed πŸ’ Adorable

Gnome Organizer Amigurumi Pattern

Gnome Organizer Amigurumi Pattern
4.9β˜… Rating
5-7 Hours Time Needed
1.3K Made This
βœ‚οΈ

Intermediate Level

Ideal for those with basic crochet experience, featuring slightly more advanced stitches and techniques to expand your skills.

⏱️

Weekend Treat

Takes 5-7 hours, making it an enjoyable project to finish over a couple of days.

🧸

Cute Companion

An adorable friend to cherish, handcrafted with love to bring comfort and joy for years to come.

About This Gnome Organizer Amigurumi Pattern

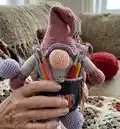
This pattern creates a 25 cm / 10 in gnome organizer with pockets and a removable hat, designed to store small tools and notions. The design uses multiple yarn colors and simple amigurumi shaping to form a weighted, stable body. Clear round-by-round instructions and helpful assembly notes guide you through sewing and finishing.

Gnome Organizer Amigurumi Pattern crochet pattern - detailed view of completed project

Complete stitch counts are provided for every round so you can follow along precisely. Photos and tips explain how to add weight, pockets, and pigtails for a finished look.

Why You'll Love This Gnome Organizer Amigurumi Pattern

I absolutely love this pattern because it turns practical storage into a delightful handmade character. I enjoy the combination of amigurumi shaping with functional design β€” pockets and a weighted base make it both cute and useful. The shaping is precise and satisfying, so you can see progress quickly as the body and hat take form. I also love the playful finishing details like pigtails and a ruffled hat edge that give the gnome so much personality.

Gnome Organizer Amigurumi Pattern step 1 - construction progress Gnome Organizer Amigurumi Pattern step 2 - assembly progress Gnome Organizer Amigurumi Pattern step 3 - details and accessories Gnome Organizer Amigurumi Pattern step 4 - final assembly and finishing

Switch Things Up

I love how easy it is to customize this gnome by changing colors; try muted tones for a rustic look or bright pastels for a playful nursery piece.

You can adjust the size by using a thicker yarn and larger hook to make a chunky, huggable organizer, or a thinner yarn for a small, portable version.

I often swap the pocket shapes and add extra pockets for more storage β€” consider long slim pockets for pens or wider pockets for scissors.

Add embroidery or small appliques to the pants and hat to personalize the gnome for a friend or family member.

To make it sturdier for heavy objects, add extra glass balls or use small pebbles wrapped in fabric to increase the base weight.

You can replace braided pigtails with a pompom, tassel, or a crocheted bun for a different hairstyle look.

Try making a hat with a removable lining or with a buttoned flap so you can store tiny items inside the hat too.

I sometimes make a whole set in matching colors β€” a gnome pair makes a lovely gift set for craft lovers and organizers alike.

If you want to make it child-safe, skip glass balls and use tightly packed heavy stuffing or polymer beads inside a sewn pouch before stuffing the body.

Finally, experiment with surface crochet and trims around the hat edge to create ruffles, scallops, or picot finishes for varied style.

Common Mistakes & How to Fix Them

βœ— Skipping stitch counts during increases or decreases causes uneven shaping; count your stitches after every round and mark the start of the round with a stitch marker. βœ— Forgetting to add weight to the base can make the gnome unstable and tip over easily; insert 5 to 10 glass balls on the cardboard base before stuffing and close securely. βœ— Overstuffing the body creates a stretched look and misaligned seams; stuff gradually and evenly, adding small amounts as you go to maintain shape. βœ— Not folding and sewing arms, legs, or nose properly will affect placement and balance; follow the fold-and-sew instructions exactly and pin pieces before stitching to ensure correct alignment. βœ— Failing to weave in ends and secure yarn leads to unraveling during use; break yarn at specified points, weave in ends, and tie securely when finishing parts.

Gnome Organizer Amigurumi Pattern

Create a charming gnome-shaped organizer with this complete crochet pattern. You will make a sturdy, weighted body, removable hat, pockets, and playful accessories to hold scissors and tools. The pattern includes step-by-step rounds, stuffing and assembly tips, and photos to guide placement. Perfect as a handmade gift or functional desk companion.

Intermediate 5-7 Hours

Materials Needed for Gnome Organizer Amigurumi Pattern

β€” Main Fabric

  • 01
    Yarn acryl 50 g / 125 m (main yarn used for all colors)
  • 02
    Grey yarn - approximate quantity: 1-2 skeins (body and pants)
  • 03
    White yarn - approximate quantity: 1 skein (body upper section and arms)
  • 04
    Purple yarn - small amounts for feet, pockets, needle ball and trims
  • 05
    Pink yarn - small amount for hat and hand tips
  • 06
    Beige yarn - small amount for nose
  • 07
    Brown yarn - small amount for pigtails
  • 08
    Additional small quantities of contrasting colors for pockets and hat trim

β€” Tools Required

  • 01
    Crochet hook size 2.5 mm
  • 02
    Fiberfill stuffing
  • 03
    Needle for sewing
  • 04
    Thread for embroidery (to embroider details)
  • 05
    Hard cardboard or plastic circle for base
  • 06
    5 to 10 glass balls or marbles for weight
  • 07
    Pins for positioning parts
  • 08
    Scissors
  • 09
    Yarn needle for weaving in ends
  • 10
    Stitch markers

Progress Tracker

0% Complete

β€” Body :

Round 1 :

(6 sc) into MR

Round 2 :

(inc) x 6 = 12 sc

Round 3 :

(1sc, inc) x 6 = 18

Round 4 :

(2sc, inc) x 6 = 24

Round 5 :

(3sc, inc) x 6 = 30

Round 6 :

(4sc, inc) x 6 = 36

Round 7 :

(5sc, inc) x 6 = 42

Round 8 :

(6sc, inc) x 6 = 48

Round 9 :

(7sc, inc) x 6 = 54

Round 10 :

(8sc, inc) x 6 = 60

Round 11 :

(9sc, inc) x 6 = 66

Round 12 :

(10sc, inc) x 6 = 72

Round 13 :

BLO = 72 sc

Round 14-15 :

= 72 sc (2 rounds)

Info :

Cut a circle out of hard cardboard or plastic. The size of the circle should be the same size as the crocheted circle.

Info :

Also put 5 to 10 glass balls inside. See the photo. This is necessary for the doll to stand well.

Info :

In the process of crocheting, put filler inside the body.

Round 16-42 :

= 72 sc (27 rounds)

Round 43 :

(10sc, dec) x 6 = 66

Round 44-45 :

= 66 sc (2 rounds)

Round 46 :

(9sc, dec) x 6 = 60

Round 47-48 :

= 60 sc (2 rounds)

Round 49 :

(8sc, dec) x 6 = 54

Round 50-51 :

= 54 sc (2 rounds)

Round 52 :

(7sc, dec) x 6 = 48

Round 53 :

(6sc, dec) x 6 = 42

Round 54 :

(5sc, dec) x 6 = 36

Round 55 :

(4sc, dec) x 6 = 30

Round 56 :

(3sc, dec) x 6 = 24

Round 57 :

(2sc, dec) x 6 = 18

Round 58 :

(1sc, dec) x 6 = 12

Round 59 :

(6 dec) = 6

Info :

To break yarn.

β€” Pants :

Info :

Attach yarn in 13 round

Round 1 :

FLO (5sc, inc) x 12 = 84

Round 2-27 :

= 84 sc (26 rounds)

Info :

Purple yarn

Round 28 :

= 84 sc

Info :

To break yarn.

β€” Hat :

Round 1 :

(3 sc) into MR

Round 2 :

= 3 sc

Round 3 :

(inc) x 3 = 6 sc

Round 4-5 :

= 6 sc (2 rounds)

Round 6 :

(1sc, inc) x 3 = 9

Round 7-8 :

= 9 sc (2 rounds)

Round 9 :

(2sc, inc) x 3 = 12

Round 10-11 :

= 12 sc (2 rounds)

Round 12 :

(3sc, inc) x 3 = 15

Round 13-14 :

= 15 sc (2 rounds)

Round 15 :

(4sc, inc) x 3 = 18

Round 16-17 :

= 18 sc (2 rounds)

Round 18 :

(5sc, inc) x 3 = 21

Round 19-20 :

= 21 sc (2 rounds)

Round 21 :

(6sc, inc) x 3 = 24

Round 22-23 :

= 24 sc (2 rounds)

Round 24 :

(7sc, inc) x 3 = 27

Round 25-26 :

= 27 sc (2 rounds)

Round 27 :

(8sc, inc) x 3 = 30

Round 28-29 :

= 30 sc (2 rounds)

Round 30 :

(9sc, inc) x 3 = 33

Round 31-32 :

= 33 sc (2 rounds)

Round 33 :

(10sc, inc) x 3 = 36

Round 34-35 :

= 36 sc (2 rounds)

Round 36 :

(5sc, inc) x 6 = 42

Round 37-38 :

= 42 sc (2 rounds)

Round 39 :

(6sc, inc) x 6 = 48

Round 40-41 :

= 48 sc (2 rounds)

Round 42 :

(7sc, inc) x 6 = 54

Round 43 :

= 54 sc

Round 44 :

(8sc, inc) x 6 = 60

Round 45 :

= 60 sc

Round 46 :

(9sc, inc) x 6 = 66

Round 47 :

= 66 sc

Round 48 :

(5sc, inc) x 11 = 77

Round 49 :

(6sc, inc) x 11 = 88

Info :

Purple yarn

Round 50 :

(1 sc, 1inc) x 44 = 132

Info :

To break yarn. To weave in ends.

β€” Hands (2 parts) :

Round 1 :

(6 sc) into MR

Round 2 :

(inc) x 6 = 12 sc

Round 3 :

(1sc, inc) x 6 = 18

Round 4 :

(2sc, inc) x 6 = 24

Round 5-9 :

= 24 sc (5 rounds)

Round 10 :

(2sc, dec) x 6 = 18

Round 11 :

(1sc, dec) x 6 = 12

Round 12 :

(1sc, inc) x 6 = 18

Round 13 :

= 18 sc

Round 14 :

= BLO 18 sc

Round 15-31 :

= 18 sc (17 rounds)

Info :

Put the filler inside not completely.

Info :

Fold the part in half. Crochet 9 sc. To break yarn. To weave in ends.

Info :

Attach hands to the body.

β€” Legs (2 parts) :

Round 1 :

(6 sc) into MR

Round 2 :

(inc) x 6 = 12 sc

Round 3 :

(1sc, inc) x 6 = 18

Round 4 :

(2sc, inc) x 6 = 24

Round 5 :

(3sc, inc) x 6 = 30

Round 6-10 :

= 30 sc (5 rounds)

Round 11 :

(3sc, dec) x 6 = 24

Round 12 :

= 24 sc

Round 13 :

(2sc, dec) x 6 = 18

Round 14 :

= 18 sc

Info :

Put the filler inside not completely.

Info :

Fold the part in half. Crochet 9 sc. To break yarn. To weave in ends.

Info :

Attach legs to the body.

β€” Nose (beige yarn) :

Round 1 :

(6 sc) into MR

Round 2 :

(inc) x 6 = 12 sc

Round 3 :

(1sc, inc) x 6 = 18

Round 4 :

(2sc, inc) x 6 = 24

Round 5 :

(3sc, inc) x 6 = 30

Round 6-9 :

= 30 sc (4 rounds)

Round 10 :

(3sc, dec) x 6 = 24

Round 11 :

(2sc, dec) x 6 = 18

Info :

In the process of crocheting, put filler inside the nose.

Info :

Fold the part in half. Crochet 9 sc. To break yarn. To weave in ends.

Info :

Attach legs to the body.

β€” Needle ball (purple yarn) :

Round 1 :

(6 sc) into MR

Round 2 :

(inc) x 6 = 12 sc

Round 3 :

(1sc, inc) x 6 = 18

Round 4 :

(2sc, inc) x 6 = 24

Round 5 :

(3sc, inc) x 6 = 30

Round 6-9 :

= 30 sc (4 rounds)

Round 10 :

(3sc, dec) x 6 = 24

Round 11 :

(2sc, dec) x 6 = 18

Round 12 :

(1sc, dec) x 6 = 12

Round 13 :

(6 dec) = 6

Info :

In the process of crocheting, put filler inside the nose.

Info :

To break yarn. To weave in ends. Attach thread to tie to hand.

β€” Pigtails (brown) :

Info :

Yarn length for a 3-ply braid 15 cm / 6 in.

β€” Pockets (3 parts) :

Front pocket (1 part) :

pink yarn R1. 13 ch, crochet into the 2nd ch from the hook 12 sc, turn knit

Round 2-8 :

12 sc, turn knit (7 rounds)

Info :

To break yarn.

Back pockets (2 parts) :

purple yarn R1. 14 ch, crochet into the 2nd ch from the hook 13 sc, turn knit

Round 2-10 :

13 sc, turn knit (9 rounds)

Info :

To break yarn. Attach pockets to the pants.

Info :

Attention, pockets are sewn only to the pants. Not to pants and body!

Info :

Attach the button to the front of the pants and body.

Assembly Instructions

  • Insert the hard cardboard or plastic circle into the bottom opening and place 5 to 10 glass balls on top before closing the base to ensure the gnome stands well.
  • Attach hands to the body after folding each hand in half and crocheting 9 sc to close the cuff; sew securely with a needle and yarn.
  • Attach legs to the bottom of the body after folding the leg parts in half and crocheting 9 sc to close; space legs evenly on the base for stability.
  • Attach nose to the front center of the head area (position per photos), fold and close as instructed, then sew firmly in place.
  • Sew pockets to the pants only (front and back pockets) and attach a button to the front of the pants and body for decoration.
  • Weave in all ends, weave in the purple trim on the hat, and pin parts in place before final sewing to check symmetry and placement.

Important Notes

  • πŸ’‘Use stitch markers to mark the start of each round so you maintain correct stitch counts throughout shaping.
  • πŸ’‘Insert 5 to 10 glass balls on the cardboard base before stuffing to add weight and improve stability for the finished organizer.
  • πŸ’‘Stuff pieces gradually and evenly while crocheting to avoid lumps and to maintain the intended shape and proportions.
  • πŸ’‘Pin all parts in place prior to sewing to ensure correct placement and symmetrical assembly of ears, arms, legs, and pockets.

This sweet Gnome Organizer becomes a delightful and practical accent on any desk or craft table. It is weighted and stable, with pockets to hold your tools and a removable hat for extra charm. Handmade details like braided pigtails and a ruffled hat edge make each finished gnome unique. 🧢🧡

You ask,

we answer.

FAQs

What size will the finished piece be?

The finished organizer measures approximately 25 cm / 10 in tall when using the recommended yarn and 2.5 mm hook.

Can I use different yarn weights for this pattern?

Yes, you can use different yarn weights, but this will affect the final size and stitch tension; adjust the hook size accordingly and check gauge by measuring rounds.

Do I need special tools to make the weighted base?

You will need a circle of hard cardboard or plastic cut to fit the crocheted base and 5 to 10 glass balls or marbles to add weight before stuffing.

How long does this project typically take to complete?

Most crocheters complete this project in 5-7 hours, though time may vary depending on experience, finishing details, and assembly time.