🧶 Beautiful ✨ Detailed 💝 Adorable

Giraffe Bookmark Amigurumi Pattern

Giraffe Bookmark Amigurumi Pattern
4.5★ Rating
2-4 Hours Time Needed
3.9K Made This
✂️

Intermediate Level

Ideal for those with basic crochet experience, featuring slightly more advanced stitches and techniques to expand your skills.

⏱️

Bite-Sized Project

Finishes in 2-4 hours—perfect for an afternoon of creative relaxation.

🧸

Cute Companion

An adorable friend to cherish, handcrafted with love to bring comfort and joy for years to come.

About This Giraffe Bookmark Amigurumi Pattern

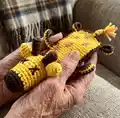
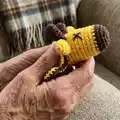
This pattern makes a cute giraffe bookmark with a stuffed head and a flat, elongated body perfect for slipping inside books. It uses YarnArt Jeans yarn and a 2.5 mm hook to create clear stitch definition and crisp color changes. The design includes simple shaping, curled legs, and embroidered facial details for a sweet finished piece.

Giraffe Bookmark Amigurumi Pattern crochet pattern - detailed view of completed project

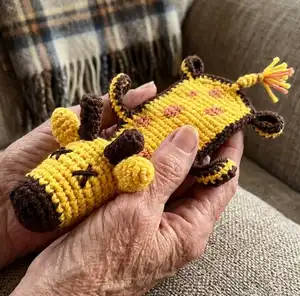
You will work mostly in rounds with small shaping increases and decreases and change colors for the snout and body. Final finishing includes sewing ears and horns, embroidering eyes and nose, and lightly marking spots with a brown crayon.

Why You'll Love This Giraffe Bookmark Amigurumi Pattern

I absolutely love this pattern because it turns a simple bookmark into a tiny tactile companion that makes reading more delightful. I enjoy the balance of amigurumi shaping for the head and flat-row work for the body — it keeps the project interesting from start to finish. The pattern is compact and perfect for using small amounts of scrap yarn, which I always appreciate. Sewing the ears and horns and adding embroidered features gives each piece personality and makes every finished bookmark unique.

Giraffe Bookmark Amigurumi Pattern step 1 - construction progress Giraffe Bookmark Amigurumi Pattern step 2 - assembly progress Giraffe Bookmark Amigurumi Pattern step 3 - details and accessories Giraffe Bookmark Amigurumi Pattern step 4 - final assembly and finishing

Switch Things Up

I love how easy it is to customize this giraffe by changing yarn colors; I often swap yellow for pastel shades to create a softer, nursery-friendly version.

I sometimes use thicker yarn and a larger hook to make a chunky, plush bookmark that doubles as a small toy; it becomes more tactile and cuddly.

I add tiny crocheted accessories like a bow tie or scarf to personalize each giraffe and give them character; these small details make great gift touches.

I like to embroider different eye shapes to change the expression; placing eyes closer together or further apart alters the personality dramatically.

I occasionally add a small loop of ribbon at the top so the bookmark can hang from a shelf or hook when not in use; it makes storage simple.

I recommend experimenting with carrying the contrasting yarn along the inside for neater color changes instead of cutting at every change; it saves ends and speeds finishing.

I sometimes insert a thin piece of felt under the head before sewing to ensure a flatter joined edge and more stable attachment to the body.

I also try adding a little weight inside the head or near the nose using a silicone bead; it helps the bookmark stay in place inside thick books.

I encourage you to make a matching set using complementary yarn colors so you always have a themed bookmark for multiple books; they make lovely gifts together.

I like to mark the giraffe's spots with fabric paint or a brown crayon as suggested, but you can also embroider spots for a textured, more durable finish.

Common Mistakes & How to Fix Them

✗ Changing color without fastening off or carrying yarn neatly can create bulky seams; secure and weave ends or carry the yarn evenly along the inside to keep edges flat and tidy. ✗ Forgetting to stuff the head before closing will make shaping difficult; stuff gradually as you close the opening to ensure consistent shape and smooth finish. ✗ Not counting stitches after increases or decreases leads to mismatched shaping and uneven rows; count each round carefully and mark your rounds with a stitch marker. ✗ Pulling your tension too tight when working the flat body can cause curling or stiffness; maintain a relaxed, consistent tension for a pliable, flat bookmark. ✗ Sewing parts without pinning first makes placement uneven; pin or baste ears and horns in place and check symmetry before stitching permanently.

Giraffe Bookmark Amigurumi Pattern

Crochet a charming giraffe bookmark that slips perfectly into your favorite book. This playful pattern gives you a long, flat body with curled legs and a cute stuffed head for a functional, decorative bookmark. You'll enjoy shaping rounds, simple color changes, and a small amount of stuffing to create a finished piece about 20 cm tall. Ideal for gifting or keeping beside your reading nook.

Intermediate 2-4 Hours

Materials Needed for Giraffe Bookmark Amigurumi Pattern

— Main Fabric

  • 01
    YarnArt Jeans yarn - yellow (small amount, main body)
  • 02
    YarnArt Jeans yarn - brown (small amount, muzzle, edges, horns, spots)
  • 03
    Silicone bead/ball for weight inside head (small)
  • 04
    Optional: small amounts of black embroidery thread for eyes and nose

— Tools Required

  • 01
    Crochet hook 2.5mm
  • 02
    Scissors
  • 03
    Yarn needle for sewing and weaving ends
  • 04
    Stitch markers
  • 05
    Polyester stuffing (small amount) or silicone bead for weight
  • 06
    Black embroidery thread for eyes and nose
  • 07
    Brown crayon for painting spots on body
  • 08
    Pins for positioning pieces while sewing

Progress Tracker

0% Complete

— Materials :

Info :

Włóczka: YarnArt Jeans. Szydełko 2,5. Wypełnienie: kulka silikonowa. Wysokość: 20 cm.

— Objaśnienia :

Infos :

MG – magiczne koło. ch - oczko. sc – półsłupek. dc – słupek. inc – 2 (pół)słupki w jedno oczko (rozszerzanie). dec – 2 (pół)słupki przerabiane razem (zwężanie). blo – półsłupki w tylną część oczka poprzedniego rzędu.

— Mordka :

Round 1 :

6sc w MG (6)

Round 2 :

(inc) – powtórz 6 razy (12)

Round 3 :

(1sc, inc) - powtórz 6 razy (18)

Round 4-5 :

18sc (18) (2 rzędy)

Info :

Zmieniamy kolor na żółty

Round 6-8 :

18sc (18) (2 rzędy)

Round 9 :

(2sc, inc) - powtórz 6 razy (24)

Round 10-16 :

24sc (24) (7 rzędów)

Round 17 :

(2sc, dec) - powtórz 6 razy (18) wypełnić

Round 18 :

(1sc, dec) - powtórz 6 razy (12)

Round 19 :

Składamy głowę na pół, łączymy oba brzegi: 1ch, 6sc (7)

Round 20 :

1ch, inc, 5sc, inc (9)

Round 21 :

1ch, 9sc (9)

Round 22 :

1ch, inc, 7sc, inc (11)

Round 23 :

1ch, 11sc (11)

Round 24 :

1ch, inc, 9sc, inc (13)

Round 25 :

1ch, 13sc (13)

Round 26 :

1ch, inc, 11sc, inc (15)

Round 27 :

1ch, 15sc (15)

Round 28 :

1ch, 15sc (15)

Info :

Tutaj robimy zakręcone nóżki ;)

Round 29-30 :

15sc, odwracamy, 14sc wzdłuż łańcuszka, 15sc wzdłuż tułowia

Round 31-50 :

1ch, 15sc (15) (20 rzędów)

Info :

Tutaj robimy zakręcone nóżki ;)

Round 51-52 :

15ch, odwracamy, 14sc wzdłuż łańcuszka, 15sc wzdłuż tułowia

Round 53-54 :

1ch, 15sc (15) (2 rzędy)

Round 55 :

1ch, dec, 11sc, dec (13)

Round 56 :

1ch, dec, 9sc, dec (11)

Round 57 :

1ch, dec, 7sc, dec (9)

Round 58 :

1ch, dec, 5sc, dec (7)

Round 59 :

1ch, dec, 3sc, dec (5)

Info :

Tułów razem z nogami obrabiamy półsłupkami brązową nitką.

— Uszy (x2) :

Round 1 :

4sc w MG (4)

Round 2 :

(inc) – powtórz 4 razy (8)

Round 3-6 :

8sc (8) (4 rzędy)

— Rogi (x2) :

Round 1 :

6sc w MG (6)

Round 2 :

(inc) – powtórz 6 razy (12)

Round 3 :

(1sc, inc) - powtórz 6 razy (18)

Round 4-5 :

18sc

Round 6 :

(1sc, dec) - powtórz 6 razy (12)

Round 7 :

(2sc, dec) - powtórz 3 razy (9)

Info :

Krzyży kami wyszywamy oczy i nos - czarną nitką. Na tułowiu malujemy brązową kredką łatki.

Assembly Instructions

  • Składamy głowę na pół i łączymy oba brzegi, 1ch, 6sc (This joins the head as described in round 19).
  • Sew ears to the sides of the head slightly above the snout, positioning symmetrically and securing with small stitches.
  • Attach horns (rogi) to the top of the head between the ears and secure firmly with whipstitch or mattress stitch.
  • Sew the head to the top of the flat body, aligning the joined edge of the head with the topmost rounds of the body and sewing securely.
  • Embroider the eyes and nose with black thread using cross-stitch as indicated, then draw brown spots on the body with a brown crayon for finishing.
  • Finish edges of the torso and legs with brown slip-stitches or specified border to create a neat outline.

Important Notes

  • 💡Use stitch markers to mark the first stitch of each round to keep track of your rounds and increases or decreases.
  • 💡Stuff the head gradually while closing to maintain smooth, even shaping without lumps or gaps.
  • 💡Change colors by switching yarn at the last pull-through of the stitch to create a neat, invisible color change.
  • 💡Pin ears and horns in place before sewing to ensure even placement and symmetry on both sides of the head.

This sweet giraffe bookmark is a playful and practical project you can finish in an afternoon. It combines amigurumi shaping with flat body rows for an interesting, fast make. Add embroidered features and hand-painted spots to personalize each piece. 🧶📚

You ask,

we answer.

FAQs

What size will the finished piece be?

The finished bookmark measures approximately 20 cm in height when using YarnArt Jeans yarn and a 2.5 mm hook.

Can I use different yarn weights for this pattern?

Yes, you can use different yarn weights, but the final size will change; adjust your hook accordingly and expect a looser or denser fabric depending on yarn weight.

Do I need prior crochet experience for this pattern?

This pattern is rated intermediate, so basic knowledge of crochet stitches, increases and decreases, and sewing pieces together is recommended for best results.

How long does this project typically take to complete?

Most crocheters complete this project in 2-4 hours, though time may vary based on experience level and working pace.