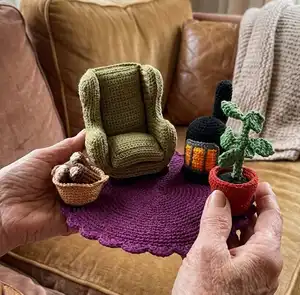
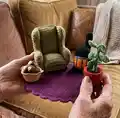
Create a charming miniature living room set with this detailed crochet pattern. You will make an arm chair, couch, coffee table, lamp, TV, cabinet, plant in pot, carpet, wood stove and accessories using small amounts of yarn and simple techniques. The pattern is photographed and written step-by-step so you can follow along and assemble a delightful playset for dolls or display.
Progress Tracker
0% Complete
— General note :
Info :
When you don't start with 2 ch or a magic ring, the part is made in rows. Ch 1 after each row and turn around.
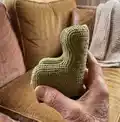
— Arm chair :
Item Name (Bottom P1) :
Ch 15 with olive green.
Round 15 :
Continue crocheting a row of sc along the work as follows: 12 sc along the side, 3 sc at the corner, 12 sc along the bottom, 3 sc at the corner, 12 sc along the side, 3 sc at the corner, 12 sc along the top, 3 sc at the corner (= 60 sc)
Round 16 :
60 sc, into the back loops only
Info :
Fasten off. Make another part like this one till round 15, but don't fasten off. Draw the crocheted shape 2 times onto the cardboard and cut them out. Crochet both parts together with a row of sc. Slide both cardboard pieces between the parts after crocheting 3 sides together. Stuff between the cardboard pieces and finish crocheting together the last side. End with 1 sl into the 1st sc and fasten off.
— Arm chair (Back) :
Round 1 :
Ch 16 with olive green.
Round 31 :
Continue crocheting a row of sc along the work as follows: 28 sc along the side down, 3 sc at the corner, 13 sc along the bottom, 3 sc at the corner, 28 sc along the side up, 3 sc at the corner, 13 sc along the top, 3 sc at the corner (= 94 sc)
Info :
Fasten off. Make another part like this, but don't fasten off.
Round 32 :
94 sc, into the back loops only
Info :
Place both parts on top of each other and crochet the st together with a row of sc. Slide the cardboard piece against the 1st crocheted part after crocheting 3 sides together. Stuff the back part and finish crocheting together the st of the last side. Fasten off. Sew the sc at the bottom of the back part to the sc of the bottom part.
— Arm chair (Side) :
Round 1 :
Ch 15 with olive green.
Round 13 :
4 sc, leave the rest of the st unworked.
Round 19 :
3 sc, 2 sc into the last sc (= 5 sc)
Round 21 :
4 sc, 2 sc into the last sc (= 6 sc)
Round 22 :
2 sc into the 1st sc, 5 sc (= 7 sc)
Round 23 :
6 sc, 2 sc into the last sc (= 8 sc)
Round 29 :
6 sc, sc 2 st together (= 7 sc)
Round 30 :
sc 2 st together, 5 sc (= 6 sc)
Round 31 :
Continue crocheting a row of sc along the work as follows: 28 sc along the back down, 3 sc at the corner, 12 sc along the bottom, 3 sc at the corner, 11 sc along the front, 3 sc at the corner, 10 sc along the top, 17 sc along the front, 3 sc at the corner, 4 sc along the top, 3 sc at the corner. (= 97 sc)
Info :
Fasten off. Draw the crocheted shape onto the cardboard and cut it out. Make another side like this one, but don't fasten off.
Info :
Place both parts on top of each other and crochet them together with a row of sc along the work. Slide the cardboard piece against the 1st crocheted part while crocheting. Stuff the side part.
Info :
Make another side, but crochet with both parts round 31 as follows: ch 1, turn around, 5 sc along the top, 3 sc at the corner, 17 sc along the front, 10 sc along the top, 3 sc at the corner, 11 sc along the front, 3 sc at the corner, 12 sc along the bottom, 3 sc at the corner, 28 sc along the back, 2 sc at the corner (= 97 sc). Sew the sides at the back and the bottom.
— Arm chair (Cushion) :
Info :
Make the 1st part of the cushion like the bottom till round 17. Fasten off. Make the 2nd part like the bottom. Draw the crocheted shape onto the cardboard and cut it out. Crochet both parts together in the same way as the bottom, but slide only 1 cardboard piece at the bottom and stuff the topside. Place the cushion into the arm chair.
— Arm chair (Legs) :
Round 1 :
Ch 2 with dark brown or start with a magic ring.
Round 1 :
6 sc into the 1st ch or into the magic ring, 1 sl into the 1st sc (= 6 sc)
Round 2 :
2 sc in every sc (= 12 sc)
Info :
End with 1 sl and fasten off. Make 3 more legs. Stuff the legs and sew them onto the bottom of the arm chair.
— Couch :
Item Name (Bottom) :
Ch 31 with sand color.
Round 15 :
Continue crocheting a row of sc along the work as follows: 12 sc along the side, 3 sc at the corner, 28 sc along the bottom, 3 sc at the corner, 12 sc along the side, 3 sc at the corner, 28 sc along the top, 3 sc at the corner (= 92 sc)
Round 16 :
92 sc, into the back loops only.
Info :
Fasten off. Make another part like this one till round 15, but don't fasten off. Draw the crocheted shape 2 times onto the cardboard and cut them out. Crochet both parts together with a row of sc. Slide both cardboard pieces between both parts after crocheting 3 sides together. Stuff between the cardboard pieces and finish crocheting together the st of the last side. End with 1 sl into the 1st sc and fasten off.
— Couch (Back) :
Round 1 :
Ch 31 with sand color.
Round 15 :
Continue crocheting a row of sc along the work as follows: 12 sc along the side, 3 sc at the corner, 28 sc along the bottom, 3 sc at the corner, 12 sc along the side, 3 sc at the corner, 28 sc along the top, 3 sc at the corner (= 92 sc)
Info :
Fasten off. Draw the crocheted shape onto the cardboard and cut it out. Make another part like this, but don't fasten off. Place both parts on top of each other with the cardboard between it and crochet the st together with a row of sc. Sew the back at the bottom.
— Couch (Side) :
Round 1 :
Ch 15 with sand color.
Round 13 :
Continue crocheting a row of sc along the work as follows: 10 sc along the side, 3 sc at the corner, 12 sc along the bottom, 3 sc at the corner, 10 sc along the side, 3 sc at the corner, 12 sc along the top, 3 sc at the corner (= 56 sc)
Info :
Fasten off. Draw the crocheted shape onto the cardboard and cut it out. Make another side like this one, but don't fasten off.
Info :
Place both parts on top of each other and crochet them together with a row of sc. Slide the cardboard piece against the 1st crocheted part while crocheting and stuff the side. Make another side. Sew the sides at the bottom and the back.
— Couch (Cushions 2 times) :
Info :
Make the cushions like the cushions of the arm chair, but use sand color instead of olive green.
— Couch (Back Cushion 2 times) :
Round 1 :
Ch 15 with sand color.
Round 11 :
Continue crocheting a row of sc along the work as follows: 8 sc along the side, 3 sc at the corner, 12 sc along the bottom, 3 sc at the corner, 8 sc along the side, 3 sc at the corner, 12 sc along the top, 3 sc at the corner (= 52 sc)
Round 12 :
52 sc, into the back loops only
Info :
Fasten off. Make another part like this one till round 11, but don't fasten off. Crochet both parts together with a row of sc. Stuff the cushion while crocheting. End with 1 sl into the 1st sc and fasten off. Place the cushions at the couch.
Item Name (Legs) :
Make the legs like the legs of the arm chair with dark brown and sew them at the bottom of the couch.
— Coffee table :
Table top Round 1 :
Ch 2 with light brown or start with a magic ring.
Round 1 :
6 sc into the 1st ch or into the magic ring, 1 sl into the 1st sc (= 6 sc)
Round 2 :
2 sc in every sc (= 12 sc)
Round 3 :
2 sc in every 2nd sc (= 18 sc)
Round 4 :
6 times (1 sc, 2 sc into the next sc, 1 sc) (= 24 sc)
Round 5 :
2 sc in every 4th sc (= 30 sc)
Round 6 :
6 times (2 sc, 2 sc into the next sc, 2 sc) (= 36 sc)
Round 7 :
2 sc in every 6th sc (= 42 sc)
Round 8 :
6 times (3 sc, 2 sc into the next sc, 3 sc) (= 48 sc)
Round 9 :
2 sc in every 8th sc (= 54 sc)
Round 10 :
6 times (4 sc, 2 sc into the next sc, 4 sc) (= 60 sc)
Round 11 :
60 sc, into the back loops only. End with 1 sl into the 1st sc and fasten off.
Bottom part :
Make the bottom like the table top till round 10. Don't fasten off. Draw the crocheted shape 2 times onto the cardboard and cut them out. Glue the cardboard onto the bottom of both parts. Place both cardboard parts on top of each other and sc the st together with a row of sc. End with 1 sl into the 1st sc and fasten off.
Legs :
Ch 2 with light brown or start with a magic ring. 1. 6 sc into the 1st ch or into the magic ring, 1 sl into the 1st sc (= 6 sc) 2. 2 sc in every 3rd sc (= 8 sc) 3 - 7. 8 sc End with 1 sl into the 1st sc and fasten off. Make 3 more legs. Stuff the legs and sew them at the bottom of the table top.
— Carpet :
Round 1 :
Ch 2 with purple or start with a magic ring.
Round 1 :
6 sc into the 1st ch or into the magic ring, 1 sl into the 1st sc (= 6 sc)
Round 2 :
2 sc in every sc (= 12 sc)
Round 3 :
2 sc in every 2nd sc (= 18 sc)
Round 4 :
6 times (1 sc, 2 sc into the next sc, 1 sc) (= 24 sc)
Round 5 :
2 sc in every 4th sc (= 30 sc)
Round 6 :
6 times (2 sc, 2 sc into the next sc, 2 sc) (= 36 sc)
Round 7 :
2 sc in every 6th sc (= 42 sc)
Round 8 :
6 times (3 sc, 2 sc into the next sc, 3 sc) (= 48 sc)
Round 9 :
2 sc in every 8th sc (= 54 sc)
Round 10 :
6 times (4 sc, 2 sc into the next sc, 4 sc) (= 60 sc)
Round 11 :
2 sc in every 10th sc (= 66 sc)
Round 12 :
6 times (5 sc, 2 sc into the next sc, 5 sc) (= 72 sc)
Round 13 :
2 sc in every 12th sc (= 78 sc)
Round 14 :
6 times (6 sc, 2 sc into the next sc, 6 sc) (= 84 sc)
Round 15 :
2 sc in every 14th sc (= 90 sc)
Round 16 :
6 times (7 sc, 2 sc into the next sc, 7 sc) (= 96 sc)
Round 17 :
2 sc in every 16th sc (= 102 sc)
Round 18 :
6 times (8 sc, 2 sc into the next sc, 8 sc) (= 108 sc)
Round 19 :
18 times (1 sc, skip 2 sc, 5 dc into the 3rd sc, skip 2 sc)
Info :
End with 1 sl into the 1st sc and fasten off. Weave in the ends.
— Flower :
Start :
Start at the bottom of the flowerpot. Ch 2 with russet or start with a magic ring.
Round 1 :
6 sc into the 1st ch or into the magic ring, 1 sl into the 1st sc (= 6 sc)
Round 2 :
2 sc in every sc (= 12 sc)
Info :
Draw the crocheted shape onto the cardboard and cut it out.
Round 3 :
12 sc, into the back loops only.
Round 5 :
2 sc in every 2nd sc (= 18 sc)
Round 6 :
18 sc, into the front loops only.
Round 7 - 8 :
18 sc, into the back loops only. Continue with black.
Round 9 :
Sc the st together with the remaining loops of round 6 at the inside of the flowerpot (= 18 sc)
Round 10 :
Sc every 2nd and 3rd st together (= 12 sc)
Info :
Place the cardboard onto the bottom and stuff the pot. Continue with green.
Round 11 :
6 times (sc 2 st together) (= 6 sc)
Round 13 :
6 sc, into the back loops only.
Continue with yellow :
Round 15: 2 sc in every sc (= 12 sc)
Round 16 :
12 sc, into the back loops only.
Round 17 :
6 times (sc 2 st together) (= 6 sc)
Info :
Fasten off. Pull the yarn through the 6 remaining st and pull tight. Weave in the end.
Leaves :
The leaves are made in rows, ch 1 after each row and turn around. Attach the green yarn into the 1st remaining loop of round 13. 1. 2 sc into the loops, leave the remaining ch 4oops unworked. 2. 2 times (2 sc into the next sc) (= 4 sc) 3. 2 times (sc 2 st together) (= 2 sc) 4. sc 2 st together (= 1 sc) Fasten off. Make another leave at the other side of the stem. Weave in the ends.
Petals :
Attach the white yarn into the 1st remaining loop of round 16. 1. * 1 sc, ch 3, (1 sc, 1 hdc) into this ch, 1 sc, repeat from * another 5 times, end with 1 sl instead of 1 sc. Fasten off. Weave in the ends.
— Standard lamp :
Bottom :
Ch 2 with gold color or start with a magic ring. 1. 6 sc into the 1st ch or into the magic ring, 1 sl into the 1st sc (= 6 sc) 2. 2 sc in every sc (= 12 sc) 3. 2 sc in every 2nd sc (= 18 sc) 4. 6 times (1 sc, 2 sc into the next sc, 1 sc) (= 24 sc) 5. 2 sc in every 4th sc (= 30 sc) 6. 6 times (2 sc, 2 sc into the next sc, 2 sc) (= 36 sc) Fasten off. Draw the crocheted shape onto the cardboard and cut it out. Glue the cardboard onto the bottom.
Lamp foot :
Start at the top of the lamp stand. Ch 30 with gold color and close with 1 sl to a ring. 1. 30 sc 2. Sc every 4th and 5th st together (= 24 sc) 3 and 4. 24 sc 5. 6 times (1 sc, sc 2 st together, 1 sc) (= 18 sc) 6 and 7. 18 sc 8. Sc every 2nd and 3rd st together (= 12 sc) 9 and 10. 12 sc 11. 6 times (sc 2 st together) (= 6 sc) 12. 6 sc, into the back loops only. Fasten off. Pull the yarn through the remaining st and pull tight.
Attach gold yarn :
Attach the gold color yarn into the 1st remaining loop of round 12, holding the crocheted point away from you. 1. 6 sc into the loops. 2 – 22. 6 sc, stuff while crocheting. 23. 2 sc in every sc (= 12 sc) 24. 2 sc in every 2nd sc (= 18 sc) 25. 6 times (1 sc, 2 sc into the next sc, 1 sc) (= 24 sc) 26. 2 sc into the 4th sc (= 30 sc) 27. 6 times (2 sc, 2 sc into the next sc, 2 sc) (= 36 sc) 28. Place the bottom against the work and sc the st together with a row of sc, making 2 sc in every 6th sc (= 42 sc) End with 1 sl into the 1st sc and fasten off.
Lampshade :
Attach the pink yarn into the 1st loop at the top of the foot, holding the bottom of the foot away from you. 1. Make 30 sc along the loops. 2. 30 sc, into the back loops only. Continue with cream white. 3. 30 sc, into the back loops only. 4 - 8. 30 sc 9. 6 times (2 sc, 2 sc into the next sc, 2 sc) (= 36 sc) 10 and 11. 36 sc
Rounds 12 - 16 :
12. 2 sc in every 6th sc (= 42 sc) 13 and 14. 42 sc 15. 7 times (1 sc, skip 2 sc, 5 dc into the 3rd sc, skip 2 sc) Continue with pink. 16. 1 sc into the 3rd sc from the needle, 1 sc, * (1 sc, ch 4, 1 sc into the 4th ch from the needle, 1 sc) into the next dc, 5 sc, repeat from * another 5 times, (1 sc, ch 4, 1 sc into the 4th ch from the needle, 1 sc) into the next dc, 2 sc. End with 1 sl into the 1st sc and fasten off. Weave in the ends. Attach the pink yarn into a remaining loop of round 3, 15 times (1 sc, ch 2, skip 1 sc). End with 1 sl into the 1st sc and fasten off.
— Tv :
Round 1 :
Ch 13 with black.
Round 9 :
Make a row of sc around the work as follows: 6 sc along the side, 3 sc at the corner, 10 sc along the top, 3 sc at the corner, 6 sc along the side, 3 sc at the corner, 10 sc along the bottom, 3 sc at the corner (= 44 sc)
Round 10 :
44 sc, into the back loops only
Round 19 :
42 sc, leave the last 2 st unworked. This is now the beginning of the round. Place the cardboard onto the bottom. Glue if necessary.
Round 20 :
Sc into the back loops only: sc 3 st together, 6 sc, sc 3 st together, 10 sc, sc 3 st together, 6 sc, sc 3 st together, 10 sc (= 36 sc)
Round 21 :
sc 3 st together, 4 sc, sc 3 st together, 8 sc, sc 3 st together, 4 sc, sc 3 st together, 8 sc (= 28 sc)
Round 22 :
sc 3 st together, 2 sc, sc 3 st together, 6 sc, sc 3 st together, 2 sc, sc 3 st together, 6 sc (= 20 sc)
Round 23 :
2 times (sc 3 st together), 4 sc, 2 times (sc 3 st together), 4 sc (= 12 sc)
Round 24 :
6 times (sc 2 st together) (= 6 sc)
Info :
Fasten off. Pull the yarn through the 6 remaining st and pull tight. Weave in the end.
Screen :
The screen is made (in rows) in the tapestry technic. For changing to the 2nd color, do not complete the final single crochet stitch with the 1st color. With two loops of the single crochet remaining on your hook, drop color 1 and carry it along, picking up color 2 with your hook and pulling it through both prepared loops. Single crochet using color 2 for the desired number of stitches. As you make these stitches, color 1 will be pulled along, concealed inside the stitches as you did for color 2 previously. Ch 1 after each row into the color you start with and turn around.
Screen (Rows):
Ch 11 with green. 1 and 2. 10 sc 3. 4 sc, continue with light blue; 2 sc, continue with green; 3 sc, continue with light blue; 1 sc 4. 7 sc, continue with green; 2 sc, continue with light blue; 1 sc 5 and 6. 10 sc Continue with dark grey. 6. Make a row of sc around the work as follows: 5 sc along the side, 3 sc at the corner, 8 sc along the bottom, 3 sc at the corner, 5 sc along the side, 3 sc at the corner, 8 sc along the top, 3 sc at the corner. End with 1 sl into the 1st sc and fasten off. Sew the screen onto the tv. Embroider 2 buttons with dark grey next to the screen.
Antenna :
Ch 2 with black or start with a magic ring. 1. 6 sc into the 1st ch or into the magic ring, 1 sl into the 1st sc (= 6 sc) 2. 2 sc in every sc (= 12 sc) 3. 12 sc End with 1 sl into the 1st sc and fasten off. Stuff this part and sew it in the middle on top of the tv. Cut off 2 black strings of approx. 6 cm. Make a knot in the yarn end. Pull the yarn through a bigger hole of the tv and then trough a st on top of the antenna part, making sure that it is secure. Repeat this with the other yarn. Cut off the strings at approx. 1.5 cm.
— Cabinet :
Top :
Ch 17 with light brown. 1 - 12. 16 sc 13. Make a row of sc around the work as follows: 10 sc along the side, 3 sc at the corner, 14 sc along the bottom, 3 sc at the corner, 10 sc along the side, 3 sc at the corner, 14 sc along the top, 3 sc at the corner (= 60 sc) Fasten off. Draw the crocheted shape 2 times onto the cardboard and cut them out. Glue 1 cardboard piece at the underside of the top part.
Bottom and side :
Make the bottom like the top part till round 13, but don't fasten off. Continue crocheting in rounds. 14. 60 sc, into the back loops only. 15 - 26. 60 sc Glue the other cardboard piece onto the bottom. Stuff the cabinet and crochet the st together with the sc of the top part. End with 1 sl into the 1st sc and fasten off.
Legs :
Ch 2 with light dark brown or start with a magic ring. 1. 6 sc into the 1st ch or into the magic ring, 1 sl into the 1st sc (= 6 sc) 2. 2 sc in every 2nd sc (= 9 sc) 3. 9 sc End with 1 sl into the 1st sc and fasten off. Make 3 more legs. Sew the legs at the bottom of the cabinet. Embroider with dark brown the door and knob onto the cabinet (use the picture as a guide).
— Plant in pot :
Pot bottom :
Start with the bottom of the pot. Ch 2 with russet or start with a magic ring. 1. 6 sc into the 1st ch or into the magic ring, 1 sl into the 1st sc (= 6 sc) 2. 2 sc in every sc (= 12 sc) 3. 2 sc in every 2nd sc (= 18 sc) Fasten off. Draw the crocheted shape onto the cardboard and cut it out. Make another part like this, but don't fasten off. Place both parts on top of each other with the cardboard between them and sc them together as follows: 4. 6 times (1 sc, 2 sc into the next sc, 1 sc) (= 24 sc) 5. 24 sc, into the back loops only. 6 - 8. 24 sc 9. 2 sc in every 4th sc (= 30 sc) 10 - 12. 30 sc 13. 6 times (2 sc, 2 sc into the next sc, 2 sc) (= 36 sc)
Rounds 14 - 19 :
14. 36 sc, into the front loops only. 15 and 16. 36 sc 17 and 18. 36 sc, into the back loops only. 19. 36 sc Continue with black. 20. Sc the st together with the remaining loops of round 13 at the inside of the flowerpot (= 36 sc) 21. 6 times (2 sc, sc 2 st together, 2 sc) (= 30 sc) 22. Sc every 4th and 5th st together (= 24 sc) 23. 6 times (1 sc, sc 2 st together, 1 sc) (= 18 sc) Stuff the flowerpot. 24. Sc every 2nd and 3rd st together (= 12 sc) 25. 6 times (sc 2 st together) (= 6 sc) Continue with dark green. 26. Sc every 2nd and 3rd st together (= 4 sc) 27 - 31. 4 sc 32. 4 sc, into the back loops only. 33 - 35. 4 sc 36. 4 sc, into the back loops only. 37 - 39. 4 sc 40. 4 sc, into the back loops only. Fasten off. Weave in the end.
Leaf instructions :
Attach the dark green yarn into the 1st remaining loop of round 32. 1. Make 2 sc into the loops, leave the other 2 loops unworked. 2. Ch 1, turn around, 2 sc 3. Ch 1, turn around, 2 times (2 sc into the next sc) (= 4 sc) 4. Ch 1, turn around, 2 sc into the 1st sc, 2 sc, 2 sc into the last sc (= 6 sc) 5 and 6. Ch 1, turn around, 6 sc 7. Ch 1, turn around, sc 2 st together, 2 sc, sc 2 st together (= 4 sc) 8. Ch 1, turn around, 2 times (sc 2 st together) (= 2 sc) 9. Ch 1, turn around, sc 2 st together (= 1 sc) Fasten off. Attach the dark green yarn into the next remaining loop of round 32 and make at the other side the same leaf. Repeat this into the remaining loops of round 36 and round 40, so you have 6 leaves in total. Weave in the ends.
— Wood stove :
Start :
Start at the bottom of the wood stove. Ch 2 with black or start with a magic ring.
Round 1 :
6 sc into the 1st ch or into the magic ring, 1 sl into the 1st sc (= 6 sc)
Round 2 :
2 sc in every sc (= 12 sc)
Round 3 :
2 sc in every 2nd sc (= 18 sc)
Round 4 :
6 times (1 sc, 2 sc into the next sc, 1 sc) (= 24 sc)
Round 5 :
2 sc in every 4th sc (= 30 sc)
Round 6 :
6 times (2 sc, 2 sc into the next sc, 2 sc) (= 36 sc)
Round 7 :
2 sc in every 6th sc (= 42 sc)
Round 8 :
6 times (3 sc, 2 sc into the next sc, 3 sc) (= 48 sc)
Info :
Draw the crocheted shape onto the cardboard and cut it out.
Round 9 :
6 times (3 sc, sc 2 st together, 3 sc), into the back loops only (= 42 sc)
Round 10 :
Sc every 6th and 7th st together (= 36 sc)
Round 11 :
36 sc, into the back loops only.
Info :
12 - 24. 36 sc 25. 6 times (2 sc, sc 2 st together, 2 sc), into the back loops only (= 30 sc) 26. 30 sc 27. Sc every 4th and 5th st together (= 24 sc) 28. 6 times (1 sc, sc 2 st together, 1 sc) (= 18 sc) Stuff the wood stove.
Round 29 :
Sc every 2nd and 3rd st together (= 12 sc)
Round 30 :
6 times (sc 2 st together) (= 6 sc) Fasten off. Pull the yarn through the 6 remaining st and pull tight. Weave in the end.
Fire :
The fire is made (in rows) in the tapestry technic. Ch 10 with orange. 1. 9 sc 2. 5 sc with orange, 1 sc with yellow, 3 sc with orange. 3. 3 sc with orange, 1 sc with yellow, 5 sc with orange. 4. 1 sc with yellow, 3 sc with orange, 3 sc with yellow, 2 sc with orange. 5. 2 sc with orange, 4 sc with yellow, 1 sc with orange, 2 sc with yellow. 6. 9 sc with yellow. 7. Make with orange a row of sc around the work as follows: 5 sc along the side down, 3 sc at the corner, 7 sc along the bottom, 3 sc at the corner, 5 sc along the side up. Continue with dark grey. 8. 3 sc into the 1st yellow sc of round 6, 7 sc, 3 sc into the last yellow sc of round 6, 6 sc, 2 sc into the next sc, 9 sc, 2 sc into the next sc, 6 sc, 1 sl into the 1st dark grey sc. Fasten off. Leave a long yarn hanging. Sew the fire onto the front of the wood stove. Embroider with dark grey 2 times 2 large stiches over the fire.
Stove pipe :
Ch 2 with black or start with a magic ring. 1. 6 sc into the 1st ch or into the magic ring, 1 sl into the 1st sc (= 6 sc) 2. 2 sc in every sc (= 12 sc) 3. 12 sc into the back loops. 4 - 14. 12 sc 15 - 18. 2 sc, 4 sl, 2 sc, 4 dc 19 and 20. 12 sc End with 1 sl into the 1st sc and fasten off. Stuff the stove pipe and sew it onto the back of the wood stove.
— Basket with logs :
Basket :
Start at the bottom of the basket. Ch 2 with light brown or start with a magic ring. 1. 6 sc into the 1st ch or into the magic ring, 1 sl into the 1st sc (= 6 sc) 2. 2 sc in every sc (= 12 sc) 3. 2 sc in every 2nd sc (= 18 sc) 4. 6 times (1 sc, 2 sc into the next sc, 1 sc) (= 24 sc) Fasten off. Draw the crocheted shape onto the cardboard and cut it out. Make another part like this, but don't fasten off. Place both parts on top of each other with the cardboard between them and sc the parts together as follows: 5. 2 sc in every 4th sc (= 30 sc) 6. 30 sc, into the back loops only. 7 and 8. 30 sc 9. 6 times (2 sc, 2 sc into the next sc, 2 sc) (= 36 sc) 10 and 11. 36 sc 12. 2 sc in every 6th sc (= 42 sc) 13. 42 sc in Crab stitch: instead of working from right to left, you work from left to right. It creates a twisted edge. Weave in the end. For the handles attach the light brown yarn into a sc at the top of the basket, ch 8 and continue with 1 sl into the 4th st from the 1st st. Repeat this at the other side for the other handle. Weave in the ends.
Large log :
Ch 2 with sand color or start with a magic ring. 1. 6 sc into the 1st ch or into the magic ring, 1 sl into the 1st sc (= 6 sc) 2. * (1 sc, 1 dc) into the next sc, (1 dc, 1 sc) into the next sc, repeat from * another 2 times (= 12 sc) 3. 12 sc, into the back loops only. 4 - 11. 12 sc 12. 1 sc, don't complete the round. From now on this is the beginning of the round. Stuff the log. 13. Sc into the back loops only: 1 sc, sc 3 st together, 1 sc, sc 3 st together, 1 sc, sc 3 st together (= 6 sc) Fasten off. Pull the yarn through the 6 remaining st and pull tight. Weave in the end.
Bark :
Ch 10 with dark brown. 1. 9 sc 2 - 4. ch 1, turn around, 9 sc 5. Make a row of sc around the work as follows: 3 sc along the side, 3 sc at the corner, 7 sc along the bottom, 3 sc at the corner, 3 sc along the side, 3 sc at the corner, 1 sl into the 1st sc of the top. Fasten off. Sew the bark onto the log.
Small log (2 times) :
Ch 2 with sand color or start with a magic ring. 1. 6 sc into the 1st ch or into the magic ring, 1 sl into the 1st sc (= 6 sc) 2. 6 sc, into the back loops only. 3 - 11. 6 sc, stuff while crocheting the log. Fasten off. Pull the yarn through the back loops of the 6 sc and pull tight. Weave in the end.
Bark for small logs :
Ch 10 with dark brown. 1. 9 sc 2 - 9. ch 1, turn around, 9 sc Fasten off. Fold the bark around the log and sew it onto the log. Bark 2nd log: Make the bark of the 1st log till round 3. Fasten off and sew the bark onto the log.
This cozy miniature living room set turns small skeins into a delightful home scene you can display or gift. The pattern combines simple amigurumi techniques with cardboard inserts for sturdy furniture and charming details like cushions, a rug, and tiny logs. Enjoy stitching each piece and arranging your own tiny room full of personality. 🧶🪑🧵