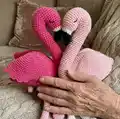
🧶 Beautiful ✨ Detailed 💝 Adorable

Florence the Flamingo Amigurumi Pattern

Florence the Flamingo Amigurumi Pattern
4.0★ Rating
5-7 Hours Time Needed
3.4K Made This
✂️

Intermediate Level

Ideal for those with basic crochet experience, featuring slightly more advanced stitches and techniques to expand your skills.

⏱️

Weekend Treat

Takes 5-7 hours, making it an enjoyable project to finish over a couple of days.

🧸

Cute Companion

An adorable friend to cherish, handcrafted with love to bring comfort and joy for years to come.

About This Florence the Flamingo Amigurumi Pattern

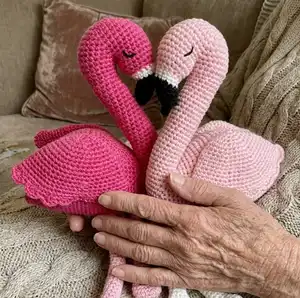
This pattern creates a soft, seated flamingo amigurumi worked in continuous rounds with separate pieces for the body, neck, head, beak, wings and legs. The design uses 10-ply cotton yarn and a small hook to keep stitches neat and reduce holes. You will assemble and sew the pieces for a polished, poseable result.

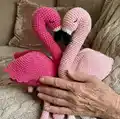
Florence the Flamingo Amigurumi Pattern crochet pattern - detailed view of completed project

Detailed round-by-round instructions, colour change notes and pictorial guides are included to help you every step of the way. Perfect for gifting or as a decorative friend.

Why You'll Love This Florence the Flamingo Amigurumi Pattern

I absolutely love this pattern because it combines simple shaping with lots of personality — the curved neck and scalloped wings are so satisfying to crochet. I enjoy how the separate pieces allow you to customise colours and placement while sewing, which makes each flamingo unique. The pattern uses common stitches but combines them in ways that teach useful amigurumi shaping techniques. It is also a great project to practice colour changes and working in the round while producing a beautiful finished toy.

Florence the Flamingo Amigurumi Pattern step 1 - construction progress Florence the Flamingo Amigurumi Pattern step 2 - assembly progress Florence the Flamingo Amigurumi Pattern step 3 - details and accessories Florence the Flamingo Amigurumi Pattern step 4 - final assembly and finishing

Switch Things Up

I love how easy it is to customise this flamingo pattern — try swapping the main pink for softer blush tones or coral for a different mood.

I sometimes use a wool blend yarn and a slightly larger hook to create a fluffier, larger version that is perfect for cuddling.

I often add embroidered eyelashes or small felt accessories like a tiny crown or scarf to give each flamingo its own personality.

To make a keychain version, use thinner yarn and a smaller hook to reduce the size, then attach a keyring to the top of the head before finishing.

Try adding wire inside the neck or legs for a posable flamingo that can be posed on shelves or perches.

You can highlight the wing edge stitches in a contrasting shade to create a scalloped two-tone wing effect that stands out.

If you want a minimalist look, make the beak and eye details tone-on-tone instead of high-contrast black and white.

I recommend experimenting with bead accents or tiny sequins for a festive or decorative version that sparkles under light.

For a baby-safe toy, secure all seams tightly, use only embroidered features, and select a soft, washable cotton yarn to make laundering simple.

I also enjoy making a family of flamingos in different sizes and shades — they look wonderful grouped together as a handmade display.

Common Mistakes & How to Fix Them

✗ Skipping the stitch marker at the start of rounds will make counting harder; use a marker or contrasting yarn to mark the first stitch of each round. ✗ Forgetting to stuff gradually causes uneven shaping and lumps; stuff little by little and shape as you go for a smooth finish. ✗ Changing colour incorrectly can leave loose loops or holes; change colours on the last sc of the previous round and weave ends neatly inside. ✗ Not pinning parts before sewing can result in misaligned wings and legs; pin each piece in place and check symmetry before stitching. ✗ Tightening yarn tension inconsistently will distort the shape; maintain steady, moderate tension throughout to keep pieces even.

Florence the Flamingo Amigurumi Pattern

Make a charming crochet flamingo you will love to display or gift. This detailed amigurumi pattern guides you through each piece — body, neck, head, beak, wings and legs — with clear rounds and assembly steps. You will sew the parts together for a polished finish and learn simple shaping and colour-change techniques.

Intermediate 5-7 Hours

Materials Needed for Florence the Flamingo Amigurumi Pattern

— Main Fabric

  • 01
    10 ply cotton yarn (Aran - 4 Medium weight)
  • 02
    865 Hot Pink - Bendigo Woollen Mills cotton 10 ply (80 grams)
  • 03
    805 Pink Rose - Bendigo Woollen Mills cotton 10 ply (15 grams)
  • 04
    801 Snow White - Bendigo Woollen Mills cotton 10 ply (5 grams)
  • 05
    817 Noir (Black) - Bendigo Woollen Mills cotton 10 ply (3 grams)

— Tools Required

  • 01
    Crochet hook size 3.75mm
  • 02
    Toy stuffing (polyester fibrefill)
  • 03
    Tapestry needle for sewing
  • 04
    Scissors
  • 05
    Black embroidery yarn for the eyes
  • 06
    Stitch markers or a contrasting yarn
  • 07
    Pins for assembly

Progress Tracker

0% Complete

— Body :

Round 1 :

sc 8 into a mr (8)

Round 2 :

inc x 8 (16)

Round 3 :

(sc 3, inc) x 4 (20)

Round 4 :

(sc 4, inc) x 4 (24)

Round 5 :

(sc 5, inc) x 4 (28)

Round 6 :

(sc 6, inc) x 4 (32)

Round 7 :

(sc 7, inc) x 4 (36)

Info :

We will now make a hole for the flamingo neck and continue to crochet the flamingo body.

Round 8 :

chain 3, skip 12 stitches then sc 24 stitches to form the body. (The body stitch count is now 27 which includes the chain 3) (27)

Info :

Before continuing to round 9 you should have two openings. One for the neck and one for the body.

Round 9 :

inc, inc, inc (these are worked into the BLO chain stitches from the previous round). Then sc 24 (30)

Round 10 :

sc (30)

Round 11 :

(sc 4, inc) x 6 (36)

Round 12 :

(sc 5, inc) x 6 (42)

Round 13 :

sc (42)

Round 14 :

(sc 2, inc) x 3 then sc 33 (45)

Round 15 :

(sc 3, inc) x 3 then sc 33 (48)

Round 16 :

sc (48)

Round 17 :

(sc 4, inc) x 3 then sc 33 (51)

Round 18 :

sc (51)

Round 19 :

(sc 5, inc) x 3 then sc 33 (54)

Round 20-21 :

sc (54) (2 rounds = a total of 108 stitches)

Round 22 :

(sc 5, dec) x 3 then sc 33 (51)

Round 23-24 :

sc (51) (2 rounds = a total of 102 stitches)

Round 25 :

(sc 4, dec) x 3 then sc 33 (48)

Round 26 :

sc (48)

Round 27 :

(sc 3, dec) x 3 then sc 33 (45)

Round 28-29 :

sc (45) (2 rounds = a total of 90 stitches)

Round 30 :

(sc 2, dec) x 3 then sc 33 (42)

Round 31 :

sc (42)

Round 32 :

(sc 5, dec) x 6 (36)

Round 33 :

(sc 4, dec) x 6 (30)

Round 34 :

(sc 1, dec) x 3 then sc 21 (27)

Round 35 :

sc (27)

Info :

Stuff the body of the Flamingo

Round 36 :

(dec x 4) then sc 19 (23)

Round 37 :

sc (23)

Round 38 :

(dec x 3) then sc 17 (20)

Round 39 :

(dec x 2) then sc 16 (18)

Info :

Tie off and leave a long tail of yarn for sewing closed.

— Neck :

Info :

Crochet the flamingo neck starting at the back of the head. Crochet the head and then chain stitch to crochet two holes, continue to crochet down the neck of the flamingo. Use colour 865 hot pink.

Round 1 :

sc 8 into a mr (8)

Round 2 :

inc x 8 (16)

Round 3 :

(sc 3, inc) x 4 (20)

Round 4 :

(sc 4, inc) x 4 (24)

Round 5 :

(sc 5, inc) x 4 (28)

Round 6 :

(sc 6, inc) x 4 (32)

Round 7 :

sc (32)

Round 8 :

(sc 7, inc) x 4 (36)

Info :

We will now make a hole for the flamingo head and continue to crochet the flamingo neck.

Round 9 :

Chain 2, skip 18 stitches and then sc 18 to form the neck. (The total stitch count for the neck is now 20 which includes the chain 2) (20)

Round 10 :

sc 2 into BLO (these are worked into the chain stitches from the previous round). Then sc 18 (20)

Round 11 :

(sc 8, dec) x 2 (18)

Round 12 :

(sc 4, dec) x 3 (15)

Round 13-34 :

sc (15) (22 rounds = a total of 330 stitches)

Info :

Tie off and leave a long tail for sewing.

— Head and Beak :

Info :

The flamingo head and beak will be made by attaching your yarn at the top of the neck and working in continuous rounds towards the beak. The first round of the head starts by working into the 18 sc plus the chain 2 join. Use colour 865 hot pink.

Round 1 :

make a slip knot and perform a standing sc in the stitch immediately after the chain 2 join (see photo for pictorial guide of the starting point). Now Sc 19. (The last two sc are worked into the FLO of the chain stitches) (20)

Round 2 :

sc (20)

Round 3 :

inc, sc 16, then (inc x 3) (24)

Round 4-5 :

sc (24) (2 rounds = a total of 48 stitches)

Round 6 :

(sc 2, dec) x 6 (18)

Round 7 :

(dec, sc 4) x 3 (15). Change colour to 801 snow.

Round 8 :

sc into BLO (15)

Round 9 :

(dec, sc 3) x 3 (12). Change colour to 817 Noir.

Round 10 :

sc into BLO (12)

Round 11 :

sc (12)

Round 12 :

inc, inc, (sc 1, dec) x 3, inc (12)

Round 13 :

sc (12)

Round 14 :

(dec, sc 2) x 3 (9)

Round 15 :

(dec, sc 1) x 3 (6)

Info :

Tie off and leave a long tail for sewing.

— Wings :

Info :

The wings will be made in a continuous round. The circle is folded flat and closed with single crochet. Do not tie off. Each wing is made with a different edge stitch. Use colour 865 hot pink.

Round 1 :

sc 6 into a mr (6)

Round 2 :

inc x 6 (12)

Round 3 :

(sc 1, inc) x 6 (18)

Round 4 :

(sc 2, inc) x 6 (24)

Round 5 :

(sc 3, inc) x 6 (30)

Round 6 :

sc (30)

Round 7 :

(sc 4, inc) x 6 (36)

Round 8 :

sc (36)

Round 9 :

(sc 5, inc) x 6 (42)

Round 10-11 :

sc (42) (2 rounds = a total of 84 stitches)

Round 12 :

(sc 6, inc) x 6 (48)

Round 13 :

sc (48)

Round 14 :

(sc 7, inc) x 6 (54)

Round 15 :

(sc 8, inc) x 6 (60)

Round 16 :

fold flat, chain 1 and sc 30 to close. Go through both loops of both sides. Do not tie off. (30)

Info :

Wing 1: Complete rounds 1-16. Do not tie off. Follow to page 14 for instructions on how to complete the final row of stitches. Wing 2: Complete rounds 1-16. Do not tie off. These are different to wing 1.

— Wing One :

Item Name (P1) :

chain 1, turn sc 14 then (sc, 2dc, 2dc, sc) x 4. Tie off and leave a long tail for sewing.

— Wing Two :

Item Name (P1) :

chain 1, turn (sc, 2dc, 2dc, sc) x 4 then sc 14. Tie off and leave a long tail for sewing.

— Legs :

Info :

The legs will be made starting at the foot. Use colour 805 pink rose.

Round 1 :

chain 5 (5)

Round 2 :

sc into the second chain from the hook, sc 2, 3sc into the last stitch. (Then working on the opposite side of the chain) sc 2, inc (10)

Round 3 :

inc, sc 2, (inc x 3), sc 2, (inc x 2) (16)

Round 4 :

sc (16)

Round 5 :

dec, sc 2, (dec x 3), sc 2, (dec x 2) (10)

Round 6 :

(sc 3, dec) x 2 (8)

Round 7-18 :

sc (8) (12 rounds = a total of 96 stitches)

Info :

Change colour to 865 hot pink

Round 19 :

sc, bobble in the following stitch (see bobble guide) then sc 6 (8)

Round 20-29 :

sc (8) (10 rounds = a total of 80 stitches)

Round 30 :

sc (8)

Round 31 :

(sc 1, inc) x 4 (12)

Round 32 :

sc (12)

Info :

Tie off and leave a long tail for sewing. Do not stuff the legs.

— Assembly :

Info :

Pin all the parts of the Flamingo together before sewing to make sure everything is aligned. Use the yarn tails and a tapestry needle to sew all parts together. Hide your yarn tails.

Item Name (P1) :

Pin the neck to the body. Make sure you stuff the join firmly with fibrefill before closing to ensure the neck sits upright. Use a mattress stitch to close the neck.

Item Name (P2) :

Pin the legs in the middle of the body with a gap of 1cm and sew securely using the yarn tails and tapestry needle.

Item Name (P3) :

Pin the wings either side of the body. Place the edge stitch right side out and stitch the front edges of the wings as indicated in the photos.

Item Name (P4) :

Pin the beak against the neck and stitch it against the middle of the neck. Sew securely and hide ends.

Info :

Face embroidery: Sew the eyes to the face using black yarn. Mark placement with a pin half way down the flamingo's face. Stitch a curved line and secure by going back through one row below; hide yarn tails.

Assembly Instructions

  • Pin the neck to the body, stuff the join firmly with fibrefill to ensure the neck sits upright, then close the seam using a mattress stitch and the long yarn tail.
  • Position and pin the legs in the middle of the body with a gap of approximately 1cm between them, then sew each leg securely using the yarn tails and a tapestry needle.
  • Fold each wing and position it on either side of the body with the edge stitch facing out, pin in place and sew the front edges of the wings to the body as shown in the photos.
  • Pin the beak to the top centre of the neck (use photos as a guide) and stitch it down securely to the neck, leaving ends to weave in and hide.
  • When all parts are sewn, weave in all yarn tails with a tapestry needle and trim any excess; adjust stuffing where needed for a smooth final shape.

Important Notes

  • 💡Use a stitch marker or small length of contrasting yarn at the first stitch of each round to keep track of your rounds and avoid accidental increases.
  • 💡Stuff gradually and evenly; stuffing a piece too firmly or too loosely will change the finished shape and can distort seams when sewing.
  • 💡Change colours on the last sc prior to the new colour change round to create a neat transition and avoid loose loops on the surface.
  • 💡For young children stitch the eyes on using black yarn and a tapestry needle rather than safety eyes, as safety eyes are a choking hazard.
  • 💡Pin parts before sewing to ensure correct placement and symmetry; adjust pins until you are happy with the look before stitching.

This delightful Florence the Flamingo pattern captures charm in every stitch and adds a splash of handmade joy to any shelf or nursery. Whether you make one for yourself or as a thoughtful gift, the finished flamingo is both decorative and huggable. The pattern includes step-by-step rounds, colour change notes and assembly tips to help you finish with confidence. 🧶✨🧵
You ask,

we answer.

FAQs

What size will the finished piece be?

The finished amigurumi measures approximately 21 cm tall when sitting and 33 cm with the legs stretched out, using the recommended yarn and 3.75mm hook.

Can I use different yarn weights for this pattern?

Yes, you can use different yarn weights but this will change the finished size; if using a different weight, adjust your hook size to match the yarn and expect altered dimensions.

Do I need prior crochet experience for this pattern?

This pattern is rated intermediate, so basic knowledge of single crochet, increases, decreases, working in the round and simple colour changes is recommended for best results.

How should I attach and embroider the eyes?

For safety with young children use black embroidery yarn and a tapestry needle. Mark the placement with a pin halfway down the face, stitch a curved line for a closed eye and secure by coming back through one row below.

How long will this project take?

Most crocheters complete this project in about 5-7 hours depending on skill level and how much time is spent on sewing and finishing details.