🧢 Beautiful ✨ Detailed πŸ’ Adorable

Floral tea set Amigurumi Pattern

Floral tea set Amigurumi Pattern
4.3β˜… Rating
12-15 Hours Time Needed
3.1K Made This
βœ‚οΈ

Intermediate Level

Ideal for those with basic crochet experience, featuring slightly more advanced stitches and techniques to expand your skills.

⏱️

Multi-Day Project

A rewarding 12+ hour journeyβ€”perfect for dedicated crafters who love detailed work.

🧸

Cute Companion

An adorable friend to cherish, handcrafted with love to bring comfort and joy for years to come.

About This Floral tea set Amigurumi Pattern

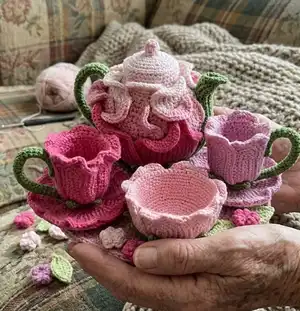
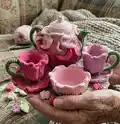
This pattern creates a floral-themed crochet tea set: a petal-covered teapot with lid, spout and handle, plus a coordinating teacup and saucer. The teapot is worked around a small ball-shaped bottle or foam ball for stable shaping and features layered petals for a romantic flower look. Techniques include working in rounds, shaping with increases and decreases, and simple sewn-on assembly with hot glue for finishing.

Floral tea set Amigurumi Pattern crochet pattern - detailed view of completed project

Detailed photo steps guide you through construction and finishing for reliable results. The pattern uses YarnArt Jeans shades and includes instructions for using fishing line and pipe cleaner for structure.

Why You'll Love This Floral tea set Amigurumi Pattern

I absolutely love this pattern because it turns simple crochet stitches into a delicate floral object that feels special and tactile. I enjoy the process of shaping the body over a bottle or foam ball β€” it gives the piece a lovely, sculpted form. The layered petals are my favorite part; they create dramatic, petal-like waves that really bring the teapot to life. I also appreciate how the small structural details (fishing line, pipe cleaner) make the finished set sturdy yet full of character.

Floral tea set Amigurumi Pattern step 1 - construction progress Floral tea set Amigurumi Pattern step 2 - assembly progress Floral tea set Amigurumi Pattern step 3 - details and accessories Floral tea set Amigurumi Pattern step 4 - final assembly and finishing

Switch Things Up

I love how easy it is to customize this pattern with color swaps; you can swap the pinks for purples or pastels to create a different mood.

I often change the size by using a thicker yarn and a larger hook for a chunky, cuddly teapot or a finer yarn for a delicate mini version.

I add embroidered veins on the petals sometimes to give more texture and personality to each petal.

I recommend trying metallic or variegated yarn for a fun accent on the handle or cap to make the piece pop.

I occasionally stitch small felt leaves or tiny crocheted berries and sew them between petals for a seasonal look.

I also like to replace the pipe cleaner with thin florist wire when I need a more rigid or poseable handle.

I sometimes attach a small ribbon bow or tag for a gift-ready presentation β€” it’s a simple finishing touch that looks lovely.

I advise experimenting with the petal count and placement: adding more small petals will make a fuller skirt around the teapot base.

I recommend testing one petal first to check scale and glue placement before committing to gluing all petals to your teapot body.

I like to make a matching teacup saucer set in a contrasting shade to create a two-tone display; it makes the whole set feel curated and special.

Common Mistakes & How to Fix Them

βœ— Not cutting the bottle top neatly before covering; clean and cut the top thread carefully to get a neat neck for the cap. βœ— Forgetting to add the pipe cleaner inside the handle makes it floppy; fold the pipe cleaner in half, insert it and sew the handle up for stability. βœ— Using too loose tension when working around the bottle will cause a sloppy fit; use slightly tighter tension so the crochet hugs the bottle shape. βœ— Skipping the hot glue during petal assembly leads to shifting petals; apply glue to the bottom two-thirds of each petal and position symmetrically for a secure finish.

Floral tea set Amigurumi Pattern

Make a charming floral tea set including a petal-covered teapot, matching teacup and saucer. This pattern guides you through shaping over a small bottle or foam ball and adding decorative petals for a romantic, handmade display. You will enjoy constructing the teapot body, spout, handle, cap and layered petals with clear step-by-step photos and instructions. Perfect for a thoughtful gift or a sweet home accent.

Intermediate 12-15 Hours

Materials Needed for Floral tea set Amigurumi Pattern

β€” Main Fabric

  • 01
    YarnArt Jeans (sport/light) in multiple colors: Raspberry (42) - main base color for lower teapot section (small skein)
  • 02
    Pink shades: Color 36 (pink) - approx several meters for body; Color 18 or 74 (light pink) - for top and cap; note: pink shades 18 (74), 36 and 42 may need more than 1 skein when combined
  • 03
    Green yarn Color 69 - for handle, spout and sepal; small amount
  • 04
    Yellow and lilac pink yarn - for teacup interior and exterior contrast
  • 05
    Optional additional yarn colors (07, 11, 35) - for details

β€” Tools Required

  • 01
    Crochet hook 2.25 mm (B) as shown in photos
  • 02
    Fishing line (1 mm diameter) for teacup structure
  • 03
    30 cm pipe cleaner (chenille wire) for handle support
  • 04
    Hot glue gun for attaching petals and sepal
  • 05
    Tapestry/yarn needle for sewing pieces
  • 06
    Scissors
  • 07
    Polyester fiberfill (fiberfill) for stuffing cap and spout base
  • 08
    Ball-shaped bottle (350 ml, diameter 9 cm) or 9 cm styrofoam ball and a milk bottle cap
  • 09
    Stitch markers (optional)

Progress Tracker

0% Complete

β€” Preparation :

Info :

If you have a ball shaped bottle, clean it, stuff firmly and cut the top thread.

Info :

If you cannot find a bottle, use 9 cm styrofoam ball and milk bottle cap.

Info :

Glue a cap from milk bottle on top using hot glue gun.

Info :

Begin from bottom with raspberry yarn (42).

β€” Teapot base :

Round 1 :

6 sc in AR

Round 2 :

Inc every st =12 sc

Round 3 :

Inc every 2d =18 sc

Round 4 :

Inc every 3d =24 sc

Round 5 :

Inc every 4th = 30 sc

Round 6 :

Inc every 5th = 36 sc

Round 7 :

Inc every 6th = 42 sc

Round 8 :

Inc every 7th = 48 sc

Round 9 :

Inc every 8th = 54 sc

Round 10 :

Inc every 9th = 60 sc

Round 11 :

Inc every 10th = 66 sc

Round 12 :

Inc every 11th =72 sc

Round 13-14 :

Work 2 rounds straight

Round 15-24 :

Change yarn to pink color (36), work 10 rounds straight.

Round 25 :

Change yarn to light pink (18 or 74). (10 sc, dec)* 6 times

Round 26 :

(9 sc, dec)* 6 times

Round 27 :

(8 sc, dec)*6 times

Info :

Keep decreasing symmetrically to increasing.

Info :

When you came close to bottleneck, work straight, without dec.

β€” Spout :

Info :

Work with green yarn (69). Chain 20.

Round 1 :

3 sc in 2d ch, 17 sc, 4 sc in last ch, 17 sc on another side of chain.

Round 2 :

3 inc, 17 sc, 4 inc, 17 sc.

Round 3 :

(1 sc, inc) *3, 17 sc, (1 sc, inc) *4, 17 sc.

Round 4 :

(2 sc, inc) *3, 17 sc, (2 sc, inc) *4, 17 sc.

Round 5 :

(3 sc, inc) *3, 17 sc, 16 inc, 16 sc, sl st.

Info :

Join the straight sides and sew with a needle.

Info :

Stuff the bottom 2/3 with a synthetic fiberfill and glue it to the base of the teapot, as in the photo. The upper part is where it was 4 inc.

β€” Handle :

Info :

For handle ch 8 and work spiral rounds without inc, 15 cm up.

Info :

Pipe cleaner (chenille wire) fold in half, insert into handle and sew up the hole.

Info :

Glue the handle to the pot and additionally sew for reliability.

β€” Cap :

Info :

Work with light pink. Crochet a circle of such size to close the neck. I got 6 rows. You can follow the scheme of teapot bottom for circle.

Info :

Work 1 round through back loops only and one more round through both loops.

Info :

For cap handle work 8 sc in AR.

Info :

Work 2 rounds straight, stuff and sew the hole with the end of yarn.

Info :

Sew this ball to the center of the cap.

Info :

Put the cap on its place, adding a fiberfill under it. Sew on the base.

Info :

If you use a foam ball instead of a bottle, you can make a cap in another way. Crochet the neck place a little bit wider, so that the cap can fit under it.

β€” Big petal :

Info :

Raspberry yarn, make 4. Ch 9.

Round 1 :

3 sc in 2d ch, 6 sc, 4 sc in last ch, 6 sc on another side of chain. Now work spiral rounds:

Round 2 :

Inc *3 , 6 sc, inc *4, 6 sc.

Round 3 :

(1 sc, inc) *3, 6 sc, (1 sc, inc) *4, 6 sc.

Round 4 :

(2 sc, inc) *3, 6 sc, (2 sc, inc) *4, 6 sc.

Round 5 :

(3 sc, inc) *3, 6 sc, (3 sc, inc) *4, 6 sc.

Round 6 :

(4 sc, inc) *3, 6 sc, (4 sc, inc) *4, 6 sc.

Round 7 :

(5 sc, inc) *3, 6 sc, 24 inc, 5 sc, sl st.

β€” Middle petal :

Info :

Pink yarn, make 6 pieces. Ch 10.

Round 1 :

8 sc, 4 sc in last ch, 8 sc on another side of chain. Now work back-and-forth rows. Make turning chain in the beginning of every row.

Round 2 :

8 sc, 4 inc, 8 sc.

Round 3 :

8 sc, (1 sc, inc) *4, 8 sc.

Round 4 :

8 sc, (2 sc, inc) *4, 8 sc.

Round 5 :

8 sc, (3 sc, inc) *4, 8 sc.

Round 6 :

8 sc, 20 inc, 8 sc.

β€” Small petal :

Info :

Light pink yarn, make 6 pieces. Ch 8.

Round 1 :

6 sc, 4 sc in last ch, 6 sc on another side of chain. Now work back-and-forth rows. Make turning chain in the beginning of every row.

Round 2 :

6 sc, 4 inc, 6 sc.

Round 3 :

6 sc, (1 sc, inc) *4, 6 sc.

Round 4 :

6 sc, (2 sc, inc) *4, 6 sc.

Round 5 :

6 sc, 16 inc, 6 sc.

β€” Assembly :

Info :

Attach all the petals with hot glue gun, applying glue on the bottom 2/3 of the petals. Make symmetrically on both sides of the pot. Small petals are fixed at the level of light pink part of the base. First one in the center, then 2 on the sides with an overlap, right next to the handle and spout.

Info :

Large petals stretch wide with your hands so that they fit well on the bottom of the pot, 2 on each side.

Info :

Now turn down the unglued edges of the petals, giving them beautiful waves. All areas adjacent to the base, fasten with a gun.

β€” Sepal :

Info :

Green yarn (69): Crochet 7 rounds circle, following the scheme of teapot bottom.

Info :

Ch 10, 1 sl st, 1 sc, 1 htc, 6 dc. Skip 2 st, sl st in 3d st of the circle.

Info :

Repeat around the circle.

Info :

Glue the sepal on pots bottom, but leave the tips unglued.

β€” Floral teacup :

Round 1 :

6 sc in AR.

Round 2 :

Inc every 2d =12 sc. Add a fishing line. Find more information about using fishing line in saucer description.

Round 3 :

(1 sc, inc) *6 =18 sc

Round 4 :

(2 sc, inc) *6 = 24 sc

Round 5 :

Join lilac pink yarn and alternate 1 yellow and 1 pink st. Don’t forget to follow the inc scheme: (3 sc, inc) *6 =30 sc. Change the yarn color at the time of working the last loop of the sc.

Round 6 :

Fasten off yellow yarn, continue with lilac pink only. (4 sc, inc) *6 = 36 sc.

Round 7-17 :

Work 11 rounds straight. Crochet on the inside (front side inside, purl outside). Not very convenient, but we have to.

Assembly Instructions

  • Glue a milk-bottle cap onto the top of your bottle (or attach cap to foam ball) before covering so the neck is closed and neat.
  • Attach the spout to the side of the teapot body, stuffing its base 2/3 with fiberfill and gluing it securely to the base where the increases were made.
  • Glue the handle into position and additionally sew it for reliability, making sure the folded pipe cleaner is inserted to give the handle strength.
  • Sew the cap pieces together, stuff lightly, fasten the small cap ball and sew the cap to the top of the teapot, adding fiberfill under the cap for a rounded look.
  • Attach petals with hot glue, applying glue along the bottom two-thirds of each petal and arranging them symmetrically: middle petals first, then side petals with slight overlap near handle and spout.
  • Glue the sepal to the pot base leaving the tips unglued so they can be shaped and finished; finish by turning petal edges down to create waves and secure with glue where they meet the base.

Important Notes

  • πŸ’‘Work with slightly tighter tension when crocheting around a bottle or foam ball so the fabric hugs the shape and avoids sagging.
  • πŸ’‘Use hot glue sparingly and press petals firmly in place to ensure they stay attached; allow glue to cool before moving the piece.
  • πŸ’‘Insert a pipe cleaner folded in half into the handle for structure, and sew the handle hole closed around it for longevity.
  • πŸ’‘When using a foam ball instead of a bottle, trim the foam to make a flat bottom and adjust the neck diameter so the cap fits neatly.
  • πŸ’‘Add the fishing line to the teacup base where indicated to keep the cup rim firm and help the saucer sit flat.

This floral tea set pattern turns yarn into a whimsical, petal-covered teapot and matching cup that will brighten any shelf or gift table. The layered petals and delicate cap give a handmade charm that’s both decorative and collectible. Make one for yourself or stitch a set to share β€” each piece is a small floral treasure handmade with care. 🧢🌸

You ask,

we answer.

FAQs

What size will the finished piece be?

The finished teapot fits a small 350 ml ball-shaped bottle (approx 9 cm diameter); exact size depends on yarn and tension.

Can I use different yarn weights for this pattern?

Yes, you can use different yarn weights but this will change the final size; use an appropriate hook and be guided by the bottle shape and gauge.

Do I need special tools for structure?

This pattern uses fishing line for the teacup and a pipe cleaner inside the handle for rigidity; both are optional but recommended for best shape and stability.

How long does this project typically take to complete?

Most makers complete the full tea set over multiple sessions; expect roughly 12-15 hours depending on experience and how many pieces you make.