🧢 Beautiful ✨ Detailed πŸ’ Adorable

Floral Fairy House Amigurumi Pattern

Floral Fairy House Amigurumi Pattern
4.7β˜… Rating
12-15 Hours Time Needed
3.5K Made This
βœ‚οΈ

Intermediate Level

Ideal for those with basic crochet experience, featuring slightly more advanced stitches and techniques to expand your skills.

⏱️

Multi-Day Project

A rewarding 12+ hour journeyβ€”perfect for dedicated crafters who love detailed work.

🏑

Cozy Accent

A warm touch for your space that transforms ordinary corners into inviting nooks filled with handmade charm.

About This Floral Fairy House Amigurumi Pattern

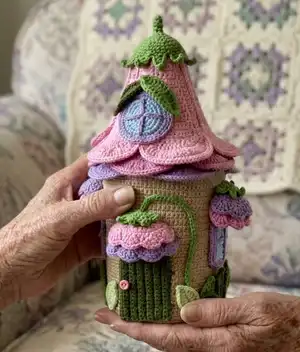
This pattern creates a delightful floral fairy house with a reinforced interior using plastic canvas for stability. You will crochet the base, wall, roof cone, layered petals and decorative leaves, then assemble and glue the pieces for a durable finish. The instructions include stitch-by-stitch rounds, canvas preparation and tips for using fishing line to stiffen the roof.

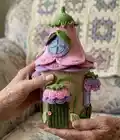
Floral Fairy House Amigurumi Pattern crochet pattern - detailed view of completed project

The design uses three shades of the same flower color to create a graduated petal look and simple plastic canvas inserts for structural support. Detailed photos and assembly notes help you build a charming, display-ready piece.

Why You'll Love This Floral Fairy House Amigurumi Pattern

I absolutely love this pattern because it blends delicate crochet with clever structural techniques like using plastic canvas and fishing line to make a durable yet whimsical house. I enjoy layering petals in different saturations to create a soft ombre effect that brings the roof to life. The project is satisfying to construct β€” each assembly step transforms separate pieces into a coherent miniature home. Sharing this pattern makes me happy because crocheters can practice shaping, small motifs and finishing while producing a delightful decorative item.

Floral Fairy House Amigurumi Pattern step 1 - construction progress Floral Fairy House Amigurumi Pattern step 2 - assembly progress Floral Fairy House Amigurumi Pattern step 3 - details and accessories Floral Fairy House Amigurumi Pattern step 4 - final assembly and finishing

Switch Things Up

I love how adaptable this pattern is β€” you can change petal colors to match seasons or create a rainbow roof by using many small shades.

If you want a sturdier display piece, use a heavier plastic canvas or double up the canvas layers inside the base and wall.

To make a smaller version perfect for a keychain, pick a finer yarn and a smaller hook and reduce the canvas to a tiny disc or omit canvas entirely and reinforce with interfacing.

I often embroider extra details on the door or add tiny crocheted mushrooms at the base for a storybook feel; small felt accents also look very characterful.

Try adding LED micro-lights inside (battery operated) for a glowing fairy house effect β€” make a small removable roof and hide the battery pack inside the canvas cylinder.

For a more rustic look, use textured cotton or linen-blend yarns and darker, muted petals; for a toy-friendly version, skip glue and secure petals entirely with sewing.

I sometimes add a thin wire inside a tendril to make a poseable vine that can curl around the door or window frame for extra charm.

Adjust petal sizes and quantities to create different roof silhouettes β€” more, shorter petals give a frilly roof while longer fewer petals provide a sweeping bell shape.

If you prefer sewing over gluing, baste each petal in place first and then stitch through the center to secure them; hot glue is faster but sewing gives more control.

I like adding tiny embroidered flowers or beads to the petals for sparkle β€” experiment with placement before committing to glue so you can find the perfect arrangement.

Common Mistakes & How to Fix Them

βœ— Skipping to the next round without counting stitches can throw off increases; always count your stitches after each round to ensure the correct stitch count. βœ— Not securing the plastic canvas properly causes gaps and poor alignment; pin and baste the canvas to the crocheted circle and sew with small stitches before gluing. βœ— Using too thick or heavy yarn for detailed petals will hide shaping and increase bulk; choose a fine cotton and adjust hook if necessary to retain crisp edges. βœ— Failing to anchor the fishing line in the roof base will let the cone lose shape; burn the end to a small bead and press into the fabric or secure with a few crochet stitches so it cannot slip out.

Floral Fairy House Amigurumi Pattern

Create a whimsical Floral Fairy House using cotton yarn, plastic canvas and simple crochet techniques. This detailed pattern guides you step-by-step through the base, walls, roof, petals, sepal and finishing touches to produce a sturdy decorative amigurumi house. You will learn how to incorporate plastic canvas and fishing line for structure while making pretty layered petals for a charming roof. Perfect for gifting or as a playful decor piece for any crafty home.

Intermediate 12-15 Hours

Materials Needed for Floral Fairy House Amigurumi Pattern

β€” Main Fabric

  • 01
    Alize Cotton Gold Hobby (examples: 262*3, 98 and 166) for main body and accents
  • 02
    YarnArt Jeans (colors referenced: 36, 11, 69, 82, 75) - used for petals and roof layers; choose three shades of same color family
  • 03
    Hard plastic canvas sheet 26 x 33 cm - 1 sheet for base and wall inserts
  • 04
    1 mm diameter fishing line (about 100 meters recommended) for roof stiffening and structure
  • 05
    Small button or bead (matching color) for doorknob
  • 06
    Optional: small amounts of white, light blue yarn for windows and contrast details

β€” Tools Required

  • 01
    Crochet hook size 2.25 mm (use hook size to match your crocheting density)
  • 02
    Hard plastic canvas 26 x 33 cm sheet (1)
  • 03
    1 mm diameter fishing line (a 100-meter skein is enough)
  • 04
    Scissors
  • 05
    Big-eyed needle for sewing and canvas stitching
  • 06
    Lighter to melt fishing line ends (use with caution)
  • 07
    Hot glue gun (for attaching petals and strengthening roof)
  • 08
    Pins for holding parts during assembly
  • 09
    Yarn needle for weaving ends and sewing pieces together
  • 10
    Small button or bead for doorknob

Progress Tracker

0% Complete

β€” House Bottom :

Info :

Start crocheting from house bottom with beige yarn. Use a marking thread of contrast color to mark the beginning and the end of the rounds.

Round 1 :

6 sc in AR (6)

Round 2 :

inc*6=12 sc (12)

Round 3 :

(1 sc, inc)*6=18 sc (18)

Round 4 :

1 sc, inc, (2 sc, inc)*5, 1 sc=24 sc (24)

Round 5 :

(3 sc, inc)*6=30 sc (30)

Round 6 :

2 sc, inc, (4 sc, inc)*5, 2 sc=36 sc (36)

Round 7 :

(5 sc, inc)*6=42 sc (42)

Round 8 :

3 sc, inc, (6 sc, inc)*5, 3 sc=48 sc (48)

Round 9 :

(7 sc, inc)*6=54 sc (54)

Round 10 :

4 sc, inc, (8 sc, inc)*5, 4 sc=60 sc (60)

Info :

To make the completion of the circle more accurate, after the last increase, crochet another 1 sc and then 1 sl st. Leave a long end of the thread.

Round 11 :

(9 sc, inc)*6=66 sc (66)

Round 12 :

5 sc, inc, (10 sc, inc)*5, 5 sc=72 sc (72)

Round 13 :

(11 sc, inc)*6=78 sc (78)

Round 14 :

6 sc, inc, (12 sc, inc)*5, 6 sc=84 sc (84)

Round 15 :

(13 sc, inc)*6=90 sc (90)

Info :

Cut the fishing line leaving a short end if fishing line was used for reinforcement of circular piece (for roof base later). Leave a long tail of yarn.

β€” Canvas Base & Layering :

Info :

Cut a circle from the plastic canvas with a diameter slightly smaller than crocheted. Sew the canvas to the crocheted circle with small stitches.

Info :

Crochet the second circle in the same way. Put 3 layers together and sew over the edge. Stitch several times through the center to secure layers.

β€” Cylinder Walls (Canvas Insert) :

Info :

Cut a strip along the entire length (33 cm) 15 cm wide from the canvas. Roll it into a cylinder; diameter should coincide with the bottom. Adjust excess or overlap as needed.

Info :

Crochet the walls of the house with beige yarn. Chain 91 and crochet back and forth rows: 90 sc in a row.

Info :

Crochet half the height of the canvas (example got 21 rows). Next crochet only from one side in a height of 38 sc to the end of the canvas. Cut the thread.

Info :

Skip 14 loops in the middle of the canvas and crochet from the other side also 38 sc to the end of the canvas. Carefully cut out the door opening. Do not discard the cut piece.

Info :

Crochet the second piece for the outer side in the same way. Fold the wall with the plastic canvas outward and sew the edges of the crocheted canvases end-to-end.

Info :

Then join the edges of the canvas end-to-end and sew them through the crocheted fabric. Cut a strip about 4 cm wide from the canvas and overlap the seam; sew the strip on both sides through the crocheted fabric.

Info :

Sew the second piece outside starting from the door opening and sew over the edge. Then sew vertical seam on the back side of the house. Sew the top and bottom sides over the edge.

Info :

Sew the bottom to the wall. When stitching, it is not necessary to grab the canvas; it is enough to grab only the edge of the crocheted fabric with a needle.

β€” Roof Base & Cone :

Info :

Crochet the base of the roof with fishing line. The base color can match or contrast the house. Before starting, burn the end of the fishing line so a small ball forms at the end so it will not slip out of crocheting.

Round 1 :

6 sc in AR (6)

Round 2 :

inc*6=12 sc (12)

Round 3 :

12 sc (12)

Round 4 :

(1 sc, inc)*6=18 sc (18)

Round 5 :

18 sc (18)

Round 6 :

(2 sc, inc)*6=24 sc (24)

Round 7 :

24 sc (24)

Round 8 :

(3 sc, inc)*6=30 sc (30)

Round 9 :

30 sc (30)

Round 10 :

(4 sc, inc)*6=36 sc (36)

Round 11 :

36 sc (36)

Round 12 :

(5 sc, inc)*6=42 sc (42)

Round 13 :

42 sc (42)

Round 14 :

(6 sc, inc)*6=48 sc (48)

Round 15 :

48 sc (48)

Round 16 :

(7 sc, inc)*6=54 sc (54)

Round 17 :

54 sc (54)

Round 18 :

(8 sc, inc)*6=60 sc (60)

Round 19 :

60 sc (60)

Round 20 :

(9 sc, inc)*6=66 sc (66)

Round 21 :

66 sc (66)

Round 22 :

(10 sc, inc)*6=72 sc (72)

Round 23 :

72 sc (72)

Round 24 :

(11 sc, inc)*6=78 sc (78)

Round 25 :

78 sc (78)

Round 26 :

(12 sc, inc)*6=84 sc (84)

Round 27 :

84 sc (84)

Round 28 :

(13 sc, inc)*6=90 sc (90)

Round 29 :

90 sc. Cut the fishing line leaving a short end. Crochet a few more sc to close the line, finish with a sl st and cut the thread.

Info :

Gently melt the end of the fishing line protruding from crocheting and quickly press it to crocheting. The melted fishing line will stick to the yarn for extra rigidity.

β€” Roof Petals (make multiple shades) :

Info :

Crochet roof petals with a lilac yarn. Make 5 petals in this shade, then repeat to make 5 more of two other shades (three shades total) and glue layers offset.

Petal Round 1 :

3 sc in AR. Adjust the ring and then crochet back and forth rows with turning ch.

Petal Round 2-3 :

3 sc

Petal Round 4 :

1 sc, inc, 1 sc =4 sc

Petal Round 5-6 :

4 sc

Petal Round 7 :

2 sc, inc, 1 sc =5 sc

Petal Round 8-9 :

5 sc

Petal Round 10 :

2 sc, inc, 2 sc =6 sc

Petal Round 11-12 :

6 sc

Petal Round 13 :

2 sc, inc, 3 sc =7 sc

Petal Round 14-15 :

7 sc

Petal Round 16 :

2 sc, inc, 4 sc =8 sc

Petal Round 17-18 :

8 sc

Petal Round 19 :

2 sc, inc, 5 sc =9 sc

Petal Round 20-21 :

9 sc

Petal Round 22 :

2 sc, inc, 6 sc=10 sc

Petal Round 23-24 :

10 sc

Info :

Join yarn to the narrow end and sc around without inc adding a fishing line if desired. Make 5 petals per shade (total 15 petals if using three shades). Fold and glue or sew petal edges as shown in photos to give dome shape.

β€” Petal Assembly :

Info :

Fasten the petals to the base of the roof with a thin line of glue in the center of each petal, gluing one at a time. The 25th row of petals should fall on the edge of the roof base roughly.

Info :

Gently lift the edges of each petal and glue completely. Glue the second layer a little higher and offset relative to the first row. Glue the third row; fishing line and glue make the roof very hard and durable.

β€” Sepal (green crown) :

Round 1-4 :

6 sc in AR, 3 rounds of 6 sc (6)

Round 5 :

inc*6=12 sc (12)

Round 6 :

(1 sc, inc)*6=18 sc (18)

Round 7 :

(2 sc, inc)*6=24 sc (24)

Round 8 :

(3 sc, inc)*6=30 sc (30)

Round 9-10 :

2 rounds of 30 sc (30)

Info :

Crochet an angle: 7 ch, 2 sl st, 1 sc, 1 htr, 2 dc, skip 2 st of the base, 1 sl st. Repeat around to make points.

Info :

Put the sepal on the top of the roof and sew or glue. The roof is not attached to the house β€” it simply sits on top.

β€” Door & Door Leaf :

Info :

Put off the roof and take the door. Cut the door leaf so it is 5 mm smaller than the opening in height and width. Crochet a rectangle with dark green yarn to cover the door from two sides; number of sc and rows depends on density.

Info :

Sew the door along 3 sides over the edge. Sew the door to the opening making several stitches through the canvas in two points. Sew a small button or bead as a doorknob (example used 2 mini-buttons put together).

β€” Visor (over door) :

Round 1 :

6 sc in AR (6)

Round 2 :

inc*6=12 sc (12)

Round 3 :

(1 sc, inc)*6=18 sc (18)

Round 4 :

(2 sc, inc)*6=24 sc (24)

Round 5 :

(3 sc, inc)*6=30 sc (30)

Round 6 :

(4 sc, inc)*6=36 sc (36)

Round 7 :

(5 sc, inc)*6=42 sc (42)

Round 8-9 :

2 rounds of 42 sc (42)

Info :

Crochet shells along the edge: skip 1 st, 6 dc in 1 st, skip 1 st, 1 sc. Make 10 such shells. Because there are 42 sc, two sts will be excess; in two places skip 2 st instead of one. Leave a long end of thread.

Info :

Fold the part in half aligning shells, glue inside to give dome shape and sew over the edge with thread. Apply glue to the fold of the lilac visor and glue it over the door; do not fasten too low so visor does not interfere with door opening. Additionally sew the visor to the wall with thread.

β€” Windows :

Info :

Crochet windows with light blue yarn. Crochet a rectangle 10 sc wide and 12 rows high; attach to canvas opening and add cross bars as shown in images.

β€” Final Assembly :

Info :

Glue or sew petals layers, attach sepal to roof, place roof on house top. Sew and glue any remaining leaves, tendrils and decorative elements.

Info :

Weave in ends, trim excess canvas edges, and add any small beads or buttons as details. The roof is removable for display or storage.

Assembly Instructions

  • Cut a circle from the plastic canvas slightly smaller than the crocheted base and sew the canvas to the crocheted circle with small stitches to create a rigid bottom.
  • Roll a strip of plastic canvas into a cylinder matching the base diameter and position it inside the crocheted wall piece; sew the crocheted wall to the canvas edges then sew the canvas seam with an overlapping strip for a smooth finish.
  • Carefully cut the door opening in the canvas and crochet/sew the door leaf to the opening; attach a small button or bead as a doorknob and tack the door to the canvas with a few stitches.
  • Glue and/or sew the layered petals to the roof base one at a time, aligning the 25th row of petals to fall on the base edge; use hot glue for quick hold and reinforce with sewing where needed.
  • Position the sepal on the top of the roof and sew or glue it in place; set the finished roof on top of the house (roof is removable) and secure final decorative elements such as window trims and leaves.
  • Sew the bottom circle to the wall by catching only the edge of the crocheted fabric with a needle so the canvas remains hidden and the seam is tidy.

Important Notes

  • πŸ’‘Use a contrasting marker thread to mark the beginning and end of rounds, especially during increases and shaping sections.
  • πŸ’‘Match the canvas diameter with the crocheted bottom carefully; trim the canvas or adjust overlap to prevent puckering or gaps in the wall.
  • πŸ’‘When using fishing line for the roof, burn the end carefully to form a bead and press into the crochet to stop slipping, working in a well-ventilated area and handling the lighter with care.
  • πŸ’‘Glue adds rigidity to delicate petals and the roof base, but position parts and test placement before gluing as bond is permanent; pin and sew where you want adjustability.

This Floral Fairy House pattern brings together delicate crochet petals and smart structural details for a charming handmade accent. Whether you display it on a shelf or gift it to a friend, it adds whimsy and warmth to any space. Enjoy building, layering and personalizing each little flower and roof detail β€” happy crocheting! 🧢✨

You ask,

we answer.

FAQs

What size will the finished piece be?

The finished Floral Fairy House measures approximately 29 cm tall with a bottom diameter of about 11 cm when using the recommended yarn and canvas.

Can I use different yarn weights for this pattern?

Yes, you can use different yarn weights, but this will change the final size and may require adjusting the plastic canvas diameter and hook size to maintain proportions.

Do I need prior crochet experience for this pattern?

This pattern is rated intermediateβ€”basic knowledge of crochet stitches, shaping, and simple sewing is recommended for best results.

How long does this project typically take to complete?

Most crafters will spend 12-15 hours on this detailed project, factoring in time for cutting and assembling the canvas, gluing petals and finishing seams.