🧢 Beautiful ✨ Detailed πŸ’ Adorable

First Aid Kit Zippered Pouch Pattern

First Aid Kit Zippered Pouch Pattern
4.0β˜… Rating
5-7 Hours Time Needed
4.1K Made This
βœ‚οΈ

Intermediate Level

Ideal for those with basic crochet experience, featuring slightly more advanced stitches and techniques to expand your skills.

⏱️

Weekend Treat

Takes 5-7 hours, making it an enjoyable project to finish over a couple of days.

✨

Stylish Touch

An elegant detail to elevate any look, combining traditional techniques with contemporary design sensibilities.

About This First Aid Kit Zippered Pouch Pattern

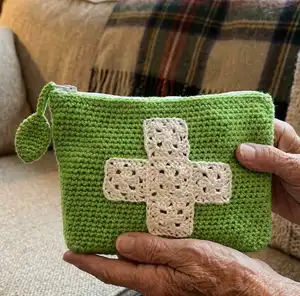
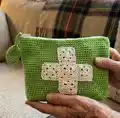
This pattern creates a zippered first-aid kit pouch with a decorative granny-square plus sign on the front. The pouch is worked from a rectangular bottom up in single crochet rounds for a neat, sturdy fabric. The emblem is made from five small granny squares in a contrasting color and stitched together to form the cross.

First Aid Kit Zippered Pouch Pattern crochet pattern - detailed view of completed project

The pouch size is easily customizable by changing the starting chain and number of rows, and the granny-square emblem can be sized by using thinner or thicker yarn. Instructions include zipper tab construction and clear finishing notes for sewing in the zipper and attaching the emblem.

Why You'll Love This First Aid Kit Zippered Pouch Pattern

I absolutely love this pattern because it turns a practical item into a personalized handmade treasure. I enjoy the contrast of simple single crochet fabric with the delicate granny-square emblem β€” it creates a lovely focal point. The project is satisfying because the pouch is quick to make but still offers opportunities for creative customization. Sewing in the zipper and assembling the emblem always feels like a finishing flourish that makes the piece look professional.

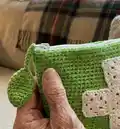
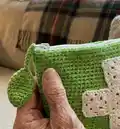
First Aid Kit Zippered Pouch Pattern step 1 - construction progress First Aid Kit Zippered Pouch Pattern step 2 - assembly progress First Aid Kit Zippered Pouch Pattern step 3 - details and accessories First Aid Kit Zippered Pouch Pattern step 4 - final assembly and finishing

Switch Things Up

I love changing the look of this pouch by swapping yarn colors; try a neutral pouch with a bright cross for a bold contrast.

You can make the emblem pop by using a textured or metallic yarn for the granny squares which gives a special finish.

If you want a smaller version, I change to a fingering weight yarn and a smaller hook to make miniature granny squares that still read as a plus sign.

To create a larger organizer, I increase the starting chain by multiples of 4 and add rows to the rectangular bottom to get a wider and deeper pouch.

I sometimes add a fabric lining for durability and to prevent small items catching on the stitchesβ€”use a lightweight cotton and hand-stitch it in place.

For an extra practical touch, I add an interior pocket by sewing a small rectangle of crocheted fabric to the inside before attaching the zipper.

Try attaching a wrist strap or small handle at the zipper tab so it can be carried like a clutch; I usually make a simple 6-8" strap and sew it securely into the zipper tab seam.

Embellish the front with embroidery over the granny squares for personalizationβ€”initials or a small motif look delightful stitched on top of the emblem.

I also enjoy changing stitch texture for the body; working alternating rows of hdc or moss stitch creates a different drape and feel to the pouch.

Swap the non-separating zipper for a contrasting colored zipper to add a design accent; make sure the zipper length matches the finished opening or shorten as instructed.

For gift versions, I work the pouch in cotton for a polished look and include a small first-aid selection inside before gifting.

Finally, I save different yarn scraps to make multi-colored granny squares and arrange them into a whimsical plus sign that uses up small bits of yarn beautifully.

Common Mistakes & How to Fix Them

βœ— Skipping the locking stitch marker at the beginning of rounds leads to losing track of the round start; place a locking stitch marker at the beginning of every round and move it up as you work. βœ— Working turning chains as stitches in the rectangular bottom will change counts and size; remember turning chains in the rectangular bottom do not count as stitches and begin rows accordingly. βœ— Failing to check the zipper length against the pouch opening can create fit problems; measure the finished opening and purchase or shorten the zipper to match before attaching. βœ— Not blocking granny squares will make assembly uneven and ill-fitting; block all granny squares and pieces before sewing them together for a neat emblem and flat edges. βœ— Pulling the yarn too tightly while sewing the emblem can distort the pouch front; use moderate tension when whipstitching and pin squares in place to maintain shape.

First Aid Kit Zippered Pouch Pattern

Make a handy, customizable crocheted pouch to carry travel first-aid essentials. This pattern uses simple single crochet construction for the pouch body with a charming granny-square "+" emblem on the front. You can easily change the size, colors, and yarn to suit your needs, making a practical and thoughtful handmade gift.

Intermediate 5-7 Hours

Materials Needed for First Aid Kit Zippered Pouch Pattern

β€” Main Fabric

  • 01
    Approximately 160 yds [146 m] worsted weight yarn (#4) for pouch (MC) - sample uses Red Heart Super Saver Spring Green #0672, partial skein
  • 02
    Approximately 60 yds [55 m] sport or light worsted weight yarn for granny square emblem (CC) - sample uses Patons Grace Natural #62008, partial skein
  • 03
    You may substitute acrylic, cotton, or wool fibers as preferred

β€” Tools Required

  • 01
    Crochet hook size US G (4.0 mm) for pouch
  • 02
    Crochet hook size US D (3.25 mm) for granny square emblem
  • 03
    Yarn needle for sewing and weaving ends
  • 04
    Removable locking stitch markers
  • 05
    Non-separating zipper (sample shown measures 9")
  • 06
    Sewing needle and thread for attaching zipper
  • 07
    Scissors
  • 08
    Pins for blocking

Progress Tracker

0% Complete

β€” Finished Measurements :

Info :

Sample shown is 9" wide (along top edge folded flat) x 2" from front to back (near bottom of bag) x 5.75" tall. Size is easily customizable. Changing the size of the pouch will change the yardage needed. (Note- the Rectangular Bottom measures 8" x 2")

β€” Materials :

Infos :

Approximately 160 yds [146m] acrylic, cotton, or wool worsted weight yarn for pouch. Approximately 60 yds [55m] acrylic, cotton, or wool sport or light worsted weight yarn for granny square emblem. US G [4.0mm] crochet hook or size needed to obtain gauge for pouch. US D [3.25mm] crochet hook or size needed to obtain gauge for granny square "+" symbol only. Yarn needle. Removeable stitch markers. Non-separating zipper (sample shown measures 9"). Sewing needle and thread (for attaching zipper).

β€” Yarn Used for Kit Shown :

Info :

Red Heart Super Saver (worsted weight, CYCA #4) Spring Green #0672 (MC), partial skein. Patons Grace (light weight, CYCA #3) Natural #62008 (CC), partial skein.

β€” Gauge :

Info :

16 sts and 20 rows = 4" over Single Crochet, blocked. 1 granny square = about 1.5", blocked.

β€” Notes :

Info :

Pouch begins by working in turned rows to form a rectangle. After rectangular bottom is made, stitches are worked around the rectangle's perimeter, and pouch is worked in the round from the bottom up. 5 small granny squares are each constructed separately, then stitched together to form the "+" sign emblem. The granny squares are all stitched onto the front of the bag. A small strip of crocheted fabric is made, then looped through the zipper pull and stitched in place. Turning chains in the rectangular bottom do not count as a stitch. Use a locking stitch marker to note the beginning of the round.

β€” Changing size of pouch :

Info :

Changing the size of the pouch will change the amount of yarn needed, as well as the zipper length needed. If making a smaller pouch than the sample shown, you may need to use a thinner yarn for the granny stitch portion - try a fingering weight yarn, or thin crochet thread (size 3 or size 10) to make smaller granny squares. Otherwise, your "+" symbol may not fit on the front of the bag.

β€” Instructions :

Rectangular bottom :

With MC and larger hook, ch 31.

Info :

Note for altering size: Chain more sts for a wider pouch, fewer for a smaller pouch. Add 4 sts for each inch of added width. Subtract 4 sts for each inch of subtracted width.

Row 1 :

Beginning with the 2nd ch from hook and working into the bottom of the chain, 1 SC into each st. 30 SC.

Rows 2-10 :

Ch 1 (turning ch does not count as a st), turn, 1 SC in each st across. Do not turn after working the last row. Do not fasten off.

Info :

Note for altering size: Work more rows here for a larger front-to-back measurement. Work fewer rows here for a smaller front-to-back measurement. To add or subtract one inch, add or subtract 5 rows.

Set-Up Rnd :

Ch 1 (does not count as a stitch), rotate work 90 degrees to stitch along row-ends. Use a stitch marker to divide the side edge (along row-ends) into two equal sections. 5 SC into each of the two sections along row-ends to next corner, place stitch marker in first st to keep track of first st of round, rotate work 90 degrees to stitch along opposite edge of foundation chain, placing one SC into each of the 30 sts across edge, rotate work 90 degrees to stitch along row ends (use stitch marker to divide edge in half as before), 5 SC into each of the two sections along row-ends, rotate work 90 degrees and work 1 SC into each st across ending at marked stitch, do not join, but continue to work in the round. 80 SC around.

Info :

Note if altering size: If more stitches were added to Rectangular Bottom, be sure to work into each stitch along long edges. If more rows were added, work extra stitches along row-ends (there should be one stitch in each row along row-ends). This will alter the stitch count.

Rnd 1-28 :

SC into each stitch around. On last round fasten off at side edge of bag with a sl st (fold bag flat along top opening to find side edge). Work more stitches after last round if needed, to end at side edge.

Info :

Note for altering size: Work more or fewer rounds here to change the height of the pouch.

Zipper tab :

With larger hook and MC, ch 13.

Row 1 :

Beginning with the 2nd ch from hook and working into the bottom of the chain, 1 sl st in next st, SC in each of next 10 sts, 1 sl st in last st. 2 sl st, 10 SC.

Row 2 :

Ch 1 (turning ch does not count as a st), turn, 1 sl st in next st, 1 SC in each of next 10 sts, 1 sl st in last st.

Info :

Fasten off leaving long tail for sewing.

β€” Emblem :

Granny square (make 5) :

Set-up Rnd: With CC and smaller hook, ch 4, sl st in first ch to join into a ring.

Rnd 1 :

Ch 3 (counts as the first DC of rnd), 2 DC in center of ring, [ch 2, 3 DC in ring] 3 times, HDC into top of the ch-3 at beginning of rnd, this HDC counts as the last ch-2 sp of rnd as well as a join.

Rnd 2 :

Ch 3 (counts as first DC of rnd), 2 DC in same sp, *skip next 3 DC, [3 DC, ch 2, 3 DC] in next ch-2 sp, repeat from * twice more, skip next 3 DC, 3 DC into first ch-2 sp, HDC into top of ch-3 to join (HDC counts as a ch-2 sp as well as the join).

Rnd 3 :

Ch 3 (counts as first DC of rnd), 2 DC in same ch-2 sp, *skip next 3 DC, 3 DC into sp before next set of 3 DC sts, skip next 3 DC, [3 DC, ch 2, 3 DC] in next ch-2 sp, repeat from * twice more, skip next 3 DC, 3 DC into sp before next set of 3 DC sts, skip next 3 DC, [3 DC, ch 2] into first ch-2 sp, sl st into top of ch-3 to join.

Info :

Fasten off leaving long tail for sewing.

Finishing :

Block all pieces.

Zipper :

Check measurement of zipper against the measurement of opening. If zipper is longer than opening, it can be shortened from the bottom by stitching around the zipper teeth several times with a needle and thread and trimming away the excess below the stitching line. Pin zipper into opening in top of pouch. Place zipper tape to inside of crocheted fabric and make sure teeth are far enough away from crocheted fabric so that it will not get snagged by zipper teeth. Using sewing needle and thread, stitch zipper in place from the RS, just below the "v"s along the top edge of opening with a back stitch.

Zipper :

Feed one end of zipper tab through the opening in zipper pull. Using yarn needle and yarn tails, stitch short ends of zipper tab together. Position the narrow section of zipper tab within the hole in zipper pull, then stitch tab in place just above opening in zipper pull to keep it in place. Weave in all ends of MC.

Emblem: Making the "+" sign :

Weave in all beginning yarn tails of granny squares, but leave ending tails loose for sewing. Position all granny squares in formation on table and whip stitch edges together to make the + symbol. Pin the + symbol to the front of the bag. Use yarn needle and yarn tails to sew symbol in place, using a back stitch around all edges.

Assembly Instructions

  • Block all granny squares and pouch pieces flat before assembly to ensure neat edges and correct sizing.
  • Whip stitch the five granny squares together into a plus sign, leaving tails long for sewing; position the assembled emblem on the front of the pouch and pin in place before sewing.
  • Attach the zipper by pinning zipper tape to the inside of the top opening; stitch from the right side just below the top edge using a back stitch so teeth sit clear of crocheted fabric.
  • Make the zipper tab using the small crocheted strip, feed one end through the zipper pull, stitch the short ends together, then stitch the tab into the pull and weave in all ends.
  • Fasten off and weave in all ends of MC and CC after sewing the emblem and zipper; fold the pouch flat to check side edges and secure any loose stitches.

Important Notes

  • πŸ’‘Turning chains in the rectangular bottom do not count as a stitch; begin rows accordingly to maintain correct stitch counts.
  • πŸ’‘Use a locking stitch marker to mark the beginning of the round when working the pouch in the round to avoid miscounting.
  • πŸ’‘Purchase a zipper after making the pouch so you can check the finished opening measurement and shorten the zipper if necessary.
  • πŸ’‘Block all granny squares and pieces before sewing to ensure the emblem lies flat and the stitches align properly.

This First Aid Kit Zippered Pouch is a quick, practical crochet project that makes a thoughtful gift or travel essential. Customize the colors, yarn, and size to make it uniquely yours and perfectly suited to your needs. Small details like the granny-square "+" emblem and sewn zipper tab bring a handmade, professional finish. 🧢🩹

You ask,

we answer.

FAQs

What size will the finished piece be?

The sample pouch measures approximately 9" wide x 2" deep x 5.75" tall when using the recommended yarn and hooks; size will vary with different yarn weights and alterations.

Can I use different yarn weights for this pattern?

Yes, you can substitute yarn weights but this will change the final size and the granny emblem scale; adjust the starting chain and rows and use a thinner yarn for the granny squares if making a smaller pouch.

Do I need prior crochet experience for this pattern?

This pattern is rated intermediate and assumes familiarity with single crochet, double crochet, working in rounds, and basic finishing techniques like sewing and installing a zipper.

How long does this project typically take to complete?

Most crocheters finish this pouch in about 5-7 hours, though time may vary depending on experience level and the amount of detailing or blocking you choose to do.