🧢 Beautiful ✨ Detailed πŸ’ Adorable

Elephant Amigurumi Pattern

Elephant Amigurumi Pattern
4.7β˜… Rating
5-7 Hours Time Needed
3.6K Made This
βœ‚οΈ

Intermediate Level

Ideal for those with basic crochet experience, featuring slightly more advanced stitches and techniques to expand your skills.

⏱️

Weekend Treat

Takes 5-7 hours, making it an enjoyable project to finish over a couple of days.

🧸

Cute Companion

An adorable friend to cherish, handcrafted with love to bring comfort and joy for years to come.

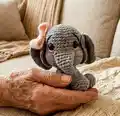
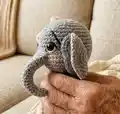
About This Elephant Amigurumi Pattern

This pattern guides you through crocheting a small, charming elephant amigurumi with clear rounds for head, body, trunk, ears, legs, arms and tail. It includes photo references and instructions to shape the face and add a ribbon for a finishing touch. The final toy is compact and full of personality.

Elephant Amigurumi Pattern crochet pattern - detailed view of completed project

Techniques used include magic ring, increases and decreases, and sewing pieces together for a polished finish. Suitable for crafters comfortable with basic amigurumi shaping.

Why You'll Love This Elephant Amigurumi Pattern

I absolutely love this pattern because it transforms simple stitches into a charming little elephant full of character. I enjoy the small scale that makes it quick to finish yet detailed enough to be satisfying. The ribbon and facial shaping allow for so much personality and customization. I always appreciate patterns that combine clear instructions with photos, and this one delivers both for great results.

Elephant Amigurumi Pattern step 1 - construction progress Elephant Amigurumi Pattern step 2 - assembly progress Elephant Amigurumi Pattern step 3 - details and accessories Elephant Amigurumi Pattern step 4 - final assembly and finishing

Switch Things Up

I love how many ways you can customize this elephant β€” change the ribbon color or remove it entirely for a simpler look.

I often switch yarn to a fuzzy or textured type to give the elephant a softer, more plush finish; just adjust the hook size accordingly.

Want a pocket-sized version? Use thinner yarn and a smaller hook to make an adorable mini elephant for a keychain.

Make a larger, cuddlier version by using chunky yarn and a larger hook for a toy that's perfect for hugs.

I sometimes add wire to the limbs to give a little posability; just insert it carefully and secure the ends so they don't poke.

You can change the expression by moving eye placement or embroidering a different eyebrow shape for a happier or sleepier look.

Try embroidering small details like eyelashes or a heart on the belly for a personalized touch that makes each elephant unique.

Mix colors on the ears or trunk for a playful, whimsical design β€” contrasting inner ear color looks especially cute.

I like making sets with matching accessories (tiny blankets, hats or scarves) to create themed gifts for babies or birthdays.

Experiment with different eye types β€” safety eyes, embroidered eyes, or felt appliques β€” to change the final style and safety level for kids.

Common Mistakes & How to Fix Them

βœ— Skipping stitch counting during increases and decreases can throw off shaping; count your stitches after each round to ensure accuracy and match the pattern. βœ— Forgetting to leave long yarn tails for sewing pieces together can make assembly difficult later; always leave a long yarn tail where the pattern instructs for easy attachment. βœ— Stuffing too early or too much will distort shape and make sewing tricky; stuff gradually and shape as you go so pieces remain smooth and proportional. βœ— Not placing the eyes in the correct round or position will change the expression; follow the placement note exactly (eyes in Round NΒΊ10) and measure spacing before securing.

Elephant Amigurumi Pattern

Create a tiny, adorable elephant with this detailed amigurumi crochet pattern. You will enjoy step-by-step rounds, clear photos, and helpful assembly notes to guide you through every piece. Perfect for gifting or keeping as a sweet handmade companion. Follow the instructions to craft your own cuddly elephant with a cute ribbon detail.

Intermediate 5-7 Hours

Materials Needed for Elephant Amigurumi Pattern

β€” Main Fabric

  • 01
    Cotton or wool thread - Grey (main color) - amount as needed for a 10cm finished toy
  • 02
    Cotton or wool thread - White (small details) - small amount
  • 03
    Cotton or wool thread - Black (eyebrows/details) - small amount
  • 04
    Cotton or wool thread - Pink (ribbon and blush) - small amount
  • 05
    Fiberfill or padding of your choice for stuffing

β€” Tools Required

  • 01
    Crochet hook no. 2.5mm
  • 02
    Wool needle (yarn needle) for sewing pieces
  • 03
    Plastic eyes NΒΊ10 (2 pieces)
  • 04
    Scissors
  • 05
    Stitch markers
  • 06
    Polyester stuffing / fiberfill
  • 07
    Pins for assembly (to position ears and ribbon)

Progress Tracker

0% Complete

β€” Head + Body :

Info :

weave spiral

Round 1 :

Magic ring 6sc (6)

Round 2 :

1inc at all stitches (12)

Round 3 :

(1sc, 1inc) x6 (18)

Round 4 :

(2sc, 1inc) x6 (24)

Round 5 :

(3sc, 1inc) x6 (30)

Round 6 :

(4sc, 1inc) x6 (36)

Round 7-11 :

36sc (36)

Round 12 :

9sc, (1inc) x3, 3sc, 6ch (leave 6 free stitches), 3sc, (1inc) x3, 9sc (42)

Round 13-15 :

42sc (42)

Round 16 :

(5sc, 1dec) x6 (36). Place eyes in Round NΒΊ10, on the sides of the opening made.

Round 17 :

(4sc, 1dec) x6 (30)

Round 18 :

(3sc, 1dec) x6 (24)

Round 19 :

(2sc, 1dec) x6 (18). Fill

Round 20 :

(1sc, 1dec) x6 (12)

Round 21 :

(1sc, 1inc) x6 (18)

Round 22 :

(2sc, 1inc) x6 (24)

Round 23-28 :

24sc (24)

Round 29 :

(2sc, 1dec) x6 (18). Fill

Round 30 :

(1sc, 1dec) x6 (12)

Round 31 :

(1dec) x6 (6). Fasten off

β€” Trunk :

Round 1 :

Magic ring 4sc (4)

Round 2 :

(1sc, 1inc) x2 (6)

Round 3 :

6sc (6)

Round 4 :

(2sc, 1inc) x2 (8)

Round 5 :

8sc (8)

Round 6 :

(3sc, 1inc) x2 (10)

Round 7 :

10sc (10)

Round 8 :

(4sc, 1inc) x2 (12). Do not fill

Info :

Leave a long yarn for sewing. Join the edge of the trunk as shown in the images.

Info :

Join the trunk to the face in the opening that we left previously.

Info :

Embroider the eyes and eyebrows as shown in the images.

Info :

Shape the face as shown in the images.

β€” Ears (x2) :

Round 1 :

Magic ring 6sc (6)

Round 2 :

1inc at all stitches (12)

Round 3 :

(1sc, 1inc) x6 (18)

Round 4 :

(2sc, 1inc) x6 (24)

Round 5 :

(3sc, 1inc) x6 (30)

Round 6 :

(1dec) x2, 1sc, (3sc in the same stitch) x22, 1sc, (1dec) x2 (66)

Info :

Leave a long yarn for sewing. Pin the top to shape the ear, then pin the ears to the head.

β€” Legs (x2) :

Round 1 :

Magic ring 6sc (6)

Round 2 :

1inc at all stitches (12)

Round 3 :

(1sc, 1inc) x6 (18)

Round 4 :

Taking the back chain: 18sc (18)

Round 5 :

(1sc, 1dec) x6 (12). Fill

Round 6 :

(1dec) x6 (6)

Round 7 :

6sc (6)

Info :

Leave a long yarn for sewing. Join the legs to the body from Round NΒΊ25.

β€” Arms (x2) :

Round 1 :

Magic ring 6sc (6)

Round 2 :

1inc at all stitches (12)

Round 3 :

(1sc, 1inc) x6 (18)

Round 4 :

Taking the back chain: 18sc (18)

Round 5 :

(1sc, 1dec) x6 (12). Fill

Round 6 :

(2sc, 1dec) x3 (9)

Round 7 :

9sc (9)

Round 8 :

(1sc, 1dec) x3 (6)

Round 9 :

6sc (6)

Info :

Leave a long yarn for sewing. Join the arms to the body from Round NΒΊ21.

β€” Tail :

Round 1 :

8ch

Round 2 :

8st

Info :

Attach the tail to the body.

β€” Ribbon :

Round 1 :

Ring of 26ch

Round 2 :

26sc (26)

Round 3-5 :

26sc (26)

Round 6 :

8ch

Info :

Shape the ribbon by joining the last chain with the first chain as shown in the images. Apply blush on the cheeks and on the trunk as seen in the images. Join the ribbon to the head.

Assembly Instructions

  • Join the trunk to the face by inserting and sewing it into the opening left in Round 12, matching the edges and securing with small whipstitches.
  • Place and secure the plastic eyes in Round NΒΊ10 on the sides of the opening made, then embroider eyelids and eyebrows as shown in the photos.
  • Pin the top of each ear to shape it, then sew the ears to the head symmetrically, using the long yarn tail left for sewing.
  • Attach legs to the body starting at Round NΒΊ25, spacing them evenly and sewing firmly so the elephant sits stably.
  • Sew the arms to the body from Round NΒΊ21, positioning them slightly forward for a natural pose and fastening securely.
  • Attach the tail to the lower back of the body and weave in ends; shape the ribbon and join it to the head where desired.
  • Apply a touch of blush to the cheeks and trunk for a soft, finished look and hide any visible sewing threads.

Important Notes

  • πŸ’‘Work in continuous spiral (weave spiral) unless otherwise noted to avoid visible seams and maintain round shaping.
  • πŸ’‘Place safety/plastic eyes in Round NΒΊ10 on the sides of the opening and confirm spacing before fastening.
  • πŸ’‘Leave long yarn tails for sewing when instructed (trunk, ears, legs, arms) to make assembly easier and more secure.
  • πŸ’‘Do not fill the trunk (Round 8 of trunk) as instructed; fill other pieces as indicated and shape gradually.
  • πŸ’‘Pin pieces in place before sewing to ensure symmetry and correct positioning.

Thank you for choosing this Elephant Amigurumi pattern β€” I hope it brings you joy and creative fun! 🧢 This little elephant is perfect as a handmade gift or a sweet addition to your collection, and it’s full of character with simple shaping and a pretty ribbon. πŸŽ€ Share your finished project with me β€” I love seeing your creations and hearing your crocheting stories! 😊

You ask,

we answer.

FAQs

What size will the finished piece be?

The finished amigurumi measures approximately 10 cm tall when using the recommended yarn and a 2.5mm hook.

Can I use different yarn weights for this pattern?

Yes, you can use different yarn weights, but it will change the final size; choose an appropriate hook and adjust stitch counts if necessary.

Do I need prior crochet experience for this pattern?

This pattern is rated intermediate, so basic knowledge of magic ring, increases, decreases, and sewing pieces together is recommended.

How long does this project typically take to complete?

Most crocheters complete this project in 5-7 hours, depending on experience and how much time you spend on assembly and finishing details.