🧢 Beautiful ✨ Detailed πŸ’ Adorable

Dragonfruiteratops Amigurumi Pattern

Dragonfruiteratops Amigurumi Pattern
4.6β˜… Rating
5-7 Hours Time Needed
2.3K Made This
βœ‚οΈ

Intermediate Level

Ideal for those with basic crochet experience, featuring slightly more advanced stitches and techniques to expand your skills.

⏱️

Weekend Treat

Takes 5-7 hours, making it an enjoyable project to finish over a couple of days.

🧸

Cute Companion

An adorable friend to cherish, handcrafted with love to bring comfort and joy for years to come.

About This Dragonfruiteratops Amigurumi Pattern

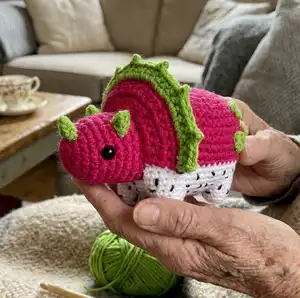
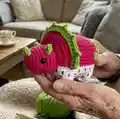
This pattern creates a tiny dragonfruit-themed dinosaur amigurumi with bright pink body, white seeded belly and green ruff, horns and spots. You will crochet legs, body, head, tail and small decorative pieces then stitch them together using the long tails. The instructions include techniques for invisible closing, colour changes and invisible decreases to give a neat finish. Photos are provided to help with assembly and placement of features.

Dragonfruiteratops Amigurumi Pattern crochet pattern - detailed view of completed project

Designed for DK weight yarn and a 2.5mm hook to produce a firm fabric and a finished toy about 9cm tall. The pattern uses US terms and includes all round-by-round instructions and assembly steps.

Why You'll Love This Dragonfruiteratops Amigurumi Pattern

I absolutely love this pattern because it combines playful colour with simple shaping to create a unique little toy. I enjoyed designing the ruff and tiny spots which give so much personality with very little extra work. It is satisfying to join the legs and shape the body so it sits nicely, and the invisible closing technique keeps the finish neat. This project is a great way to practice small amigurumi joins and colour changes while producing a charming finished piece.

Dragonfruiteratops Amigurumi Pattern step 1 - construction progress Dragonfruiteratops Amigurumi Pattern step 2 - assembly progress Dragonfruiteratops Amigurumi Pattern step 3 - details and accessories Dragonfruiteratops Amigurumi Pattern step 4 - final assembly and finishing

Switch Things Up

I love how many ways you can customise this pattern: try softer pastel colours for a sweeter, baby-friendly version or neon shades for a playful modern look.

You can change the size easily by swapping yarn weight and hook size β€” use bulky yarn and a larger hook for a cuddly chunky toy or a finer yarn and smaller hook for a tiny keyring version.

I often experiment with different facial expressions by moving the eyes and embroidery slightly higher or lower to give unique personalities.

Try embroidering tiny spots in contrasting colours instead of the green spots, or use felt shapes glued on for a different texture.

For a poseable version, add a thin wire in the body or limbs before stuffing to create a toy that can be positioned.

Make a family set by varying tail shapes, ruff sizes, or horn numbers to create different species of dragonfruiteratops.

If you want a more realistic seed texture, use a small bit of black yarn for french knots instead of embroidery floss for a raised effect.

I sometimes add a tiny crocheted scarf or accessory to personalise gifts β€” small changes make each piece special.

Switch yarn brands while keeping DK weight if you prefer a different fibre or more vibrant colour palette; always swatch if size is critical.

Use safety eyes for durability in toys for older children, or embroider eyes for baby-safe versions; both give very different looks.

Common Mistakes & How to Fix Them

βœ— Skipping stitch markers during rounds can cause you to lose track of the start; place a marker at the first stitch of each round and move it up as you go. βœ— Not stuffing gradually makes shaping difficult and causes lumps; add small amounts of fibrefill as you work and shape each section evenly before closing. βœ— Changing colours without pulling yarn tails through properly can lead to loose stitches; complete the final stitch of the old colour by pulling through the new colour and secure the ends after a few stitches. βœ— Forgetting to count stitches after increases or decreases will lead to incorrect shaping; count your stitches at the end of each increase or decrease round to ensure accuracy.

Dragonfruiteratops Amigurumi Pattern

Make a cute dragonfruit-inspired dinosaur amigurumi with this complete crochet pattern. You'll create a small, colorful companion with a ruff, horns and spots using DK yarn and a small hook. Clear round-by-round instructions and assembly notes guide you through every step so you can finish a lovable 9cm tall toy. Perfect for gifting or brightening your handmade collection.

Intermediate 5-7 Hours

Materials Needed for Dragonfruiteratops Amigurumi Pattern

β€” Main Fabric

  • 01
    Stylecraft Special DK - Bright Pink (DK weight) - small amount for body (change to pink at round 11)
  • 02
    Stylecraft Special DK - Grass Green (DK weight) - small amount for ruff, horns and spots
  • 03
    Stylecraft Special DK - White (DK weight) - small amount for legs and lower body section

β€” Tools Required

  • 01
    2.5 mm Crochet Hook
  • 02
    Two 6mm safety eyes
  • 03
    Stitch markers
  • 04
    Black embroidery floss
  • 05
    Yarn needle
  • 06
    Fibrefill

Progress Tracker

0% Complete

β€” Techniques used in this pattern :

Infos :

How to close amigurumi invisibly. 1. Insert needle in the FLO of each stitch around 2. Pull tight to close 3. Insert needle through centre exiting a few rounds down 4. Weave in the end and admire your work!

Infos :

How to change yarn colour. 1. Insert hook in final st before the colour change, yarn over and pull through as normal, yarn over in new colour 2. Pull through the new colour to complete stitch 3. Continue in new colour 4. Once a few stitches have been made and new yarn is secure you can tie the ends together.

Infos :

How to decrease invisibly. 1. Insert hook into FLO of first stitch 2. Insert hook into FLO of next stitch 3. Yarn over and pull through two loops 4. Yarn over and pull through two loops again. Invisible decrease complete!

β€” Legs (make four) :

Round 1 :

6sc in MR (6)

Round 2 :

inc each st around (12)

Round 3 :

in BLO sc each st around (12)

Round 4 :

sc each st around (12)

Info :

Cut yarn and weave in ends (photo 1).

β€” Body :

Round 1 :

ch9, sc in second ch from hook, 6sc, 3sc in next st, working down the other side of the ch, 6sc, inc (18)

Round 2 :

inc, 6sc, 3inc, 6sc, 2inc (24)

Round 3 :

sc, inc, 6sc, *sc, inc* rep 3 times, 6sc, *sc, inc* rep 2 times (30)

Round 4 :

With the body still on your hook Insert hook through any st in leg 1 and through the next st of rnd 3 complete sc, complete a further 2sc in this way, 6sc, 3sc through leg 2 and rnd 3, 3sc, 3sc through leg 3 and rnd 3, 6sc, 3sc through leg 4 and rnd 3, 3sc (30)

Info :

All four legs should now be attached to the body (photo 4).

Round 5 :

9sc around the remaining sts of leg 1, 6sc, 9sc round leg 2, 3sc, 9sc round leg 3, 6sc, 9sc round leg 4, 3sc (54)

Round 6 :

*8sc, inc* rep 6 times (60)

Round 7 :

*8sc, dec* rep 6 times (54)

Rounds 8 - 10 :

sc each st around (54) (3 rds)

Info :

Change to Bright Pink.

Rounds 11 - 17 :

sc each st around (54) (7 rds)

Round 18 :

*7sc, dec* rep 6 times (48)

Round 19 :

*6sc, dec* rep 6 times (42)

Round 20 :

*5sc, dec* rep 6 times (36)

Info :

Start to add stuffing, ensuring each leg is stuffed firmly. Continue stuffing as we go.

Round 21 :

*4sc, dec* rep 6 times (30)

Round 22 :

*3sc, dec* rep 6 times (24)

Round 23 :

*2sc, dec* rep 6 times (18)

Round 24 :

*1sc, dec* rep 6 times (12)

Round 25 :

dec 6 times (6)

Info :

Cut yarn leaving a long tail. Close invisibly and weave in any ends.

β€” Head :

Round 1 :

6sc in MR (6)

Round 2 :

inc each st around (12)

Round 3 :

*3sc in next st, sc, 3sc in next st, 3sc* rep 2 times (20)

Rounds 4 - 6 :

sc each st around (20) (3 Rnds)

Round 7 :

*4sc, inc* rep 4 times (24)

Rounds 8 - 10 :

sc each st around (24) (3 rds)

Info :

Finish the final rnd with a slst to join. Cut yarn leaving a long tail. Insert safety eyes either side of the head between rnds 6 - 7 and add stuffing.

β€” Tail :

Round 1 :

6sc in MR (6)

Round 2 :

*sc, inc* rep 3 times (9)

Round 3 :

sc each st around (9)

Round 4 :

*2sc, inc* rep 3 times (12)

Round 5 :

sc each st around (12)

Round 6 :

5sc, 2inc, 5sc (14)

Round 7 :

sc each st around (14)

Round 8 :

6sc, 2inc, 6sc (16)

Round 9 :

sc each st around (16)

Info :

Finish the final rnd with a slst to join. Cut yarn leaving a long tail and add stuffing. Head and tail shown in (photo 6).

β€” Ruff :

Row 1 :

Ch 19, sc in 2nd ch from hook, 17sc, ch1 turn (18)

Row 2 :

sc, *inc, 2sc* rep 5 times, inc, sc, ch1 turn (24)

Row 3 :

sc each st in the row, ch1 turn (24)

Row 4 :

sc, *inc, 3sc* rep 5 times, inc, 2sc (30)

Info :

Fasten off and cut yarn. Using Grass Green, turn work and join yarn to last sc worked in row 4.

Row 5 :

sc each st in row, ch1 turn (30)

Row 6 :

3sc, *picot, 4sc* rep 6 times, picot, 3sc (30sc, 7 picots)

Info :

Cut yarn and weave in all ends except for the beginning long tail. Ruff shown in (photo 7).

β€” Horns (make 3) :

Row 1 :

ch3, sc in 2nd ch from hook, hdc. Cut yarn leaving a long tail. Horns shown in (photo 8).

β€” Spots (make 6) :

Round 1 :

6sc in MR close with a slst (6). Cut yarn leaving a long tail. Spots shown in (photo 9).

β€” Assembly :

Info :

We will use the long tails to attach everything to the body. Using the black embroidery floss, stitch seeds on the white section of the body (photo 10). Attach the head to the front of the body over rnds 9 - 15 (photo 11). Attach the tail to the back over rnds 11 - 16 (photo 11). Stitch the ruff around the head at the point where the head meets the body. This should start and end at round 11 on either side of the head (photo 12). Sew one horn at the front of the head between rnds 3-4, the other two should be sewn between rnds 7-8 roughly three sts apart (photo 12). Finally sew three spots onto the body either side of the tail (photo 13).

Assembly Instructions

  • Using black embroidery floss, stitch seeds on the white section of the body as shown in photo 10, spacing seeds randomly to mimic dragonfruit seeds.
  • Attach the head to the front of the body aligning rounds 9-15 of the body to the base of the head and sew securely using the long tail from the head (photo 11).
  • Attach the tail to the back of the body aligning to rounds 11-16 and sew firmly so the tail is secure and positioned straight from the body (photo 11).
  • Stitch the ruff around the head where the head meets the body, starting and ending at round 11 on either side of the head to create an even circular ruff (photo 12).
  • Sew one horn at the front of the head between rounds 3-4 and place the other two between rounds 7-8, roughly three stitches apart for symmetry (photo 12).
  • Sew three green spots onto the body either side of the tail using the long tails left on the spots, spacing them as shown in photo 13.

Important Notes

  • πŸ’‘Use stitch markers to keep track of your rounds, especially when joining legs to the body and during colour changes.
  • πŸ’‘Stuff each leg and body section gradually for even shaping and to avoid lumps or misshapen parts.
  • πŸ’‘Weave in ends as you go where possible and leave long tails on small parts for sewing during assembly.

This Dragonfruiteratops is a playful amigurumi toy combining bright colours and charming details to delight crafters and giftees alike. The pattern includes step-by-step rounds and assembly notes so you can create a neat, professional finish. Happy crocheting and enjoy bringing this tiny fruity dinosaur to life! 🧢🧡

You ask,

we answer.

FAQs

What size will the finished piece be?

If made using the suggested yarn and hook size, the finished product is approximately 9cm tall.

Can I use different yarn weights for this pattern?

Yes, you can use different yarn weights but this will affect the final size; choose an appropriate hook for your yarn and adjust stuffing accordingly.

Do I need prior crochet experience for this pattern?

This pattern is rated intermediate and assumes familiarity with single crochet, increases, decreases, and basic amigurumi finishing techniques.

How long does this project typically take to complete?

Most crocheters complete this project in around 5-7 hours depending on experience, assembly time and how familiar you are with small amigurumi parts.