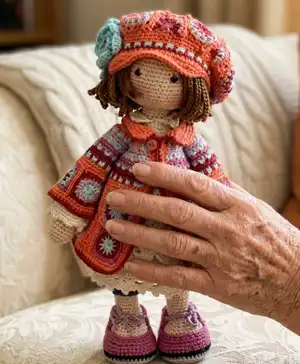
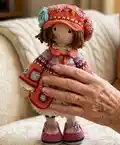
Create a charming boho-style Doll Zoey with this detailed intermediate crochet pattern. You will craft a layered dress, granny-square coat, wig, shoes and accessories for a fully dressed amigurumi doll. The pattern uses sport-weight cotton yarn and clear step-by-step instructions so you can enjoy a satisfying multi-piece project. Perfect for crafters who love stitching quirky handmade friends with personality.
Progress Tracker
0% Complete
— Head :
Round 1 :
Magic ring: 1 ch (does not count as st), 6 sc in magic ring (6 sts)
Round 3 :
*1 sc, 1 inc* crochet 6 times (18 sts)
Round 4 :
*1 sc, 1 inc, 1 sc* crochet 6 times (24 sts)
Round 5 :
*3 sc, 1 inc* crochet 6 times (30 sts)
Round 6 :
*2 sc, 1 inc, 2 sc* crochet 6 times (36 sts)
Round 7 :
*1 inc, 5 sc* crochet 6 times (42 sts)
Round 8 :
*5 sc, 1 inc, 1 sc* crochet 6 times (48 sts)
Round 9 :
*3 sc, 1 inc, 4 sc* crochet 6 times (54 sts)
Round 10-19 :
54 sc (10 rds) (54 sts)
Round 20 :
*3 sc, 1 inv-sc2tog, 4 sc* crochet 6 times (48 sts)
Round 21 :
*5 sc, 1 inv-sc2tog, 1 sc* crochet 6 times (42 sts)
Round 22 :
*1 inv-sc2tog, 5 sc* crochet 6 times (36 sts)
Round 23 :
*2 sc, 1 inv-sc2tog, 2 sc* crochet 6 times (30 sts)
Round 24 :
*3 sc, 1 inv-sc2tog* crochet 6 times (24 sts)
Infos :
Safety eyes: Set the eyes in place first. Make sure the working yarn of the head is at the back. Put the eyes between round 12 and 13, 8 stitches apart. Poke the eye shafts through to the inside of the head and fasten with the washers that came with them.
Round 25 :
*1 sc, 1 inv-sc2tog, 1 sc* crochet 6 time (18 sts)
Round 26 :
*7 sc, 1 inv-sc2tog* crochet twice (16 sts)
Info :
1 slst in next st, fasten off, leaving a 20"/50 cm tail, sk 1 st, 1 NJ in next st. Stuff the remaining head with fiberfill. Do not weave in end, use it for later to sew the head onto the body. Your head should have approximately the following dimensions: see photo 8.
— Body :
Round 1 :
Magic ring: 1 ch (does not count as st), 8 sc in magic ring (8 sts)
Round 3-10 :
16 sc (8 rds) (16 sts)
Info :
1 slst in next st, FO, sk 1 st, 1 NJ in next st. The slst marks the center back of the body. Switch to yarn color B and work an uncounted round of slst as follows: Insert hook in the NJ, yo, pull through lp, 1 slst in next st and all remaining sts. Work the last slst in the same st where the yarn was attached.
Round 11 :
(Work in the sts of rd 10), (see photo 9) *3 sc, 1 inc* crochet 4 times (20 sts) - mark the beginning of the round with a stitch marker (20 sts)
Round 13 :
1 sc, 1 inc, *4 sc, 1 inc* crochet 3 times, 3 sc (24 sts)
Round 15 :
*3 sc, 1 inc* crochet 6 times (30 sts)
Round 17 :
1 sc, 1 inc, *4 sc, 1 inc* crochet 5 times, 3 sc (36 sts)
Round 19 :
*1 inc, 5 sc* crochet 6 times (42 sts)
Round 21 :
5 sc, *1 inc, 6 sc* crochet 5 times, 1 inc, 1 sc (48 sts)
Round 22-23 :
48 sc (2 rds) (48 sts)
Round 24 :
(work BLO in the sts of rd 23) 1 s-sc, 47 sc (48 sts)
Round 25-26 :
48 sc (2 rds) (48 sts)
Infos :
Now work the first layer of the dress. Continue working in spiral rounds. See also crochet chart 1 on page 35. The chains are included in the stitch count at the end of each rd.
Layer I, Rd 1 :
(work all sts FLO) *1 sc, 1 ch, sk 2 sts, [1 inc, 1 ch, 1 inc], 1 ch, sk 2 sts* crochet 8 times (64 sts)
Layer I, Rd 2 :
*1 sc in next sc, 1 ch, [1 inc, 2 ch, 1 inc] in next ch1-sp, 1 ch* crochet 8 times (72 sts)
Layer I, Rd 3-4 :
*1 sc in next sc, 1 ch, [3 sc, 2 ch, 3 sc] in next ch2-sp, 1 ch* crochet 8 times (88 sts)
Layer I, Rd 5 :
*1 sc in next sc, 2 ch, [3 sc, 2 ch, 3 sc] in next ch2-sp, 2 ch* crochet 8 times (104 sts)
Infos :
Continue to work subsequent layers of the dress following the pattern charts and the layer instructions. Work Layer II, Layer III and so on as indicated in the pattern, changing to BLO or FLO where specified and finishing rounds with NJ when instructed.
— Arms / Sleeve :
Info :
ARM/SLEEVE (MAKE 2): The arm is worked in spiral rounds. Use the hook US 1½ or 2.5 mm and the yarn colors A and B. Stuff the arm as you go. Start with yarn color A.
Round 1 :
Magic ring: 1 ch (does not count as st), 6 sc in magic ring (6 sts)
Round 3 :
*1 sc, 1 inc* crochet 6 times (18 sts)
Round 4-6 :
18 sc (3 rds) (18 sts)
Round 7 :
16 sc, 1 inv-sc2tog (17 sts)
Round 8 :
7 sc, 1 inv-sc2tog, 7 sc, 1 CL-6 (16 sts)
Round 9 :
14 sc, 1 inv-sc2tog (15 sts)
Round 10 :
1 inv-sc2tog, 13 sc (14 sts)
Round 11 :
6 sc, 1 inv-sc2tog, 6 sc (13 sts)
Round 12 :
11 sc, 1 inv-sc2tog (12 sts)
Round 13 :
4 sc, 1 inv-sc2tog, 6 sc (11 sts)
Round 14 :
9 sc, 1 inv-sc2tog (10 sts)
Round 15-17 :
10 sc (3 rds) (10 sts)
Round 18 :
10 sc, 1 slst in next st, FO, sk 1 st, 1 NJ in next st (10 sts)
Info :
Switch to yarn color B to work the sleeve. Before starting the sleeve cut a length of 10 m (11 yds) of the yarn color B and keep to one side ready to work the cuff of the sleeve (or use the other yarn tail of the ball). Attach the yarn in any st of rd 18 that is at the back of the arm (opposite of the thumb).
Cuff, Rd 1 :
(work FLO in the sts of rd 19) *1 sc (the 1st sc of the rd will be a s-sc), 1 inc* crochet 5 times (15 sts)
Cuff, Rd 2-3 :
15 sc (15 sts)
Cuff, Rd 4 :
*2 sc, 1 inc* crochet 5 times (20 sts)
Cuff, Rd 5-6 :
20 sc (20 sts)
Cuff, Rd 7 :
*4 sc, 1 inc* crochet 4 times (24 sts)
Cuff, Rd 8-9 :
24 sc (24 sts)
Cuff, Rd 10 :
*5 sc, 1 inc* crochet 4 times (28 sts)
Cuff, Rd 11 :
28 sc (28 sts)
Cuff, Rd 12 :
(work all sts BLO), *4 slst, 3 ch* crochet 7 times (28 sts)
Cuff, Rd 13 :
(work FLO in the sts of rd 11) 28 slst (28 sts)
Info :
FO, 1 NJ in next st. Replace loop of yarn color B on the hook and finish the arm/sleeve. Rd 26-34 10 sc (9 rds) (10 sts). Rd 35 *3 sc, 1 inv-sc2tog* crochet twice (8 sts). Rd 36 *1 sc, 1 inv-sc2tog, 1 sc* crochet twice (6 sts). Stuff the remaining sleeve and cut yarn leaving a 12"/30 cm tail. Close the hole as described on page 6.
— Leg :
Round 1 :
(work all sc in BB of the chains) 6 ch, 1 sc in 2nd ch from hook, 3 sc, [3 sc], bottom side of chain: 3 sc, 1 inc (12 sts)
Round 2 :
1 inc, 3 sc, 3 inc, 3 sc, 2 inc (18 sts)
Round 3 :
1 sc, 1 inc, 4 sc, *1 inc, 1 sc* crochet 3 times, 3 sc, 1 inc, 1 sc, 1 inc (24 sts)
Round 4 :
1 sc, 1 inc, 6 sc, 1 inc, 1 sc, 2 inc, 1 sc, 1 inc, 6 sc, 1 inc, 1 sc, 2 inc (32 sts)
Round 5 :
1 sc, 1 inc, 4 sc, 1 inc, 3 sc, *1 inc, 1 sc* crochet twice, *1 sc, 1 inc* crochet twice, 4 sc, 1 inc, 1 sc, 1 inc (42 sts)
Round 6-10 :
42 sc (5 rds) (42 sts)
Round 11 :
12 sc, *1 inv-sc2tog, 2 sc* crochet 3 times, 1 inv-sc2tog, 16 sc (38 sts)
Round 12 :
8 sc, *1 inv-sc2tog, 1 sc* crochet 3 times, *1 sc, 1 inv-sc2tog* crochet 3 times, 12 sc (32 sts)
Round 13 :
7 sc, 7 inv-sc2tog, 11 sc (25 sts)
Round 14 :
8 sc, 2 hdc, 1 hdc2tog, 1 hdc, 12 sc (24 sts)
Round 15 :
*4 sc, 1 sc2tog* crochet 4 times (20 sts)
Round 16-17 :
20 sc (2 rds) (20 sts)
Round 18 :
*3 sc, 1 inv-sc2tog* crochet 4 times (16 sts)
Round 19-21 :
16 sc (3 rds) (16 sts)
Round 22 :
16 sc, 1 slst in next st, FO, sk 1 st, 1 NJ in next st (16 sts)
Info :
Put the cardboard or plastic inside the foot (sole) before finishing the sole rounds. Now work the leggings and turn-up as indicated in the pattern. Fasten on the new yarn in the NJ of previous round and work the turn-up. Replace loop of yarn color C on the hook and finish the leggings. Cut yarn leaving a 12"/30 cm tail. Stuff the remaining leg with fiberfill. Close the hole as described on page 6.
— Shoes :
Info :
SHOES (MAKE 2): Work the shoe in spiral rounds, in turned (joined) rounds and in rows. Starting at sole, with hook US 4 (3.5 mm) and the yarn color E. Start working in spiral rounds.
Round 1-5 :
repeat rd 1-5 of the leg (see page 16) (42 sts)
Round 6 :
42 sc, 1 slst in next st (42 sts)
Round 7 :
1 ch (does not count as st), 42 bpsc (for the 1st bpsc insert hook from back to front in same st where slst of previous rd was made), FO, sk 1 st, 1 NJ in next st (42 sts)
Round 8 :
1 ch (count as st), 41 sc, FO, 1 NJ in 1st sc (the NJ and underlying ch count together as a sc) (42 sts)
Round 9 (RS) :
1 ch (count as st), 41 sc, 1 slst in 1st sc (the slst and the underlying ch count together as a sc), 1 ch, turn work (42 sts)
Round 10-12 :
42 sc, 1 slst in 1st sc, 1 ch, turn work (42 sts)
Row 1 (RS) :
13 sc, 1 ch, turn work (13 sts)
Row 2 :
6 sc, 1 inv-sc2tog, 5 sc, 1 ch, turn work (12 sts)
Row 3-4 :
12 sc, 1 ch, turn work (12 sts)
Row 5 :
1 inc, 1 sc, 1 inv-sc2tog, 4 sc, 1 inv-sc2tog, 1 sc, 1 inc, 1 ch, turn work (12 sts)
Row 6 :
12 sc, 1 ch, turn work (12 sts)
Final Rd 1 (RS) :
11 sc, 1 inc, 1 sc each sidewise in the edge sts of row 5-1 (= 5 sc), 8 sc, 3 inv-sc2tog, 1 sc, 3 inv-sc2tog, 8 sc, 1 sc each sidewise in the edge sts of row 1-4 (= 4 sc), 1 inc sidewise in the edge sts of row 5 (47 sts)
Final Rd 2 :
12 slst, sk 2 sts, [3 dc, 1 ch, 3 dc], sk 2 sts, 23 slst, sk 2 sts, [3 dc, 1 ch, 3 dc], sk 2 sts, FO, 1 NJ in next st (49 sts incl. slst and ch)
Info :
Weave in all loose ends. Use the hook US 1½ or 2.5 mm and the yarn color L. Work approx. 75 chains and thread the shoelace. Tie the ends and make a loop. Photo shows the finished shoes.
— Coat, Granny Squares, Trim & Assembly :
Info :
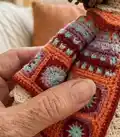
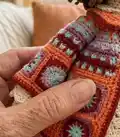
The coat consists of the body part and the two sleeves. For the coat you have to work 20 granny squares - three for each sleeve and 14 for the body part. You need also 6 triangles for the body part of the coat. After finishing the granny squares and the triangles you have to join them and work additional rows to complete the coat. For all parts of the coat use the hook US 1½ (2.5 mm).
Doll Zoey brings boho charm and handmade personality to your collection with layered lace skirts, a granny-square coat, tiny shoes, and a sweet wig. The pattern is rich in color-play and finishing options so each doll becomes a unique little treasure. Make one for yourself or craft a whole wardrobe of outfits to mix and match. 🧶✨🎀