🧢 Beautiful ✨ Detailed πŸ’ Adorable

Delilah Boho Bag Pattern

Delilah Boho Bag Pattern
4.0β˜… Rating
5-7 Hours Time Needed
1.6K Made This
βœ‚οΈ

Intermediate Level

Ideal for those with basic crochet experience, featuring slightly more advanced stitches and techniques to expand your skills.

⏱️

Weekend Treat

Takes 5-7 hours, making it an enjoyable project to finish over a couple of days.

✨

Stylish Touch

An elegant detail to elevate any look, combining traditional techniques with contemporary design sensibilities.

About This Delilah Boho Bag Pattern

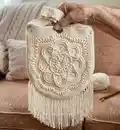
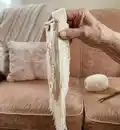
This pattern creates the Delilah Boho Bag β€” a decorative boho-style shoulder bag built around a large floral mandala front panel. It uses layered petal rounds and textured stitches to achieve a sculpted look and finished with a long strap and fringe. The pattern is photo-forward and ideal for crocheters who like visual guidance alongside round-by-round instructions.

Delilah Boho Bag Pattern crochet pattern - detailed view of completed project

The pattern includes photo references for every round and clear finishing sections for joining, top edging, and strap construction. Perfect for gifting or everyday use, this bag pairs well with cotton or cotton-blend yarns for structure and durability.

Why You'll Love This Delilah Boho Bag Pattern

I absolutely love this pattern because it turns simple stitches into a gorgeous sculpted mandala that becomes the focal point of the bag. I enjoy how the layered petal rounds create depth and texture without overly complex techniques. The step-by-step photo references made as part of this pattern help me see exactly where each stitch sits, which I find invaluable when shaping motifs. Making the strap and finishing the top edge feels satisfying and brings the whole boho aesthetic together in a practical, wearable piece.

Delilah Boho Bag Pattern step 1 - construction progress Delilah Boho Bag Pattern step 2 - assembly progress Delilah Boho Bag Pattern step 3 - details and accessories Delilah Boho Bag Pattern step 4 - final assembly and finishing

Switch Things Up

I love how easy it is to customize this pattern with color choices; try a two-tone mandala with a contrasting border for a bold look.

For a softer bag, I sometimes switch to a cotton-blend DK yarn and a smaller hook to create a more drapey finish.

If you prefer a sturdier bag, I recommend using 100% cotton or a thicker aran weight yarn and a slightly larger hook for structure.

Swap the fringe for tassels or remove fringe entirely for a cleaner, minimalist look.

I often add a fabric lining to the inside for extra durability and to prevent small items from poking through the stitches.

Try different strap styles: a shorter hand strap, a longer crossbody strap, or even a woven leather strap attached to the finished bag.

Personalize with a wooden button closure, metal toggle, or magnetic snap at the top edge for secure closure.

Use variegated or ombre yarn for the mandala rounds to create a color-changing focal point with no extra sewing required.

I like to experiment with stitch height in the outer roundsβ€”switching some dc rows to hdc creates a subtle texture variation that looks lovely.

For a festival-ready bag, I sometimes incorporate beads into the fringe or along the top edging for extra sparkle.

Common Mistakes & How to Fix Them

βœ— Skipping the photo reference for each round can lead to misaligned petals and uneven shaping; follow the photo for stitch placement and shaping in each round. βœ— Not counting your stitches after increases causes the motif to drift out of round; stop to count at the end of every round to confirm stitch counts. βœ— Working with inconsistent tension will distort the mandala and edges; maintain steady, even tension and use the same hook size throughout. βœ— Joining rounds loosely or too tightly changes the motif shape and size; join using a neat slip stitch and keep tension consistent to preserve shape. βœ— Ignoring the note about 'no ch3 space' areas in Round 17 will create extra gaps; follow the photo and avoid creating a chain-3 space where indicated.

Delilah Boho Bag Pattern

Make a statement with the Delilah Boho Bag β€” a beautifully textured crochet shoulder bag featuring a large floral mandala panel and boho fringe. This pattern includes step-by-step photo references for each round and clear finishing instructions so you can create a durable, stylish everyday bag. You'll learn motif shaping, layered petals, and a comfortable strap construction to suit daily use.

Intermediate 5-7 Hours

Materials Needed for Delilah Boho Bag Pattern

β€” Main Fabric

  • 01
    Medium/Aran or Worsted weight cotton or cotton-blend yarn, approx 300-450g (main color) depending on chosen size and tension
  • 02
    Small amount of matching yarn for strap and edging (included in main quantity)
  • 03
    Optional fringe yarn: additional 50-100g matching or contrasting yarn

β€” Tools Required

  • 01
    Crochet hook 5.0mm (or size required to obtain gauge)
  • 02
    Alternative hook 4.5mm for tighter sections (optional)
  • 03
    Yarn needle for weaving in ends and joining sections
  • 04
    Scissors
  • 05
    Stitch markers
  • 06
    Measuring tape
  • 07
    Large blunt darning needle for fringe

Progress Tracker

0% Complete

β€” Photo Notes :

Infos :

These photos are to be used in conjunction with the written pattern.

β€” Mandala Panel (Front) :

Round 1 :

Photo reference - see Round 1 photo for foundation ring and initial stitches.

Round 2 :

Photo reference - see Round 2 photo for stitch placement and spacing around the ring.

Round 3 :

Photo reference - see Round 3 photo showing the first textured clusters forming petals.

Round 4 :

Photo reference - see Round 4 photo where petal shapes begin to enlarge and join.

Round 5 :

Photo reference - see Round 5 photo demonstrating petal shaping and spacing.

Round 6 :

Photo reference - see Round 6 photo for transition stitches and preparation for scallops.

Round 7 :

Photo reference - see Round 7 photo for the raised ridge and stitch placement at petal bases.

Round 8 :

Photo reference - see Round 8 photo for building up the scallop edges; observe stitch heights and spacing.

Round 9 :

Photo reference - see Round 9 photo showing petal domes and joining points.

Round 10 :

Photo reference - see Round 10 photo where petals are rounded and stitches evened out.

Round 11 :

Photo reference - see Round 11 photo showing the back of the petal domes and how they attach to base rounds.

Round 12 :

Photo reference - see Round 12 photo for the shaping that creates petal separation and arches.

Round 13 :

Photo reference - see Round 13 photo for the arch definition and beginning of outer texture rows.

Round 14 :

Photo reference - see Round 14 photo showing raised arches and openwork beginning.

Round 15 :

Photo reference - see Round 15 photo where the arches are refined and spacing adjusted.

Round 16 :

Photo reference - see Round 16 photo showing the open chain spaces that start the airy border.

Round 17 :

Photo reference - see Round 17 photo; note arrows indicating 'No ch3 space' at specific locations to avoid extra gaps.

Round 18a :

Photo reference - see Round 18a photo showing addition of raised bobble sections and border detail.

Round 18b :

Photo reference - see Round 18b photo showing repeated segments across the edge (image shows 'x5' repeated groups).

Round 18c :

Photo reference - see Round 18c photo for continuation of bobble clusters and joining rows.

Round 18d :

Photo reference - see Round 18d photo demonstrating alignment of bobbles and edge stitches.

Round 18e :

Photo reference - see Round 18e photo showing the completed bobble row and transition to finishing rounds.

Round 19 :

Photo reference - see Round 19 photo where the motif begins to read as a full panel and gaps are smoothed.

Round 20 :

Photo reference - see Round 20 photo showing the panel with even outer borders and prepared shape for folding.

Round 21 :

Photo reference - see Round 21 photo where the final exterior shaping and border rows complete the mandala panel.

β€” Joining & Edging :

Joining row :

Photo reference - see Joining row photo for how the panel is squared and prepared for top folding and seam joining.

Top edge - Round 1 :

Photo reference - see Top edge Round 1 photo for the first round of single/double crochet along the folded top edge and placement of the loopy strap opening.

Top edge - Round 2 :

Photo reference - see Top edge Round 2 photo showing the second decorative row smoothing the top edge.

Top edge - Round 3 :

Photo reference - see Top edge Round 3 photo showing the final top edge round and finishing of the strap loop base.

β€” Strap :

Strap - Row 1 :

Photo reference - see Strap Row 1 photo showing the foundation row for the strap worked in rows.

Strap - Row 2-61 :

Photo reference - see Strap Row 2-61 photo sequence indicating the strap is worked lengthwise for a total of 61 rows (photo shows texture and stitch repeat).

Strap - Joining :

Photo reference - see Strap Joining photo for how the strap is folded and joined into the top edge, matching the strap end to the bag body.

Assembly Instructions

  • Fold the completed mandala panel at the top edge according to the Joining row photo, matching sides evenly and pinning in place before joining.
  • Join the folded top edges together using the joining row technique shown in the photo, working neat single or half double crochet stitches to create a reinforced top seam.
  • Attach the strap by aligning the strap ends to the top edge on the inside, then sew or crochet them securely in place as shown in the Strap - Joining photo, ensuring even spacing and reinforcement.
  • Work the Top edge rounds around the joined top to create a clean finish; add the loopy strap opening at the center front as pictured, then secure with a few extra stitches.
  • If adding fringe, attach fringe evenly spaced along the lower curved edge using a lark's head knot; trim to even length and block or steam lightly to finish the fringe.

Important Notes

  • πŸ’‘Use the photo references for each round to check stitch placement and shapingβ€”the photos show exact locations where stitches should sit.
  • πŸ’‘Maintain consistent tension throughout so the mandala panel lays flat and the bag shape remains symmetrical.
  • πŸ’‘Pin and check placement of the strap before joining; the strap should be firmly secured with multiple passes of sewing or crochet stitches for durability.
  • πŸ’‘When working bobbles and raised clusters, keep stitch tension consistent so clusters sit uniformly around the panel.

This Delilah Boho Bag pattern celebrates texture, shape, and handmade charm in every stitch. The floral mandala panel paired with a sturdy strap and fringe makes a perfect everyday bag or special handmade gift. Gather your favorite cotton yarn and start a weekend project that becomes a wearable piece of art. 🧢✨

You ask,

we answer.

FAQs

What size will the finished piece be?

The finished bag measures approximately 30-35 cm across the panel (flat) and the strap length can be adjusted to preference; exact size depends on yarn weight and tension.

Can I use different yarn weights for this pattern?

Yes, you can use different yarn weights, but this will affect the final size and drape. Use a hook appropriate for the chosen yarn and adjust strap rows to achieve the desired handle length.

Do I need prior crochet experience for this pattern?

This pattern is rated intermediate, so basic knowledge of crochet stitches and techniques is recommended for best results.

How long does this project typically take to complete?

Most crocheters complete this project in 5-7 hours, though time may vary based on experience level, yarn choice, and finishing details like fringe.

How is the strap attached?

The strap is worked separately in rows and then joined to the top edge of the bag using the joining photo reference; secure with sewing or crochet stitches to ensure strength.