๐Ÿงถ Beautiful โœจ Detailed ๐Ÿ’ Adorable

Cupid Whale Amigurumi Pattern

Cupid Whale Amigurumi Pattern
4.7โ˜… Rating
5-7 Hours Time Needed
3.3K Made This
โœ‚๏ธ

Intermediate Level

Ideal for those with basic crochet experience, featuring slightly more advanced stitches and techniques to expand your skills.

โฑ๏ธ

Weekend Treat

Takes 5-7 hours, making it an enjoyable project to finish over a couple of days.

๐Ÿงธ

Cute Companion

An adorable friend to cherish, handcrafted with love to bring comfort and joy for years to come.

About This Cupid Whale Amigurumi Pattern

This pattern creates a small, heart-topped whale amigurumi complete with a water fountain and rosy cheeks. You will work in continuous rounds, change colors for the belly and fountain details, and sew small appliques for the finishing touches. The instructions include exact round-by-round counts and tips for assembly so your whale turns out neat and sturdy.

Cupid Whale Amigurumi Pattern crochet pattern - detailed view of completed project

The design includes separate pieces for tail fins, flippers, cheeks and a tiny heart that sits above the fountain. Clear photos in the original pattern show placement and finishing โ€” perfect for makers who like visual guidance.

Why You'll Love This Cupid Whale Amigurumi Pattern

I absolutely love this pattern because it blends simple amigurumi shaping with a playful assembly โ€” that tiny heart fountain is such a sweet detail. I enjoy how the color changes create a friendly belly and the separate little pieces let you personalise the whale easily. The pattern teaches you to divide body and tail rounds smoothly, which is a great technique to learn. Working the fountain and heart is so satisfying; they transform a round toy into a story-filled character. I hope you find the same joy in making this cuddly whale that I had designing it.

Cupid Whale Amigurumi Pattern step 1 - construction progress Cupid Whale Amigurumi Pattern step 2 - assembly progress Cupid Whale Amigurumi Pattern step 3 - details and accessories Cupid Whale Amigurumi Pattern step 4 - final assembly and finishing

Switch Things Up

I love how easy it is to customize the Cupid Whale by changing colors โ€” try pastel shades for a softer baby-safe toy or bright contrasting colors for a playful look.

You can scale the pattern by swapping yarn weight and hook size: use a thicker yarn and larger hook for a chunky whale, or a finer yarn for a petite keychain version.

Swap the heart for a star or shell to match different themes โ€” small appliques are simple to crochet and sew on for a big style change.

Try embroidered facial expressions: move the eye placement slightly or add a smile or wink to change the personality of your whale before attaching features permanently.

If you want posable fins, insert a thin plastic-coated wire inside the flippers before stuffing; this creates bendable details that still stay soft.

Mix yarn textures for contrast โ€” use a cotton yarn for the belly and a soft acrylic for the body to add tactile interest.

Make a matching family by varying sizes and colors: crochet several whales in a range of sizes using the same stitch counts but different yarns for a cohesive set.

Add tiny accessories like a mini scarf, bow, or embroidered bubbles around the fountain to create a story scene for display or photography.

I often change the eye size to adjust the expression โ€” 4mm eyes give a delicate look while 6mm gives a cuter, more toy-like appearance.

For gifts, stuff the whale slightly less and include a small sachet inside so it doubles as a scented keepsake; just be sure to secure the opening well.

Common Mistakes & How to Fix Them

โœ— Skipping stitch markers when working continuous rounds causes you to lose track of the beginning of the round; place a marker at the first stitch of each round and move it as you go. โœ— Not counting stitches after increases or decreases leads to mistaken shaping and uneven sections; count after every increase/decrease round to ensure the correct stitch total. โœ— Overstuffing bulky parts like the belly causes distortion and flat spots; stuff gradually and evenly, adding small amounts to reach a smooth shape. โœ— Forgetting to change color neatly when instructed will leave loose ends and messy joins; change color by completing the last yarn-over with the new color and weave ends in as you go. โœ— Sewing fins and decorative pieces without pinning first can result in uneven placement; pin pieces in place and check symmetry before stitching them permanently.

Cupid Whale Amigurumi Pattern

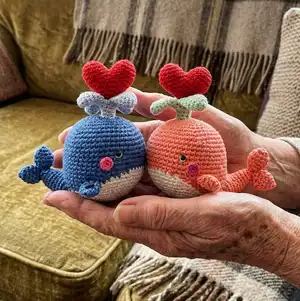
Make a lovable Cupid Whale with cute details like a heart-topped water fountain, rosy cheeks and a chubby body. This pattern guides you through body shaping, tail and fin construction, and simple assembly so you can create a charming handmade toy. Perfect for gifting or decorating a nurseryโ€”follow step-by-step rounds and helpful photos to bring your whale to life.

Intermediate 5-7 Hours

Materials Needed for Cupid Whale Amigurumi Pattern

โ€” Main Fabric

  • 01
    Color A: white YarnArt Jeans 01 (50g, 160m)
  • 02
    Color B: blue YarnArt Jeans 17 (50g, 160m)
  • 03
    Color C: baby blue YarnArt Jeans 75 (50g, 160m)
  • 04
    Color D: red YarnArt Jeans 90 (50g, 160m)
  • 05
    Color E: fuchsia YarnArt Jeans 59 (50g, 160m)

โ€” Tools Required

  • 01
    Crochet hook size 2.5mm
  • 02
    1 pair of safety eyes size 5mm
  • 03
    Tapestry needles
  • 04
    Brown thread
  • 05
    Pins
  • 06
    Stitch markers
  • 07
    Scissors
  • 08
    Polyester fiberfill

Progress Tracker

0% Complete

โ€” Body :

Info :

We will change color if the letter color changes: (if you do not know how to change color, see Crochet Tips at the end of the pattern) Red letter: yarn A Black letter: yarn B

Round 1 :

sc 7 into a magic loop (7)

Round 2 :

inc 7 (14)

Round 3 :

[sc 1, inc] 7x (21)

Round 4 :

[sc 1, inc, sc 1] 7x (28)

Round 5 :

[sc 3, inc] 7x (35)

Round 6 :

[sc 2, inc, sc 2] 7x (42)

Round 7 :

[sc 5, inc] 7x, change to yarn B (49)

Round 8 :

sc 3, inc, sc 3, sc 3, inc, [sc 6, inc] 2x, sc 6, inc, [sc 6, inc] 2x, sc 3 (56)

Round 9 :

sc 7, inc, sc 1, sc 6, inc, [sc 7, inc] 2x, sc 1, sc 6, inc, [sc 7, inc] 2x (63)

Round 10 :

sc 4, inc, sc 6, sc 2, inc, [sc 8, inc] 2x, sc 4, sc 4, inc, [sc 8, inc] 2x, sc 4 (70)

Round 11 :

sc 13, sc 27, sc 30 (70)

Round 12 :

sc 14, sc 25, sc 31 (70)

Round 13 :

sc 15, sc 23, sc 16, we will divide the body & the tail from this rnd (pic 1), skip the next 16 sts, continue to crochet the next rnd (pic 2&3) (54)

Round 14 :

sc 16, sc 21, sc 17 (54)

Round 15 :

sc 18, sc 17, sc 19 (54)

Round 16 :

sc 20, sc 13, sc 21, break yarn A (54)

Round 17-24 :

sc 54 (8 rnds), insert eyes between rnd 20&21, 17 sts apart (pic 13&14) (54)

Round 25 :

[sc 7, dec] 6x (48)

Round 26 :

[sc 6, dec] 6x (42)

Round 27 :

[sc 5, dec] 6x (36)

Round 28 :

[sc 4, dec] 6x, stuff firmly (30)

Round 29 :

[sc 3, dec] 6x (24)

Round 30 :

[sc 2, dec] 6x (18)

Round 31 :

[sc 1, dec] 6x (12)

Round 32 :

(blo) sc 12 (12)

Round 33-37 :

sc 12 (5 rnds), do not stuff this part (12)

Round 38 :

dec 6 (6)

Info :

Break the yarn, weave in the last 6 sts (pic 4). Use the crochet hook to push the last 6 rnds inside the body (pic 5&6). Skip the next 2 sts from the last st on the whale's body (pic 7), join yarn B on, continue to crochet the tail.

โ€” Tail :

Round 1 :

sc 12, skip the next 2 sts, join with the 1st st of this rnd (pic 8&9) (12)

Round 2 :

[sc 4, dec] 2x (10)

Round 3 :

sc 10, stuff firmly (10)

Round 4 :

dec 5 (5)

Info :

Break the yarn, weave in the last 5 sts (pic 10).

โ€” Cheeks :

Round 1 :

sc 6 into a magic loop (6)

Info :

Break the yarn with a long rest to sew later.

โ€” Water Fountain :

Round 1 :

sc 6 into a magic loop (6)

Round 2 :

inc 6 (12)

Round 3-5 :

sc 12 (3 rnds) (12)

Round 6 :

[sc 4, dec] 2x (10)

Round 7 :

[sc 3, dec] 2x (8)

Info :

Break the yarn with a long rest to sew later. Make another 3 pieces the same way, but do not break the yarn on the 4th piece, continue to crochet the following rounds to join the 4 pieces into a fountain.

Round 8 :

sc 4 on the 4th piece, sc 4 on the 3rd piece, sc 4 on the 2nd piece, sc 4 on the 1st piece = 16 sts (pic 18-19-20-21), slst on the 1st st to make a ring (pic 22) (16)

Round 9 :

[sc 2, dec] 4x (12)

Round 10 :

[sc 4, dec] 2x (10)

Round 11 :

[sc 3, dec] 2x (8)

Round 12-17 :

sc 8 (6 rnds), stuff firmly (8)

Info :

Break the yarn, weave in the last 8 sts (pic 23). Join yarn C on the remaining sts of the upper part (pic 24), crochet: sc 16 (4 sts for each piece) (pic 25) (16). Round 2: dec 8, stuff firmly (8). Break the yarn, weave in the last 8 sts (pic 26). Use tapestry needle to create a dent in the middle of the fountain (pic 27&28). Use your finger to bend each piece (pic 29&30). Put the water fountain inside the hole (pic 31&32).

โ€” Tail Fins :

Round 1 :

sc 3 into a magic loop (3)

Round 2 :

inc 3 (6)

Round 3 :

[sc 1, inc] 3x (9)

Round 4 :

[sc 2, inc] 3x (12)

Round 5-6 :

sc 12 (2 rnds) (12)

Round 7 :

dec 6 (6)

Info :

Break the yarn, weave in the last 6 sts.

โ€” Flippers :

Round 1 :

sc 5 into a magic loop (5)

Round 2 :

inc 5 (10)

Round 3 :

sc, hdc, dc, [dc inc] 4x, dc, hdc, sc (14)

Info :

Break the yarn with a long rest to sew later. Sew the Fins on the tail & Flippers, Cheeks on both sides (pic 15&16).

โ€” Heart :

Round 1 :

sc 6 into a magic loop (6)

Round 2 :

inc 6 (12)

Round 3 :

[sc 1, inc] 6x (18)

Round 4-5 :

sc 18 (2 rnds) (18)

Info :

Break the yarn, make the 2nd piece the same way but do not break the yarn, join with the 1st piece (pic 31), and continue to crochet the following rounds.

Round 6 :

sc 18 (on the 1st piece), sc 18 (on the 2nd piece) (36)

Round 7 :

sc 36 (36)

Round 8 :

[sc 4, dec] 6x (30)

Round 9 :

[sc 3, dec] 6x (24)

Round 10 :

[sc 2, dec] 6x, stuff firmly (18)

Round 11 :

[sc 1, dec] 3x (12)

Round 12 :

dec 6 (6)

Info :

Break the yarn, weave in the last 6 sts (pic 34). Put the heart above the water fountain (pic 35), and we have finished the Cupid Whale!

Assembly Instructions

  • Use the tapestry needle to sew the remaining stitches on the body (pic 11&12) and weave in all ends securely.
  • Insert safety eyes between rounds 20 and 21, 17 stitches apart (pic 13&14) and embroider a small white line under each eye with white thread.
  • Sew the tail fins and flippers to the tail and sides, pinning them in place first to ensure symmetry (pic 15&16).
  • Assemble the water fountain pieces and place the fountain inside the hole created on top of the whale (pic 27-32), then sew the heart above the fountain (pic 34-35).
  • Position cheeks on both sides of the face and sew them with long tails left for a neat finish; secure all small parts firmly for durability.

Important Notes

  • ๐Ÿ’กUse stitch markers to mark the start of each round, especially where the pattern instructs divisions or joins, to maintain shape and stitch counts.
  • ๐Ÿ’กChange color neatly by completing the last yarn-over of the stitch with the new color and weave in ends as you work to avoid bulky joins.
  • ๐Ÿ’กStuff firmly but evenly; overstuffing can distort shaping while under-stuffing will make the toy floppy โ€” add stuffing in small amounts for best shape.

This charming Cupid Whale is a delightful amigurumi that brings a splash of love to any shelf or nursery. The playful heart fountain and rosy cheeks make it a perfect handmade gift full of personality. Follow the step-by-step rounds and assembly guidance to create your own tiny ocean friend. ๐Ÿงถ๐Ÿ’–

You ask,

we answer.

FAQs

What size will the finished piece be?

The finished Cupid Whale measures approximately 12-15 cm tall depending on yarn tension and finishing; using the recommended yarn and 2.5 mm hook will produce the size shown in the photos.

Can I use different yarn weights for this pattern?

Yes, you can use different yarn weights, but final size and proportions will change; choose an appropriate hook for your yarn and adjust stuffing and safety eye size accordingly.

Do I need prior crochet experience for this pattern?

This pattern is rated intermediate, so basic knowledge of single crochet, increases/decreases, magic ring, and color changes is recommended for the best results.

How long does this project typically take to complete?

Most crocheters complete the Cupid Whale in 5-7 hours, depending on experience level and how many separate pieces you crochet before assembly.

Where should I place the safety eyes?

Insert the safety eyes between rounds 20 and 21, 17 stitches apart, as indicated in the pattern photos and instructions to achieve the correct facial placement.