๐Ÿงถ Beautiful โœจ Detailed ๐Ÿ’ Adorable

Creeper Amigurumi Pattern

Creeper Amigurumi Pattern
4.3โ˜… Rating
5-7 Hours Time Needed
3.4K Made This
โœ‚๏ธ

Intermediate Level

Ideal for those with basic crochet experience, featuring slightly more advanced stitches and techniques to expand your skills.

โฑ๏ธ

Weekend Treat

Takes 5-7 hours, making it an enjoyable project to finish over a couple of days.

๐Ÿงธ

Cute Companion

An adorable friend to cherish, handcrafted with love to bring comfort and joy for years to come.

About This Creeper Amigurumi Pattern

This pattern teaches you how to crochet a kawaii-style Creeper amigurumi using 2.5 mm fine cotton yarn. You will work simple increases, decreases and basic finishing to create a 15 cm tall finished toy. Full step-by-step rounds, photos and assembly notes are included to guide you through the process.

Creeper Amigurumi Pattern crochet pattern - detailed view of completed project

Includes head, body and four feet patterns plus facial felt and embroidered details. Perfect for makers who enjoy character amigurumi and small plush projects.

Why You'll Love This Creeper Amigurumi Pattern

I absolutely love this pattern because it takes a classic gaming character and turns it into an irresistibly cute amigurumi. I enjoy the square shaping technique used for the head and bodyโ€”it creates that iconic Creeper silhouette while staying fun to crochet. The pattern is satisfying to stitch and assemble, with simple, effective details like felt eyes and embroidered squares that really bring the character to life. I also love that it is small and quick enough to finish in a weekend, making it a perfect gift project.

Creeper Amigurumi Pattern step 1 - construction progress Creeper Amigurumi Pattern step 2 - assembly progress Creeper Amigurumi Pattern step 3 - details and accessories Creeper Amigurumi Pattern step 4 - final assembly and finishing

Switch Things Up

I love to change colors to give the Creeper a unique personality; try pastel greens or even gradient yarn for a whimsical twist.

To make a larger Creeper, I choose a thicker yarn and a larger hookโ€”this gives a chunky, huggable toy that works great for kids.

I sometimes add a tiny scarf or bow to create a seasonal version; a small accessory can completely change the mood of the character.

If I want a keychain, I make the Creeper mini by using fingering weight yarn and a 1.75 mm hook, then add a keyring before finishing.

I experiment with embroidered expressions; moving the mouth and eye placement slightly makes the Creeper look surprised, sleepy, or cheeky.

For safer toys for small children, I prefer to embroider the eyes and mouth instead of using felt or glue so everything is sewn on securely.

Try mixing yarn textures for detailsโ€”the dark green squares can be crocheted with a slightly fuzzy yarn to add contrast and tactile interest.

I sometimes attach a small wire inside the neck for a posable head; be careful to cover wire ends well and use if the toy is not for small children.

To create a set, I make Creeper family members with different heights by changing yarn weight and hook sizes while keeping the same round counts proportionally.

Donโ€™t be afraid to add tiny props like a mini sword or present; they make great personalized gifts and add to the characterโ€™s story.

Common Mistakes & How to Fix Them

โœ— Skipping the back loop only (BLO) rounds when indicated can change the head and body shape; follow BLO instructions exactly to keep the square profile. โœ— Not stuffing gradually causes lumps and uneven shaping; stuff a little at a time, shaping as you go to maintain a smooth surface. โœ— Forgetting to leave long tails for sewing will make assembly harder; always leave long yarn ends when instructed for joining pieces securely. โœ— Ignoring stitch counts during increases and decreases results in mismatched rounds; count stitches after each round, especially during shaping rounds.

Creeper Amigurumi Pattern

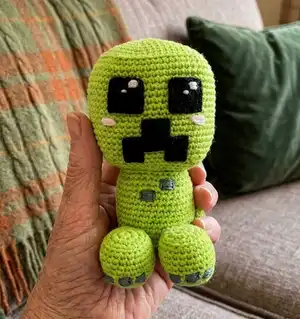
Make your own kawaii Creeper amigurumi with this clear, photo-assisted crochet pattern. You will create a charming 15 cm high Creeper using fine cotton yarn and simple amigurumi techniques. The pattern includes full round-by-round instructions, assembly guidance, and details for the face and squares. Perfect for gifting or decorating your gaming space.

Intermediate 5-7 Hours

Materials Needed for Creeper Amigurumi Pattern

โ€” Main Fabric

  • 01
    2.5 mm cotton yarn (Rainbow cotton 8/6) - Green lime (main color)
  • 02
    2.5 mm cotton yarn (Rainbow cotton 8/6) - Dark green (for squares and details)
  • 03
    2.5 mm cotton yarn (Rainbow cotton 8/6) - Pink (for blushes)
  • 04
    2.5 mm cotton yarn (Rainbow cotton 8/6) - White (for eye reflections)
  • 05
    Black felt - for eyes and mouth

โ€” Tools Required

  • 01
    2.5 mm crochet hook
  • 02
    Yarn needle
  • 03
    Scissors
  • 04
    Hot glue gun or needle and thread to sew the felt
  • 05
    Synthetic cotton filling
  • 06
    Stitch markers (optional)

Progress Tracker

0% Complete

โ€” Head :

Info :

With 2.5 mm lime green cotton yarn.

Round 1 :

8 sc in a magic ring (8)

Round 2 :

8 inc (16)

Round 3 :

2 inc, 2 sc (24)

Round 4 :

1 sc, 2 inc, (4 sc, 2 inc) x3, 3 sc (32)

Round 5 :

2 sc, 2 inc, (6 sc, 2 inc) x3, 4 sc (40)

Round 6 :

3 sc, 2 inc, (8 sc, 2 inc) x3, 5 sc (48)

Round 7 :

4 sc, 2 inc, (10 sc, 2 inc) x3, 6 sc (56)

Round 8 :

5 sc, 2 inc, (12 sc, 2 inc) x3, 7 sc (64)

Round 9 :

1 sc BLO (64)

Round 10 - R.26 :

1 sc (64)

Round 27 :

7 sc, 2 dec, (12 sc, 2 dec) x3, 5 sc BLO (56)

Round 28 :

6 sc, 2 dec, (10 sc, 2 dec) x3, 4 sc (48)

Round 29 :

5 sc, 2 dec, (8 sc, 2 dec) x3, 3 sc (40)

Round 30 :

4 sc, 2 dec, (6 sc, 2 dec) x3, 2 sc (32)

Round 31 :

3 sc, 2 dec, (4 sc, 2 dec) x3, 1 sc (24)

Info :

Stuffing

Round 32 :

2 sc, 2 dec (16)

Round 33 :

8 dec (8)

Round 34 :

4 dec (4)

Info :

Fasten off with sl st, cut and hide the strand.

โ€” Body :

Info :

With 2.5 mm lime green cotton yarn.

Round 1 :

8 sc in a magic ring (8)

Round 2 :

8 inc (16)

Round 3 :

2 inc, 2 sc (24)

Round 4 :

1 sc, 2 inc, (4 sc, 2 inc) x3, 3 sc (32)

Round 5 :

2 sc, 2 inc, (6 sc, 2 inc) x3, 4 sc (40)

Round 6 :

1 sc BLO (40)

Round 7 - R.18 :

1 sc (40)

Round 19 :

2 sc, 2 dec, (6 sc, 2 dec) x3, 4 sc BLO (32)

Round 20 :

1 sc, 2 dec, (4 sc, 2 dec) x3, 3 sc (24)

Info :

Stuffing

Round 21 :

2 sc, 2 dec (16)

Round 22 :

8 dec (8)

Round 23 :

4 dec (4)

Info :

Fasten off with sl st and leave a long strand to sew to the head.

Info :

Sew with a yarn needle joining R.19 of the body to R.29 of the head.

โ€” Feet :

Info :

With 2.5 mm lime green cotton yarn.

Round 1 :

8 sc in a magic ring (8)

Round 2 :

8 inc (16)

Round 3 :

2 inc, 2 sc (24)

Round 4 :

1 sc BLO (24)

Round 5 - R.10 :

1 sc (24)

Round 11 :

2 sc, 2 dec (16)

Info :

Stuffing

Round 12 :

8 dec (8)

Round 13 :

4 dec (4)

Info :

Fasten off with sl st and leave a long strand to sew to the body.

Info :

Join R.4 - R.6 of the feet to R.6 - R.8 of the body.

Info :

Sew two feet to the front and two feet to the back.

โ€” Details :

Infos :

With 2.5 mm dark green cotton yarn and a yarn needle embroidery three squares in front of each foot in R.9. With 2.5 mm dark green cotton yarn and a yarn needle embroidery two squares in the front part of the body, one square in R.14 and another in R.16.

โ€” Face :

Infos :

Cut out two 2.5 cm eyes with black felt and embroidery two reflections with white cotton yarn and a yarn needle to give it a kawaii touch. Glue the eyes between R.13 and R.17 of the head.

Info :

With black felt, cut out a mouth 4.5 cm long and 3 cm high. Glue the mouth between R.19 and R.25 of the head.

Info :

With pink cotton yarn and a yarn needle make two blushes in R.19 on the head.

โ€” Assembly :

Info :

Sew head to body joining R.19 of the body to R.29 of the head using the long strand left from the body; secure and weave ends.

Info :

Sew and position four feet: join R.4 - R.6 of each foot to R.6 - R.8 of the body, two in front and two at back; adjust spacing before final sewing.

Info :

Attach felt eyes and mouth using hot glue or by sewing with needle and thread for a secure finish; embroider blushes and dark green squares per details instructions.

Assembly Instructions

  • Sew head to body by joining R.19 of the body to R.29 of the head using the long strand left from the body, then secure and weave in ends.
  • Join R.4 - R.6 of each foot to R.6 - R.8 of the body and sew them in place; position two feet at the front and two at the back.
  • Attach the black felt eyes between R.13 and R.17 of the head using hot glue or by sewing with needle and thread for extra security.
  • Glue or sew the black felt mouth between R.19 and R.25 of the head and embroider the white reflections on the eyes with white yarn.
  • Embroider three dark green squares on the front of each foot in R.9 and two dark green squares on the front part of the body (one in R.14 and one in R.16).

Important Notes

  • ๐Ÿ’กUse stitch markers or a marker to keep track of the beginning of rounds, especially when working BLO or when counts repeat over many rounds.
  • ๐Ÿ’กStuff gradually and evenly during shaping rounds to avoid lumps and to maintain the intended square profile.
  • ๐Ÿ’กLeave long yarn tails where instructed for sewing pieces together to simplify assembly and secure joins.

This adorable Creeper amigurumi was designed to bring a cute, kawaii twist to a classic gaming icon. Whether you make it as a gift or a shelf companion, it's sure to charm and delight. Enjoy stitching, assembling, and personalizing your little Creeper! ๐Ÿงถโœจ

You ask,

we answer.

FAQs

What size will the finished piece be?

The finished amigurumi measures approximately 15 cm high when using 2.5 mm cotton yarn and the recommended hook.

Can I use different yarn weights for this pattern?

Yes, you can use different yarn weights, but this will affect the final size; adjust your hook accordingly and expect a change in dimensions.

Do I need prior crochet experience for this pattern?

This pattern is rated intermediate, so basic knowledge of crochet stitches (sc, inc, dec) and amigurumi assembly is recommended.

How long does this project typically take to complete?

Most crocheters complete this project in 5-7 hours, though time may vary depending on experience level and finishing details.