About This Chunky Chain Pattern
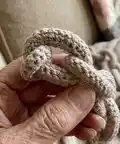
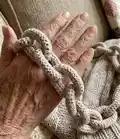
This pattern shows you how to crochet chunky chain links from cord to create a durable bag handle or wearable necklace. It uses basic single crochet and slip stitch techniques worked in rows around a 2 mm cord to form each link. The design produces a solid, textured link that stacks together to form an attractive chain.

Beginner friendly with clear step-by-step photos and exact stitch counts for each row. Make as many links as you need — 9–10 links make a comfortable handle length.
Why You'll Love This Chunky Chain Pattern
I absolutely love this pattern because it turns simple cord and basic stitches into a polished accessory that looks store-bought. I enjoy how quickly one link comes together, so you get fast satisfaction as the chain grows. The technique is flexible — you can change cord thickness or hook size and still get beautiful results. Every finished chain feels unique, and I love gifting these as bag handles or necklaces to friends and family.
Switch Things Up
I love to experiment with different cords and colors when I make this chain; try bold contrasting colors for a statement look or soft neutrals for a classic handle.
You can change the size of the chain by switching cord thickness and hook size — try bulky cord with a larger hook for oversized links or thin cord for delicate jewelry links.
I often add small metal jump rings between links for extra flexibility and a different mechanical look; it also helps when attaching to hardware.
Make a shorter chain as a bracelet or a longer chain for a crossbody strap — just increase or decrease the number of links to suit the use.
Try adding beads or charms between links for a decorative touch; thread them onto the cord before closing the link for a secure placement.
For a polished bag handle, reinforce the first and last links by sewing a small hidden stitch or gluing the interior seam before trimming the end.
I sometimes line the inner curve of each link with a thin fabric strip when using very smooth cords to prevent slipping on certain hardware.
Want a two-tone link? Use two cords of different colors held together and work the rows around both for a striped effect.
If you like a vintage look, try natural jute or linen cord and slightly fray the ends before sealing for a rustic finish.
I also recommend trying different closures like lobster clasps or decorative snap hooks so you can remove or switch chains between bags easily.
Common Mistakes & How to Fix Them
✗ Joining the chain loosely can cause a gap at the join; make sure to pull the joining SlSt snugly and leave no slack when connecting the chain into a circle.
✗ Forgetting to place or move the marker will make it hard to track the first stitch each row; place a marker in the first SC and move it each row to maintain stitch count.
✗ Cutting the end too short before hiding it will make it difficult to secure; leave a few centimeters to pull through loops and hide before trimming and melting.
✗ Working with inconsistent tension will change link size and shape; maintain even, moderate tension throughout to keep each link consistent and matching.
✗ Inserting the hook through both loops when instructed will distort the base trim; insert only in the back loop of the last row and the chain loop as directed.