๐Ÿงถ Beautiful โœจ Detailed ๐Ÿ’ Adorable

Christmas Pudding Amigurumi Pattern

Christmas Pudding Amigurumi Pattern
4.6โ˜… Rating
2-3 Hours Time Needed
2.2K Made This
โœ‚๏ธ

Intermediate Level

Ideal for those with basic crochet experience, featuring slightly more advanced stitches and techniques to expand your skills.

โฑ๏ธ

Bite-Sized Project

Finishes in 2-4 hoursโ€”perfect for an afternoon of creative relaxation.

๐Ÿงธ

Cute Companion

An adorable friend to cherish, handcrafted with love to bring comfort and joy for years to come.

About This Christmas Pudding Amigurumi Pattern

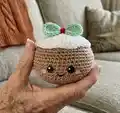
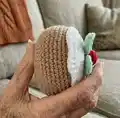
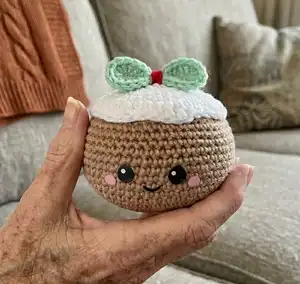
This pattern makes a small, adorable Christmas Pudding amigurumi complete with a cute face, decorative icing, leaves and berries. You will work in the round to create a soft, slightly flattened pudding body and a separate icing topper. The design uses simple amigurumi shaping techniques and small surface details to bring the pudding to life. It is a perfect holiday make for gifts, decor, or seasonal markets.

Christmas Pudding Amigurumi Pattern crochet pattern - detailed view of completed project

Includes full materials list, US stitch abbreviations, and clear round-by-round instructions for each piece. Step-by-step assembly notes help you place leaves and berries and finish a tidy, professional result.

Why You'll Love This Christmas Pudding Amigurumi Pattern

I absolutely love this pattern because it turns a classic holiday treat into a tiny, lovable amigurumi with so much personality. I enjoy the simple shaping that creates the puddingโ€™s squishy, pancake-like form and the playful little icing topper with its tiny leaves and berries. The pattern is compact yet satisfying โ€” you get a complete handmade gift in just a few hours. I also love how easy it is to customize colors and facial expressions to make each pudding unique.

Christmas Pudding Amigurumi Pattern step 1 - construction progress Christmas Pudding Amigurumi Pattern step 2 - assembly progress Christmas Pudding Amigurumi Pattern step 3 - details and accessories Christmas Pudding Amigurumi Pattern step 4 - final assembly and finishing

Switch Things Up

I love how easy it is to personalize this pudding by changing yarn colors; try a darker brown or a speckled yarn for a rustic look.

I sometimes use bulky yarn and a larger hook to make a chunky, squishy version perfect for a holiday pillow display.

You can make keychain-sized puddings by using fingering yarn and a small hook for tiny gifts or ornaments.

I often embroider different facial expressions โ€” a wink or a sleepy face completely changes the pudding's personality.

Try adding a loop of yarn at the top of the icing to turn your pudding into a hanging ornament for the tree.

Mix and match leaves and berry colors โ€” metallic or sparkly yarn for the berries can add a festive shine.

If you want removable toppings, sew the icing with a few discreet stitches so it can be removed and washed separately.

Consider making a set in graduated sizes for a charming table display or advent calendar treats.

I sometimes add a tiny crocheted bow or a bell near the leaves for extra holiday detail and charm.

Don't be afraid to experiment with eye types; embroidered eyes give a softer, child-safe finish while safety eyes make the face pop visually.

Common Mistakes & How to Fix Them

โœ— Skipping stitch counts during the increase rounds can cause uneven shaping; count stitches after each round and mark the start with a stitch marker to maintain accuracy. โœ— Not stuffing as you go will make seaming and shaping difficult later on; stuff the body gradually and keep the stuffing semi-firm to achieve the intended pancake shape. โœ— Placing the eyes and brads in the wrong rounds can look off-center; follow the placement notes and position eyes between rounds 14-15, three to four stitches above the smile. โœ— Forgetting to leave long tails when finishing small pieces prevents neat sewing; always leave a long tail on leaves, berries and the icing for secure stitching and neat finishing.

Christmas Pudding Amigurumi Pattern

Make a delightful Christmas Pudding amigurumi that is quick, charming, and full of festive detail. You will create a soft pudding body with a removable icing top, tiny leaves and berries for decoration, and a smiling face thatโ€™s irresistibly cute. This pattern is perfect if you enjoy small amigurumi projects that make lovely handmade gifts. Follow the clear, round-by-round instructions and assembly notes to finish a polished mini pudding.

Intermediate 2-3 Hours

Materials Needed for Christmas Pudding Amigurumi Pattern

โ€” Main Fabric

  • 01
    Paintbox Yarns One Ball Paper White (for icing)
  • 02
    Paintbox Yarns One Ball Grass Green (for leaves)
  • 03
    Paintbox Yarns One Ball Pillar Red (for berries)
  • 04
    Paintbox Yarns One Ball Soft Fudge (for body)

โ€” Tools Required

  • 01
    Crochet hook 3.25mm
  • 02
    Amigurumi eyes 9mm (2 pieces)
  • 03
    Red brads 5mm (2 pieces)
  • 04
    Tapestry needle
  • 05
    Glue
  • 06
    Stuffing (polyester)

Progress Tracker

0% Complete

โ€” Materials :

Info :

Paintbox Yarns One Ball in Each Colour: Paper White, Grass Green, Pillar Red and Soft Fudge. Crochet Hook: 3.25mm. Amigurumi Eyes: 2 count (9mm). Brads: 2 count in red (5mm). Tapestry Needle, Glue, Stuffing.

โ€” Stitches :

Infos :

MR: magic ring. ch: chain. sc: single crochet. inc: single crochet increase. hdc: half double crochet. st: stitches. sl st: slip stitch. bb: back bump. FO: fasten off.

โ€” Body :

Round 1 :

MR 6

Round 2 :

inc around [12]

Round 3 :

(sc, inc) x6 [18]

Round 4 :

(sc 2, inc) x6 [24]

Round 5 :

(sc 3, inc) x6 [30]

Round 6 :

(sc 4, inc) x6 [36]

Round 7 :

(sc 5, inc) x6 [42]

Round 8 :

(sc 6, inc) x6 [48]

Round 9 :

(sc 7, inc) x6 [52]

Round 10 :

(sc 8, inc) x6 [60]

Round 11-20 :

sc around [10 rounds]

Info :

Embroider a smile on R13, add eyes between R14-15, 3-4 stitches above smile. Add red brads between R13-14 next to eyes. Secure with glue.

Round 21 :

(sc 8, dec) x6

Round 22 :

(sc 7, dec) x6 [52]

Round 23 :

(sc 6, dec) x6 [48]

Round 24 :

(sc 5, dec) x6 [42]

Round 25 :

(sc 4, dec) x6 [36]

Info :

Stuff semi firmly as you go

Round 26 :

(sc 3, dec) x6

Round 27 :

(sc 2, dec) x6

Round 28 :

(sc, dec) x6

Round 29 :

dec around

Info :

FO. Weave in all ends. Squish the body by pressing the top and bottom so it is more of a tall pancake shape.

โ€” Leaves :

Leaves [Make three or more] :

Using Green Yarn: ch 7, sl st in 2nd ch from hook through bb, (sl st through bb, ch 2, sl st in same bb), sl st in next 2 back bumps, ch 3, sl st in same bb, sl st in next bb, 3 sl st in next bb. working on other side of the ch: sl st in next 2 st, ch 3, sl st in current st, sl st in next, ch 2, sl st in same, sl st in last. FO leaving long tail for sewing.

โ€” Berries :

Berries [Make three or more] :

Using Red Yarn: R1: MR 4. Clean FO and leave a long tail for sewing.

โ€” Icing :

Icing [Make one] :

Using White Yarn: R1: MR 6 [6]

Round 2 :

inc around [12]

Round 3 :

(sc, inc) x6 [18]

Round 4 :

(sc 2, inc) x6 [24]

Round 5 :

(sc 3, inc) x6 [30]

Round 6 :

(sc 4, inc) x6 [36]

Round 7 :

(sc 5, inc) x6 [42]

Round 8-9 :

sc,hdc in next 2 st, sc in next 3st, hdc, sc, hdc, sc, hdc in next 2 st, sc in next 2 st, hdc in next 3 st, sc in next 4 st, hdc in next 5 st, sc in next 6 st, hdc in 8 st, sc in last 2 st. [2 rounds]

Info :

FO leaving long tail for sewing.

โ€” Assembly :

Info :

Sew Leaves onto the top of the icing, then the berries. Place Icing onto the top of the head (around R21-29). Weave in all ends. Please use picture for reference.

Assembly Instructions

  • Sew leaves onto the top of the icing, arrange them as in the reference photo, and securely sew through the icing surface so they sit flat.
  • Sew the berries on top of the icing, clustering them near the leaves; leave long tails when making them to stitch through the icing for a neat finish.
  • Place the completed icing onto the top of the pudding body aligning it around rounds 21-29, then sew through the icing and body to secure in place.
  • Embroider the smile on round 13, attach eyes between rounds 14-15 (3-4 stitches above the smile), and glue red brads between rounds 13-14 next to the eyes.

Important Notes

  • ๐Ÿ’กStuff semi-firmly as you go; under-stuffing will flatten the shape while over-stuffing may distort the pancake silhouette.
  • ๐Ÿ’กLeave long tails when finishing the leaves, berries and icing so you have enough yarn to sew pieces securely in place.
  • ๐Ÿ’กWeave in all ends after assembly and secure any glued brads so small parts remain attached and safe for decorative use.

This charming Christmas Pudding amigurumi is a joyful little project to make for loved ones this season. It combines simple amigurumi shaping with small decorative details to create a festive keepsake. Perfect as a gift, table decoration, or market item โ€” enjoy making yours! ๐Ÿงถ๐Ÿฎ

You ask,

we answer.

FAQs

What size will the finished piece be?

The finished Christmas Pudding measures about 12cm across when using the recommended yarn and 3.25mm hook.

Can I use different yarn weights for this pattern?

Yes, you can use different yarn weights, but the finished size will change; choose an appropriate hook to match the yarn and expect differences in detail size.

Do I need prior crochet experience for this pattern?

This pattern is rated intermediate, so basic experience with amigurumi techniques, increases and decreases is recommended for best results.

How long does this project typically take to complete?

Most crocheters finish this small amigurumi in about 2-3 hours, though time may vary depending on your speed and experience.