🧢 Beautiful ✨ Detailed πŸ’ Adorable

Christmas Minion Amigurumi Pattern

Christmas Minion Amigurumi Pattern
4.2β˜… Rating
5-7 Hours Time Needed
2.0K Made This
βœ‚οΈ

Intermediate Level

Ideal for those with basic crochet experience, featuring slightly more advanced stitches and techniques to expand your skills.

⏱️

Weekend Treat

Takes 5-7 hours, making it an enjoyable project to finish over a couple of days.

🧸

Cute Companion

An adorable friend to cherish, handcrafted with love to bring comfort and joy for years to come.

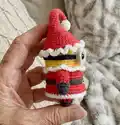
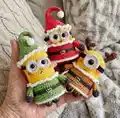
About This Christmas Minion Amigurumi Pattern

This pattern teaches you how to crochet three tiny Christmas Minions with hats, collars, glasses, and horns. You will follow round-by-round instructions to shape bodies, hats, arms, legs and accessories. The design uses sport yarn and small hooks for compact, detailed results.

Christmas Minion Amigurumi Pattern crochet pattern - detailed view of completed project

Perfect for experienced beginners who know basic amigurumi techniques, this pattern includes clear rounds and finishing steps. Youll have three adorable holiday minions ready to display or gift.

Why You'll Love This Christmas Minion Amigurumi Pattern

I absolutely love this pattern because the Minions are full of personality while staying compact and quick to make. I enjoy the mix of simple shaping and small accessory work like glasses and horns that bring each character to life. The color switches create a festive look and let me play with seasonal palettes. Sharing these little handmade characters always brings smiles and makes perfect holiday gifts.

Christmas Minion Amigurumi Pattern step 1 - construction progress Christmas Minion Amigurumi Pattern step 2 - assembly progress Christmas Minion Amigurumi Pattern step 3 - details and accessories Christmas Minion Amigurumi Pattern step 4 - final assembly and finishing

Switch Things Up

I love how easy it is to customize these minions by changing colors; I often swap the hat and shirt colors to match personal tastes or holiday themes.

I sometimes use pastel yarns for a softer look or metallic threads for festive shineβ€”these small changes can make each minion unique.

If I want a bigger, cuddlier minion I use a thicker yarn and larger hook; conversely I use thinner yarn and a smaller hook for tiny keychain versions.

I like adding embroidered mouths or tiny felt accessories to give each character a different expression and personality before sewing pieces in place.

For posable limbs I add thin wire inside the arms and legs before stuffing; this makes the minion hold small props or pose on a shelf.

I sometimes replace safety eyes with French knots or embroidered eyes for a handmade, child-safe version for little ones in the family.

Adding small buttons, ribbon loops, or a hanging loop on the hat transforms these into ornaments ready to hang on the tree.

I recommend trying different textures like boucle or cotton blends for seasonal effects β€” each yarn brings a different finish to the details.

I often make sets in coordinating colors so they look great together as a table display or gift bundle at holiday markets.

Don't be afraid to experiment with tiny accessories like mini scarves or tiny crocheted gifts to increase character and charm.

Common Mistakes & How to Fix Them

βœ— Skipping stitch markers during round counting can cause mis-shaped bodies; place a marker at the start of each round and move it as you progress. βœ— Changing colors without securing ends can lead to loose tails and unraveling; weave in or secure color joins immediately and leave long tails for sewing when instructed. βœ— Overstuffing the body will distort shaping and make sewing parts difficult; stuff gradually and check shaping frequently for a smooth finish. βœ— Not counting increases and decreases precisely will change stitch counts and ruin symmetry; count stitches after every increase or decrease round to stay accurate.

Christmas Minion Amigurumi Pattern

Create festive mini Minions for holiday gifting with this detailed crochet pattern. You will enjoy clear round-by-round instructions and helpful assembly notes to finish charming little characters. Perfect for making ornaments, keychains, or small keepsakes that bring holiday cheer to your home or gifts.

Intermediate 5-7 Hours

Materials Needed for Christmas Minion Amigurumi Pattern

β€” Main Fabric

  • 01
    Sport weight yarn (1.5-2mm) - Yellow (main body) approx 10-30g
  • 02
    Sport weight yarn - Black (details, straps) approx 5-10g
  • 03
    Sport weight yarn - White (glasses, collar, trims) approx 5-10g
  • 04
    Sport weight yarn - Red (Bob hat/shirt) approx 10-20g
  • 05
    Sport weight yarn - Green (Kevin hat/shirt) approx 10-20g
  • 06
    Sport weight yarn - Brown/Dark brown (Stuart horn/hat trim) approx 5-10g
  • 07
    Sport weight yarn - Gray (glasses rim) small amount
  • 08
    Small amounts of other accent colors as needed (orange, pink for blush)

β€” Tools Required

  • 01
    Crochet hook size 2.0mm - 2.5mm (use size to obtain gauge)
  • 02
    Black safety eyes 8mm (recommended) or 8-10mm
  • 03
    Scissors
  • 04
    Yarn needle for sewing
  • 05
    Stitch markers
  • 06
    Polyester stuffing (fiberfill)
  • 07
    Glue (to attach eyes to glasses if needed)
  • 08
    Small pins for positioning (optional)

Progress Tracker

0% Complete

β€” Bob's Body :

Round 1 :

7sc in MR (7)

Round 2 :

7-inc (14)

Round 3 :

(sc, inc) * 7 (21)

Round 4 :

(inc, 2sc) * 7 (28)

Round 5 :

(3sc, inc) * 7 (35)

Round 6-14 :

(9 rnds) 35sc (35)

Info :

Switch to red yarn

Round 15 :

BLO (4sc, inc) * 7 (42)

Round 16-17 :

(2 rnds) 42sc (42)

Info :

Switch to black yarn

Round 18-19 :

(2 rnds) 42sc (42)

Info :

Switch to red yarn

Round 20 :

BLO 42sc (42)

Round 21 :

42sc (42)

Round 22 :

(4sc, dec) * 7 (35)

Round 23 :

(3sc, dec) * 7 (28)

Info :

Stuff the body tight with fiberfill

Round 24 :

(2sc, dec) * 7 (21)

Round 25 :

(sc, dec) * 7 (14)

Round 26 :

7-dec (7)

Info :

Cut the yarn. Invisible fasten off. Thread a needle with your yarn tail and close the remaining gap.

β€” Kevin's Body :

Round 1 :

7sc in MR (7)

Round 2 :

7-inc (14)

Round 3 :

(sc, inc) * 7 (21)

Round 4 :

(inc, 2sc) * 7 (28)

Round 5 :

(3sc, inc) * 7 (35)

Round 6-21 :

(16 rnds) 35sc (35)

Info :

Switch to green yarn

Round 22 :

BLO (4sc, inc) * 7 (42)

Round 23-24 :

(2 rnds) 42sc (42)

Info :

Switch to black yarn

Round 25-26 :

(2 rnds) 42sc (42)

Info :

Switch to green yarn

Round 27 :

BLO 42sc (42)

Round 28 :

42sc (42)

Round 29 :

(4sc, dec) * 7 (35)

Round 30 :

(3sc, dec) * 7 (28)

Info :

Stuff the body tight with fiberfill

Round 31 :

(2sc, dec) * 7 (21)

Round 32 :

(sc, dec) * 7 (14)

Round 33 :

7-dec (7)

Info :

Cut the yarn. Invisible fasten off. Thread a needle with your yarn tail and close the remaining gap.

β€” Stuart's Body :

Round 1 :

7sc in MR (7)

Round 2 :

7-inc (14)

Round 3 :

(sc, inc) * 7 (21)

Round 4 :

(inc, 2sc) * 7 (28)

Round 5 :

(3sc, inc) * 7 (35)

Round 6-17 :

(12 rnds) 35sc (35)

Info :

Switch to brown yarn

Round 18 :

BLO (4sc, inc) * 7 (42)

Round 19-20 :

(2 rnds) 42sc (42)

Info :

Switch to black yarn

Round 21-22 :

(2 rnds) 42sc (42)

Info :

Switch to brown yarn

Round 23 :

BLO 42sc (42)

Round 24 :

42sc (42)

Round 25 :

(4sc, dec) * 7 (35)

Round 26 :

(3sc, dec) * 7 (28)

Info :

Stuff the body tight with fiberfill

Round 27 :

(2sc, dec) * 7 (21)

Round 28 :

(sc, dec) * 7 (14)

Round 29 :

7-dec (7)

Info :

Cut the yarn. Invisible fasten off. Thread a needle with your yarn tail and close the remaining gap.

β€” Arms :

Info :

With black and minion shirt's yarn (make two)

Round 1 :

start with black 4sc in MR (4)

Round 2 :

4-inc (8)

Info :

Switch color

Round 3-8 :

(6 rnds) 8sc (8)

Info :

Cut the yarn. Leave a long tail. Thread a needle with your yarn tail and sew to the body at the round you switch to minion shirt's color yarn.

β€” Legs :

Info :

With black and minion shirt's yarn.

Round 1 :

start with black 7sc in MR (7)

Round 2 :

inc, 6sc (8)

Info :

Switch color

Round 3-4 :

8sc (8)

Info :

Cut the yarn. Leave a long tail. Thread a needle with your yarn tail and sew the legs to bottom of the body.

β€” Bob's and Kevin's Glasses :

Info :

With white and gray.

Round 1 :

start with white 7sc in MR (7)

Round 2 :

7-inc (14)

Info :

Switch to gray

Round 3 :

FLO 14sc, slst(14)

Info :

Cut the yarn. Leave a long tail. Thread a needle with your yarn tail and sew the glasses to the body. Place the eyes on glasses and use glue to stick them to the body.

β€” Stuart's Glasses :

Info :

With white and gray.

Round 1 :

start with white 7sc in MR (7)

Round 2 :

7-inc (14)

Round 3 :

(sc, inc) * 7 (21)

Info :

Switch to gray

Round 4 :

FLO 21sc, slst (21)

Info :

Cut the yarn. Leave a long tail. Thread a needle with your yarn tail and sew the glasses to the body. Place the eyes on glasses and use glue to stick them to the body.

β€” Black trap for Bob and Kevin glasses :

Item Name (P1) :

Start with black yarn, ch32, 31-slst on chain.

Info :

Cut the yarn. Leave a long tail. Thread a needle with your yarn tail and sew it to the body of minion.

β€” Black trap for Stuart glasses :

Item Name (P1) :

Start with black yarn, ch37, 36sc on chain.

Info :

Cut the yarn. Leave a long tail. Thread a needle with your yarn tail and sew it to the body of minion.

β€” Piece of shirt :

Info :

With minion shirt's yarn. Insert your hook to FLO stitches of the second BLO round on the body,

Round 1 :

ch1, (5sc, inc) * 7, slst (49)

Round 2-3 :

(2 rnds) ch1, 49sc, slst (49)

Info :

Switch to white yarn

Round 4 :

49sc, slst (49)

Info :

Cut the yarn. Invisible fasten off. Hide your yarn tail.

β€” Collar :

Info :

With white yarn. Insert your hook to FLO stitches of the first BLO round on the body, (ch 3, slst to the next stitch) * end round

Info :

Cut the yarn. Invisible fasten off. Hide your yarn tail.

β€” Bob's and Kevin's hat :

Info :

With minion shirt's yarn

Round 1 :

4sc in MR (4)

Round 2-4 :

(3 rnds) 4sc (4)

Round 5 :

3sc, inc (5)

Round 6-8 :

(3 rnds) 5sc (5)

Round 9 :

4sc, inc (6)

Round 10-12 :

(3 rnds) 6sc (6)

Round 13 :

(sc, inc) * 3 (9)

Round 14 :

9sc (9)

Round 15 :

(2sc, inc) * 3 (12)

Round 16-17 :

(2 rnds) 12sc (12)

Round 18 :

(sc, inc) * 6 (18)

Round 19 :

18sc (18)

Round 20 :

(2sc, inc) * 6 (24)

Round 21 :

24sc (24)

Round 22 :

(3sc, inc) * 6 (30)

Round 23 :

(4sc, inc) * 6 (36)

Round 24 :

2sc, inc, (5sc, inc) * 5, 3sc (42)

Round 25 :

42sc (42)

Info :

Switch to white yarn

Round 26 :

42sc (42)

Round 27 :

(Ch 3, slst to the next stitch) * end round

Info :

Cut the yarn. Invisible fasten off. Hide your yarn tail.

β€” Stuart's horn :

Info :

With dark brown yarn. Make two.

Round 1 :

6sc in MR (6)

Round 2 :

(2sc, inc) * 2 (8)

Round 3 :

8sc (8)

Round 4 :

2sc, 2-dec, 2sc (6)

Round 5 :

2sc, dec, 2sc (5)

Round 6-7 :

(2 rnds) 5sc (5)

Round 8 :

3sc, dec, slst (4)

Info :

Cut the yarn. Leave a long tail for sewing.

Small piece - Round 1 :

4sc in MR (4)

Small piece - Round 2-3 :

(2 rnds) 4sc (4)

Info :

Cut the yarn. Leave a long tail. Thread a needle with your yarn tail. Sew small piece to big piece spanning rounds 5&6.

Info :

Sew the horn to the top of minion spanning rounds 4&5.

Assembly Instructions

  • Sew the arms to the body at the round where you switched to the minion shirt color, using the long tail left when finishing the arms and a yarn needle to secure them firmly.
  • Attach the legs to the bottom of the body using the long tails left after finishing the legs, spacing them evenly and sewing securely so the minion can sit upright.
  • Sew the glasses to the body and position the safety eyes on the glasses; use glue to adhere the eyes to the glasses if needed and sew the glasses in place with a long tail.
  • Sew hats, collars and shirt pieces into place by aligning with the BLO/FLO rounds on the body as instructed, then tack and secure with small stitches for a neat finish.
  • Sew the horns (small piece attached to big piece) to the top of Stuart by spanning rounds 4 and 5 of the head/body area and secure with tight stitches.

Important Notes

  • πŸ’‘Use stitch markers to mark the beginning of rounds and any placement points for eyes, horns, or accessories for consistent alignment.
  • πŸ’‘Switch colors cleanly by completing the last yarn-over of the stitch with the new color to avoid gaps and loose ends.
  • πŸ’‘Stuff the pieces gradually and check shaping frequently; overstuffing will distort the minion and under-stuffing will make sewing parts unstable.
  • πŸ’‘Leave long tails when finishing small pieces; these tails are used for sewing parts securely to the body and hide neatly when woven in.

Make three adorable Christmas Minions with hats, collars, glasses and playful horns β€” perfect for gifting or decorating! These pocket-sized amigurumi are quick to make and full of holiday personality. Cozy up with yarn and create festive cuteness to share this season. 🧢🎁

You ask,

we answer.

FAQs

What size will the finished piece be?

The finished amigurumi measures approximately 9-12 cm tall depending on yarn weight and hook size used.

Can I use different yarn weights for this pattern?

Yes, you can use different yarn weights but this will affect the final size; adjust hook size accordingly to maintain stitch definition and desired scale.

Do I need prior crochet experience for this pattern?

This pattern is rated intermediate and requires knowledge of single crochet, increases, decreases, BLO/FLO, and basic amigurumi assembly.

How long does this project typically take to complete?

Most crocheters complete a single minion in about 1.5-3 hours; making all three as shown will take approximately 5-7 hours total.