🧢 Beautiful ✨ Detailed πŸ’ Adorable

Cactus Frog with Removeable Pot Amigurumi Pattern

Cactus Frog with Removeable Pot Amigurumi Pattern
4.6β˜… Rating
2-3 Hours Time Needed
1.1K Made This
βœ‚οΈ

Intermediate Level

Ideal for those with basic crochet experience, featuring slightly more advanced stitches and techniques to expand your skills.

⏱️

Bite-Sized Project

Finishes in 2-4 hoursβ€”perfect for an afternoon of creative relaxation.

🎁

Tiny Treasure

Small, sweet, and gift-worthy creations that fit perfectly in the palm of your hand with detailed charm.

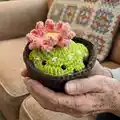
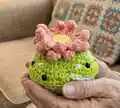
About This Cactus Frog with Removeable Pot Amigurumi Pattern

This pattern creates a tiny cactus frog amigurumi with a removable flower pot and a decorative crochet flower. You will work small, continuous rounds and use BLO/FLO for the flower and pot details. The finished toy measures about 2 1/2 inches tall and wide and is made using simple cotton yarns. The design includes embroidered white X marks to mimic cactus spines and a cute removable pot for display.

Cactus Frog with Removeable Pot Amigurumi Pattern crochet pattern - detailed view of completed project

Finished size is approximately 2 1/2 inches high and 2 1/2 inches wide using the recommended yarn and hook. The pattern includes step-by-step instructions for body, legs, toes, flower and pot with assembly notes.

Why You'll Love This Cactus Frog with Removeable Pot Amigurumi Pattern

I absolutely love this pattern because it transforms basic crochet stitches into a tiny character full of personality. I enjoy the clever removable pot concept β€” it makes the frog feel like a little surprise to uncover. The flower petals built with BLO and FLO create a satisfying texture that always delights me when finished. Sewing the tiny legs and embroidering the cactus Xs is relaxing and gives a lot of room for personal touches. It’s a small project that’s quick to finish but very rewarding to gift or keep on your desk.

Cactus Frog with Removeable Pot Amigurumi Pattern step 1 - construction progress Cactus Frog with Removeable Pot Amigurumi Pattern step 2 - assembly progress Cactus Frog with Removeable Pot Amigurumi Pattern step 3 - details and accessories Cactus Frog with Removeable Pot Amigurumi Pattern step 4 - final assembly and finishing

Switch Things Up

I love customizing this tiny frog by swapping colors; try pastel greens and pinks for a softer look or bold neons for a modern take.

I often change yarn weight and hook size to make different sizes β€” bulky yarn with a larger hook gives a chunky frog, while fine yarn makes a mini keychain version.

I sometimes replace safety eyes with embroidered eyes for a fully child-safe toy and a hand-stitched expression.

I like to add tiny accessories like a mini bow, felt crown, or a tiny crochet leaf behind the flower to give unique personality.

If you want posable limbs, try threading thin wire into the legs before stuffing to allow subtle posing.

For a different pot look, crochet a taller or shorter pot by adding or subtracting rounds in the pot's body, or add stripes using color changes.

I recommend experimenting with texture for the flower β€” use puff stitches or bobbles for a more dimensional bloom.

Try embroidering different cactus marks (dots, small lines, or tiny crosses) instead of Xs to vary the style.

I sometimes stitch a loop into the pot edge to hang the frog as an ornament or to attach a keyring for a portable charm.

For gifting, I make matching little cards or a tiny crocheted mat to display the frog; personal touches make each finished piece feel special and unique.

Common Mistakes & How to Fix Them

βœ— Skipping the stitch marker while working in spiral rounds leads to lost stitch counts; always use a marker or a contrasting piece of yarn to mark your first stitch each round. βœ— Inserting safety eyes too early or too close together can distort the face; place safety eyes between round 5 and 6 with 4 stitches between and check placement before securing. βœ— Overstuffing the pieces results in a stiff, misshapen frog; stuff gradually and only enough to hold the shape, especially before closing small openings. βœ— Cutting yarn ends too short makes assembly difficult; leave long ends on small pieces (legs, toes, flower) to sew them to the body without reattaching yarn.

Cactus Frog with Removeable Pot Amigurumi Pattern

Make a tiny, charming cactus frog that sits inside a removable pot β€” perfect as a gift or desk companion. This pattern walks you through a compact amigurumi with a cute flower, embroidered cactus marks, and a little pot that comes off. You will enjoy shaping small pieces and simple assembly while creating an adorable finished piece. Suitable for makers who enjoy small, detailed projects.

Intermediate 2-3 Hours

Materials Needed for Cactus Frog with Removeable Pot Amigurumi Pattern

β€” Main Fabric

  • 01
    Any type of yarn (I use Sugar and Cream cotton yarn for this cutie).
  • 02
    Color - Hot green for frog body (approx. small amount, sample uses cotton DK/medium).
  • 03
    Color - White for belly and embroidered X details (small amount).
  • 04
    Color - Light red / Tea rose for flower petals (small amount).
  • 05
    Color - Yellow for flower center (small amount).
  • 06
    Color - Warm brown for the removable pot (small amount).

β€” Tools Required

  • 01
    Crochet hook size 3.5mm
  • 02
    Poly-fil fiber for stuffing
  • 03
    Yarn needle for sewing and weaving ends
  • 04
    Safety eyes 6mm (2 pieces) (Not for children under 3)
  • 05
    Scissors
  • 06
    Stitch marker or a piece of yarn to mark rounds

Progress Tracker

0% Complete

β€” Head and body :

Info :

Start with green yarn.

Round 1 :

8sc in a MR (8)

Round 2 :

8inc (16)

Round 3 :

(sc, inc) x8 (24)

Round 4 :

(2sc, inc) x8 (32)

Round 5 :

(3sc, inc) x8 (40)

Round 6 :

16sc, inc, 5hdc-inc, inc, 17x (47)

Info :

Change to white yarn.

Round 7 :

BLO: 21sc, 3dec, 20sc (44)

Round 8 :

(3sc, inc) x2, 12sc, 2dec, 12sc, (3sc, inc) x2 (46)

Round 9-10 :

46sc (46)

Round 11 :

(3sc, dec) x2, 10sc, dec, 2sc, dec, 10sc, (3sc, dec) x2 (40)

Round 12 :

(2sc, dec) x10 (30)

Round 13 :

30sc (30)

Info :

Now it's time to insert the safety eyes between round 5 and 6, 4 stitches apart. Make sure the nose is in the middle of the eyes.

Info :

Stuff the piece.

Round 14 :

(sc, dec) x10 (20)

Round 15 :

10dec (10)

Round 16 :

3 dec. F.O You don't have to finish this round.

Info :

Close the body by using needle and cut the yarn. Hide the end inside the body.

β€” Back legs x2 :

Info :

Start with green yarn.

Round 1 :

6sc in a MR (6)

Round 2 :

6inc (12)

Round 3 :

(sc, inc) x6 (18)

Round 4 :

18sc (18) F.O

Info :

Leave long end to connect with the body.

β€” Toes x2 :

Info :

Start with green yarn.

Round 1 :

8sc in a MR (8)

Round 2 :

do not break the working yarn, continue to work the toes with it: chain 3, turn work, start from the second chain from the hook, hdc, 1 slst in the chain, 1 slst on the MR)x3, 4sc, slst on the last stitch. (8) F.O

Info :

Leave long end to connect with the back legs.

β€” Front legs x2 :

Info :

Start with green yarn.

Round 1 :

5sc in a MR (5)

Round 2 :

inc, 2sc, inc, sc (7)

Round 3-10 :

7sc (7) F.O

Info :

Do not close the piece. Do not stuff the piece. Leave long end to connect with the body.

β€” Flower :

Info :

Start with yellow yarn.

Round 1 :

BLO: 6sc in a MR (6)

Round 2 :

BLO: 6inc (12)

Round 3 :

BLO: (sc, inc) x6 (18)

Info :

Change to light red yarn.

Round 4 :

BLO: slst, (chain 5, start from the 2nd chain from the hook, 4hdc along the chain, skip 1 stitch, slst on the next stitch of the base) x 8.

Info :

After you finished all the petals in the back loop (8 petals), change to the front loop and do the same step (8 petals). F.O the last stitch.

Info :

At the end you should have 16 petals. Leave long end to sew into the frog's body.

β€” Flower Pot :

Info :

Start with brown yarn.

Round 1 :

8sc in a MR (8)

Round 2 :

8inc (16)

Round 3 :

(sc, inc) x8 (24)

Round 4 :

(2sc, inc) x8 (32)

Round 5 :

(3sc, inc) x8 (40)

Round 6 :

(4sc, inc) x8 (48)

Round 7 :

(5sc, inc) x8 (56)

Round 8 :

BLO: 56sc (56)

Round 9-14 :

56sc (56)

Round 15 :

FLO: 56hdc (56), slst to the first stitch.

Info :

F.O

Info :

Leave long end and sew around the pot to secure and hide the end. Cut off the yarn.

β€” Assembly :

Item Name (Back legs and toes) :

Start sewing the back legs on two side of the thighs and make sure to stuff it before closing it all the way. Sew the toes to the bottom of the legs. Make sure 3 toes pointed out.

Item Name (Front legs) :

Sew the front leg two stitches away from the back leg, 3 stitches long. Then sew the tip of the leg into the belly. Repeat the same steps on the other side.

Item Name (Embroider) :

Using white yarn, embroider 'X' around the frog body.

Item Name (Flower) :

Sew the flower to one side of the frog. You can also sew it on the top of the frog. It's completely up to you.

Info :

Now you have a cactus frog. Please take care of it by handwashing when dirty. Hope you enjoy making this pattern.

Assembly Instructions

  • Start sewing the back legs on two sides of the thighs and stuff them before closing completely; sew toes to the bottom of legs so 3 toes point outward.
  • Sew the front legs two stitches away from the back legs, make them three stitches long, and sew the tip of each front leg into the belly; repeat on the other side.
  • Using white yarn, embroider 'X' marks around the frog body to mimic cactus spines, spacing them evenly around the top and sides.
  • Sew the flower onto one side of the frog or on top of the head as you prefer; use the long yarn tail from the flower to stitch securely through the frog's body.
  • Place the frog inside the pot once the pot's end has been woven in; the pot is removable so place frog inside for display and remove for storage or play.

Important Notes

  • πŸ’‘Use a stitch marker or a piece of yarn to mark the first stitch of each round when working in continuous spiral rounds for accurate stitch counts.
  • πŸ’‘Insert safety eyes between rounds 5 and 6, spaced 4 stitches apart; safety eyes are not suitable for children under 3 years old.
  • πŸ’‘Stuff small pieces gradually and firmly enough to hold shape but avoid overstuffing which can distort the amigurumi.
  • πŸ’‘Leave long yarn tails on small pieces (legs, toes, flower) to make sewing and secure attachment easier and neater.

This tiny cactus frog is a playful little amigurumi with a removable pot and a sweet flower accent. It fits in the palm of your hand and makes a lovely handmade gift or desk companion. Enjoy making and personalizing it β€” care for it by handwashing when needed. πŸ§ΆπŸŒ΅πŸŽ€

You ask,

we answer.

FAQs

What size will the finished piece be?

The finished amigurumi measures approximately 2 1/2 inches tall and 2 1/2 inches wide when using the recommended yarn and 3.5mm hook.

Can I use different yarn weights for this pattern?

Yes, you can use different yarn weights, but this will change the final size; adjust your hook accordingly and expect different stitch counts if you change weight significantly.

Do I need prior crochet experience for this pattern?

This pattern is rated intermediate, so familiarity with single crochet, increases, decreases, working in BLO/FLO and sewing small pieces is recommended for best results.

How long does this project typically take to complete?

Most crocheters finish this small amigurumi in about 2-3 hours, though time may vary by experience and how much time you spend on assembly and embroidery.