🧢 Beautiful ✨ Detailed πŸ’ Adorable

Bunny Bag Pattern

Bunny Bag Pattern
4.7β˜… Rating
2-4 Hours Time Needed
3.4K Made This
βœ‚οΈ

Intermediate Level

Ideal for those with basic crochet experience, featuring slightly more advanced stitches and techniques to expand your skills.

⏱️

Bite-Sized Project

Finishes in 2-4 hoursβ€”perfect for an afternoon of creative relaxation.

✨

Stylish Touch

An elegant detail to elevate any look, combining traditional techniques with contemporary design sensibilities.

About This Bunny Bag Pattern

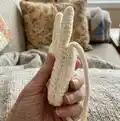
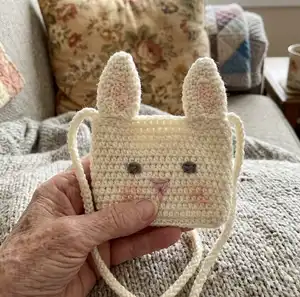
This pattern teaches you how to crochet a charming bunny bag with ears, a tiny flap closure and a long cord strap. The design uses half double crochet shaping worked in rows and small round pieces for eyes and nose. You will assemble the ears and strap, embroider facial details and optionally add a blush to cheeks for a soft finish.

Bunny Bag Pattern crochet pattern - detailed view of completed project

Suitable for making a cute child-sized purse or gift, the pieces are small and quick to complete. Photos and a cord technique tutorial link are included to support trickier steps.

Why You'll Love This Bunny Bag Pattern

I absolutely love this pattern because it turns simple stitches into a playful, wearable accessory that brings instant joy. I enjoy how small details like the flap, ears and embroidered face give so much personality to the bag. The cord technique creates a professional-looking strap that is comfortable to wear. I also appreciate that the pattern is versatile β€” you can easily change colors and trims to match different tastes.

Bunny Bag Pattern step 1 - construction progress Bunny Bag Pattern step 2 - assembly progress Bunny Bag Pattern step 3 - details and accessories Bunny Bag Pattern step 4 - final assembly and finishing

Switch Things Up

I love how easy it is to customize this bunny bag by changing yarn colors β€” try pastel pink or mint green for a softer look.

You can make a mini keychain version by using thinner yarn and a smaller hook for a tiny charm-sized bag.

Want a sturdier bag? Add a fabric lining sewn in after assembly to help hold small items more securely.

Use safety eyes instead of embroidered eyes if you prefer a glazed, toy-like look, but keep safety considerations in mind for small children.

Try adding a decorative fringe or pompom to one side of the bag for a playful accent that personalizes the design.

I sometimes replace the wooden button with a magnetic snap for a cleaner, faster-closing finish.

Swap the plain strap for a braided or chain strap for a different style β€” you can braid three cords together or add a metal chain for a grown-up look.

Embroidery can change the expression β€” a small smile or different nose shape will change the bag's personality instantly.

If you want a larger bag, use a heavier yarn and larger hooks and increase the initial chain proportionally; test gauge and adjust accordingly.

For matching sets, make coordinating accessories like a small coin purse or hairband using the same yarn and colors to create a charming collection.

Common Mistakes & How to Fix Them

βœ— Not using a stitch marker at the start of each round can make it hard to keep track of row beginnings; use a marker or contrasting yarn to mark the first stitch each round. βœ— Counting chains as stitches at the beginning of rounds will throw off your stitch totals; remember that chains at the beginning are NOT counted as hdc in this pattern. βœ— Skipping the instruction to leave a long tail when fastening off small pieces will make sewing fiddly later; leave a long yarn tail for sewing every small piece for easier assembly. βœ— Pulling the cord strap too tight while crocheting changes the final length and drape; work the cord with consistent tension and measure as you go until you reach 85cm.

Bunny Bag Pattern

Make a sweet bunny-shaped crossbody bag with this clear crochet pattern. You will create a compact little purse with ears, a cord strap, embroidered face details, and a functional buttoned flap. The pattern includes step-by-step rounds, photos reference tips, and an optional cord tutorial link to help you finish a polished tiny bag perfect for kids and gift making.

Intermediate 2-4 Hours

Materials Needed for Bunny Bag Pattern

β€” Main Fabric

  • 01
    Alize Cotton Gold Pratica yarn - Color 63 Cream - 220m/100g (primary yarn for bag)
  • 02
    Small amount of Catania (or similar) pink yarn for nose and cheek coloring
  • 03
    Small amount of Catania (or similar) brown yarn for embroidered eyes

β€” Tools Required

  • 01
    Crochet hook size 3.0mm
  • 02
    Crochet hook size 3.5mm
  • 03
    Crochet hook size 2.2mm
  • 04
    Wooden button (1)
  • 05
    Sewing needle for yarn (tapestry needle)
  • 06
    Scissors
  • 07
    Stitch markers (optional)
  • 08
    Yarn needle for sewing pieces together
  • 09
    Powder crayon or powder blush for cheek and ear coloring (optional)

Progress Tracker

0% Complete

β€” Notes :

Infos :

Chains at the beginning of the rounds won't be counted as hdc. It can be useful to use stitch marker or different colored yarn to see the beginning of round. The bag will be 11cm (4,33inch) length and 13cm (5,11inch) width if you use the same materials with me. (except ears).

β€” Bunny Body :

Info :

Make a slst at the end of each round and begin with ch2 at the beginnings new round. With cream color yarn and 3mm hook;

Round 1 :

Ch22, turn back and starting from 3rd; 19hdc, into same st; 4hdc, Continue with otherside 18hdc, into last st; 3hdc (44)

Round 2 :

(20hdc, 2hdcinc)*2 (48)

Rounds 3-14 :

(12 rounds) 48hdc (48)

Info :

Fasten off and cut the yarn.

β€” Closure Piece :

Info :

Now we're going to crochet a tiny closure piece for the bag. Make a slst at the end of each round and begin with ch2 at the beginnings new round. Count back at the finishing point and add yarn to the 15th stitch.

Rounds 1-6 :

(6 rounds) 8hdc

Round 7 :

2hdc, ch3 (skip 3sts) starting from 4th; 3hdc.

Info :

Now sew a wooden button on the back. Now you can close your bag whenever you want ☺

β€” Bunny Ears :

Info :

Make 2 of them. With cream color yarn and 3mm hook; Make a slst at the end of each round and begin with ch2 at the beginnings new round.

Round 1 :

Into MR 6hdc (6)

Round 2 :

(2hdc, 1hdcinc)*2 (8)

Round 3 :

(3hdc, 1hdcinc)*2 (10)

Round 4 :

(1hdc, 1hdcinc)*5 (15)

Rounds 5-10 :

(6 rounds) 15hdc (15)

Info :

Fasten off with a slst and cut the yarn long for sewing.

Info :

Fasten the ears to the 7 loops on both sides of the tiny flap in the middle of the bag. Sew the back of the ear to the back loop and the front to the front loop. You can get support from the photos.

β€” Bag Strap :

Info :

With cream color yarn and 3.5mm hook; I crocheted with the cord technique. When starting, leave enough yarn for sewing.

Round 1 :

Ch2, skip first st and crochet 1sc. Rotate the cord and crochet 1sc into the loop. Turn it again and from two loops insert your hook under them, crochet 1sc. Continue the cord technique until you reach 85cm in length.

Info :

You can get support from photos and a video tutorial linked below.

Info :

My friend's youtube video will help you with this. Link is here: https://youtu.be/9VfL0iB7308

Info :

Sew the strap just side the ears. Don't cut the yarn! Sew the strap with two rows of ears and fasten them together. This way the ears will not fall off.

β€” Bunny Eyes :

Info :

Make 2 of them. With brown color yarn and 2.2mm hook;

Round 1 :

Into MR 6sc (6)

Info :

Fasten off and cut the yarn long for sewing. Count from top to bottom. Sew the eyes to the 7th row with a distance of 7hdc.

β€” Nose :

Info :

Embroider a tiny nose as in the photo with pink yarn and needle.

Info :

Finally, you can color the cheeks and ears if you want. I used make-up blush because I didn't want it to be permanent.

β€” Finishing :

Info :

Sew ears, strap, eyes and nose in place using the long tails left when fastening off. Weave in ends and block lightly if desired. Congratulations β€” your bunny bag is complete!

Assembly Instructions

  • Fasten the two bunny ears to the 7 loops on both sides of the tiny flap in the middle of the bag; sew the back of each ear to the back loop and the front to the front loop to secure them.
  • Sew the strap to the bag just beside the ears; do not cut the yarn β€” sew the strap through two rows of stitches at the ears and fasten together so the ears are reinforced and will not fall off.
  • Sew the small closure flap onto the top back of the bag and attach the wooden button to the back piece; this allows the flap to fold over and close the bag.
  • Sew the two small brown eye rounds to the front of the bag at the 7th row, spacing them about 7 hdc apart (count across the row for accuracy).
  • Embroider the tiny pink nose in the center beneath the eyes using pink yarn and a needle, then add optional blush to cheeks and ear centers with powder crayon or removable makeup.

Important Notes

  • πŸ’‘Chains at the beginning of rounds are not counted as half double crochet (hdc); follow counts accordingly to avoid mismatched stitch totals.
  • πŸ’‘Use a stitch marker or different colored yarn to mark the beginning of each round so you do not lose track of round starts while working in rows.
  • πŸ’‘Leave long yarn tails when fastening off small pieces (ears, eyes, nose) to make sewing and positioning much easier during assembly.
  • πŸ’‘Measure the strap as you work the cord technique and stop when you reach approximately 85cm to achieve the recommended strap length.

Thank you for making the Bunny Bag β€” I hope it brings smiles every time it's worn! 🐰 This small purse is full of character and makes a lovely gift or special treat for a little one. 🧢 Finish with embroidered details and a blush for extra charm, then wear or gift with love. ✨

You ask,

we answer.

FAQs

What size will the finished piece be?

The finished bag measures approximately 11 cm length by 13 cm width (ears excluded) when using the recommended yarn and hook sizes.

Can I use different yarn weights for this pattern?

Yes, you can use different yarn weights but this will affect the final size; choose an appropriate hook for your yarn and be prepared to adjust stitch counts if needed.

Do I need prior crochet experience for this pattern?

This pattern is rated intermediate; basic crochet knowledge (hdc, sc, working in rows and magic ring) and some assembly skills are recommended.

How long does this project typically take to complete?

Most crocheters complete this project in 2-4 hours, though time may vary based on experience level, cord technique familiarity, and assembly detail.