🧢 Beautiful ✨ Detailed πŸ’ Adorable

Bunny Amigurumi Pattern

Bunny Amigurumi Pattern
4.2β˜… Rating
5-7 Hours Time Needed
1.4K Made This
βœ‚οΈ

Beginner Friendly Level

Perfect for those just starting their crochet journey, with clear instructions and simple techniques

⏱️

Weekend Treat

Takes 5-7 hours, making it an enjoyable project to finish over a couple of days.

🧸

Cute Companion

An adorable friend to cherish, handcrafted with love to bring comfort and joy for years to come.

About This Bunny Amigurumi Pattern

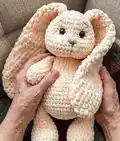
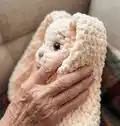
This pattern guides you to crochet a soft plush bunny using velvet or plush yarn, producing a cuddly toy with long ears and rounded paws. It uses simple stitches worked in spirals and gives clear step-by-step photos to follow. The finished bunny is approximately 12 inches tall with 11-inch ears using the specified materials.

Bunny Amigurumi Pattern crochet pattern - detailed view of completed project

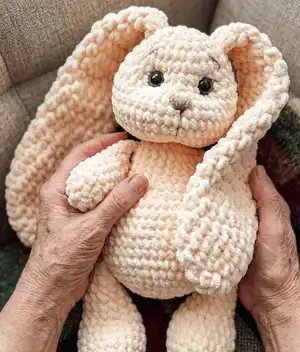
Beginner-friendly instructions and helpful tips are included to ensure a smooth crocheting experience. Perfect as a handmade gift or cozy nursery companion.

Why You'll Love This Bunny Amigurumi Pattern

I absolutely love this pattern because it turns simple stitches into a charming plush bunny you can hold and treasure. I enjoy how quickly the shapes form β€” the paws and ears take shape in a few short rows. The soft velvet yarn makes each piece feel luxurious and perfect for cuddling. I feel proud sharing a design that beginners can follow and make into a special, handmade gift.

Bunny Amigurumi Pattern step 1 - construction progress Bunny Amigurumi Pattern step 2 - assembly progress Bunny Amigurumi Pattern step 3 - details and accessories Bunny Amigurumi Pattern step 4 - final assembly and finishing

Switch Things Up

I love how this pattern adapts to different yarns; I often swap the plush yarn for a cotton worsted for a firmer, smaller bunny.

I sometimes change colors mid-body to create a two-tone tummy or add a contrasting inner ear color for personality.

If I want a tiny keychain friend I use thinner yarn and a smaller hook, or for a giant cuddle buddy I use bulkier yarn and a larger hook.

I enjoy adding embroidered facial features β€” a tiny stitched smile or freckles can completely change the expression.

For safety around small children I recommend embroidering eyes rather than using safety eyes; it keeps the toy fully soft and washable.

I often create little outfits or scarves to accessorize the bunny; a simple crocheted bow or dress adds charm and makes great gift presentation.

To make the bunny posable, I sometimes insert soft wire into the limbs before stuffing to allow gentle posing for display.

Try different stuffing levels to alter the feel; less stuffing gives a floppy, well-loved look while firm stuffing gives structure and stability.

I suggest experimenting with textured stitches on the body to add visual interest, such as alternating slipped stitches or post stitches for stripes.

Finally, I love personalizing names with surface crochet or a sewn-on felt name tag for a special, custom gift.

Common Mistakes & How to Fix Them

βœ— Skipping stitch markers during rounds can cause lost stitch counts; place a marker in the first stitch of each round and move it as you go. βœ— Not pulling the working loop up to hook level when using plush yarn creates visible holes; pull the loop to the hook level for a tight canvas. βœ— Overstuffing limbs leads to bulky, misshapen paws or ears; stuff gradually and evenly to maintain the intended shape and softness. βœ— Forgetting to count stitches after increases and decreases causes uneven shaping; count each round after shaping changes to stay accurate.

Bunny Amigurumi Pattern

Create an adorable plush bunny using soft velvet yarn with this beginner-friendly crochet pattern. You'll follow clear step-by-step instructions with photos to make a cuddly bunny with long ears and sweet paws. Perfect for gifts, nursery decor, or a cozy handmade companion you will love to craft.

Beginner Friendly 5-7 Hours

Materials Needed for Bunny Amigurumi Pattern

β€” Main Fabric

  • 01
    Plush or velvet yarn, 130 yards (120m)/100g, 2 skeins (main color; example: Baby Love plush yarn, peach color)
  • 02
    Small amounts of contrasting yarn for muzzle embroidery (approx 5-10g)
  • 03
    Optional felt for inner ear details (small scraps)

β€” Tools Required

  • 01
    Crochet hook size 4 mm
  • 02
    Crochet hook size 6 mm
  • 03
    Safety eyes 15 mm (2 pcs)
  • 04
    Soft polyester stuffing
  • 05
    Plastic needle with large eye
  • 06
    Stitch markers (3 pieces recommended)
  • 07
    Scissors

Progress Tracker

0% Complete

β€” Hind paws :

Info :

Take the 4 mm hook.

Info :

Crochet 5 CH.

Round 1 :

From the 2nd loop from the hook 3 SC, 3 SC in 1, 2 SC, 1 Inc (=10).

Info :

Next crochet a spiral.

Round 2 :

1 Inc, 2 SC, 3 Inc, 2 SC, 2 Inc (=16).

Info :

Place the marker in the 1st SC of the row. Next rearrange the marker to the 1st SC of the each subsequent row.

Info :

When crochet SC, pull the working loop to the level of the hook. Then the canvas will be without holes.

Info :

Then tighten the loop on the hook back.

Round 3 :

1 SC, 1 Inc, 3 SC, 1 Inc, 3 SC, 1 Inc, 3 SC, 1 Inc, 2 SC (=20).

Round 4 :

1 SC, 1 Inc, (4 SC, 1 Inc)*3, 3 SC (=24).

Round 5-6 :

2 rows of 24 SC.

Round 7 :

6 SC, (1 Dec, 1 SC)*3, 1 Dec, 5 SC, 1 Dec (=19).

Round 8 :

4 SC, 4 Dec, 5 SC, 1 Dec (=14).

Round 9-14 :

6 rows of 14 SC.

Info :

Take some stuffing. Take the same amount for the second paw to ensure they are equally filled. Gently stuff the lower part of the paw. Fold in half.

Info :

Crochet 6 SC on both part. Cut the thread, pull out the end.

Info :

Similarly crochet the 2nd paw.

β€” Front paws :

Info :

Take the 4 mm hook.

Info :

Crochet 2 CH.

Round 1 :

6 SC in the 2nd loop from the hook.

Info :

Next crochet a spiral.

Round 2 :

6 Inc (=12). Place the marker in the 1st SC of the row. Next rearrange the marker to the 1st SC of the each subsequent row.

Round 3 :

(5 SC, 1 Inc)*2 (=14).

Round 4-7 :

4 rows of 14 SC.

Round 8 :

10 SC, 2 Dec (=12).

Round 9-13 :

5 rows of 12 SC.

Info :

Take some stuffing. Take the same amount for the second paw to ensure they are equally filled. Gently stuff the lower 2/3 of the paw. Fold in half.

Info :

Crochet 5 SC on both part. Cut the thread, pull out the end.

Info :

Similarly crochet the 2nd paw.

β€” Ears :

Info :

Take the 6 mm hook.

Info :

Crochet 2 CH.

Round 1 :

6 HDC in the 2nd loop from the hook.

Info :

Next crochet a spiral.

Info :

Crochet the loops loosely to create a voluminous pattern.

Round 2 :

6 Inc (=12). Place the marker in the 1st HDC of the row. Next rearrange the marker to the 1st HDC of the each subsequent row.

Round 3 :

(1 HDC, 1 Inc)*6 (=18).

Round 4-8 :

5 rows of 18 HDC.

Round 9 :

(4 HDC, 1 Dec)*3 (=15).

Round 10-12 :

3 rows of 15 HDC.

Round 13 :

(3 HDC, 1 Dec)*3 (=12).

Info :

Fold in half.

Info :

Crochet 4 SlSt on both part. Cut the thread, pull out the end.

Info :

Similarly crochet the 2nd ear.

β€” Body :

Info :

Take the 4 mm hook.

Info :

Crochet 2 CH.

Round 1 :

6 SC in the 2nd loop from the hook.

Info :

Next crochet a spiral.

Round 2 :

6 Inc (=12). Place the marker in the 1st SC of the row. Next rearrange the marker to the 1st SC of the each subsequent row.

Round 3 :

12 Inc (=24).

Round 4 :

(3 SC, 1 Inc)*6 (=30).

Assembly Instructions

  • Attach the stuffed hind paws to the bottom of the body, aligning the folded seam with the body seam and sew securely with a yarn needle using a whipstitch.
  • Sew the front paws to the chest area of the body, spacing them evenly and angling slightly inward for a natural pose.
  • Pin the ears to the top sides of the head, matching the folded edge to the head seam, then sew them in place with small, neat stitches so they sit securely.
  • Position safety eyes on the head before final stuffing and sewing; secure them between the recommended rounds and embroider the muzzle afterward.

Important Notes

  • πŸ’‘Use stitch markers to keep track of the start of each round, especially when working in spirals with increases and decreases.
  • πŸ’‘Pull the working loop to the level of the hook when crocheting with plush yarn to avoid visible holes in the fabric.
  • πŸ’‘Stuff each limb gradually and evenly; use the same amount of stuffing for paired parts so they match in size and shape.

This charming bunny pattern creates a soft, huggable companion perfect for nurseries or a handmade gift. The plush yarn creates an irresistibly cuddly texture that kids and grown-ups will love. Simple stitches and helpful photos make this a relaxing, joyful weekend project. 🧢🐰

You ask,

we answer.

FAQs

What size will the finished piece be?

The finished bunny from the specified materials measures approximately 12 inches (30 cm) in height, with ears about 11 inches (27 cm) long.

Can I use different yarn weights for this pattern?

Yes, you can use different yarn weights, but the finished size will change. Use an appropriate hook for your chosen yarn and make a gauge swatch to estimate the final size.

Do I need prior crochet experience for this pattern?

This pattern is beginner-friendly and works well for those new to amigurumi; basic knowledge of single crochet, increases, and decreases is helpful.

How long does this project typically take to complete?

Most crocheters finish this project in 5-7 hours, depending on experience level and how many pieces you make at once.