🧢 Beautiful ✨ Detailed πŸ’ Adorable

Bernat Baby's Booties Amigurumi Pattern

Bernat Baby's Booties Amigurumi Pattern
4.8β˜… Rating
2-3 Hours Time Needed
4.1K Made This
βœ‚οΈ

Intermediate Level

Ideal for those with basic crochet experience, featuring slightly more advanced stitches and techniques to expand your skills.

⏱️

Bite-Sized Project

Finishes in 2-4 hoursβ€”perfect for an afternoon of creative relaxation.

πŸ‘Ά

Tiny Treasure

Small, sweet, and gift-worthy creations that fit perfectly in the palm of your hand with detailed charm.

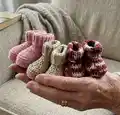
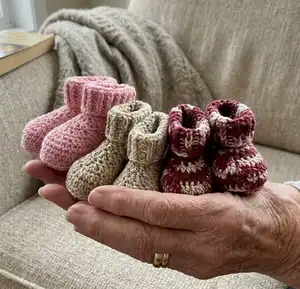
About This Bernat Baby's Booties Amigurumi Pattern

This pattern creates a pair of classic baby booties worked in rounds with an integrated cuff, instep and sole. The instructions include both rows and rounds with exact stitch counts for three infant sizes. You will use simple stitches along with a back-post technique for texture, all written for the smallest size with notes for larger sizes. The finished booties are comfortable, washable, and make a lovely handmade gift.

Bernat Baby's Booties Amigurumi Pattern crochet pattern - detailed view of completed project

Designed for 3 to 12 month infants, the pattern uses Bernat cotton or satin yarn for a soft finish. It includes clear shaping instructions and seam directions so you can assemble a neat, wearable pair.

Why You'll Love This Bernat Baby's Booties Amigurumi Pattern

I absolutely love this pattern because it transforms simple stitches into a wonderfully wearable baby accessory that looks professional. I enjoy how the textured rounds around the sole add durability while keeping the booties soft and flexible. The pattern is concise yet detailed, so I can finish a pair in just a couple of hours for a last-minute gift. Making these booties always feels rewarding β€” they are small, quick and so appreciated by new parents.

Bernat Baby's Booties Amigurumi Pattern step 1 - construction progress Bernat Baby's Booties Amigurumi Pattern step 2 - assembly progress Bernat Baby's Booties Amigurumi Pattern step 3 - details and accessories Bernat Baby's Booties Amigurumi Pattern step 4 - final assembly and finishing

Switch Things Up

I love to change up the color scheme when I make these booties; try contrasting cuff and sole colors for a bold look.

If you want a chunkier, cuddlier version, use a bulkier yarn and a larger hook, which will make the booties larger and softer.

For a mini keychain or ornament, use finer yarn and a smaller hook to create a tiny, adorable pair that’s perfect for decorations.

Embellish the cuff with a ribbon threaded through the stitches or add a small button on the side for a classic finish.

Experiment with different stitches for texture β€” swap the cuff rows for half double crochets or ribbing for a different look and stretch.

I sometimes add an embroidered heart or initials on the toe area to personalize the booties for a gift recipient.

Try adding a suede or leather sole patch for extra durability if these will get heavy wear from a mobile infant.

Use variegated or ombre yarn to create subtle color transitions without changing colors manually.

If you want a slipper-style bootie, lengthen the instep shaping and reduce decreases on the toe for a roomier front.

I often pair these with a matching hat or blanket, creating a coordinated gift set that’s quick to complete and always appreciated.

Common Mistakes & How to Fix Them

βœ— Skipping gauge checking before you begin will change the finished size and fit; measure your swatch and adjust hook size as required to match the pattern gauge. βœ— Not following the instruction to work the cuff in back loops only will produce a different edge texture and width; be sure to work Row 2 of the cuff in the back loops only as instructed. βœ— Forgetting to leave remaining stitches unworked when starting the instep can distort the sole and upper shaping; after joining for the instep leave the remaining stitches unworked as directed and turn when told. βœ— Failing to sew seams evenly causes lumpy or twisted booties; pin pieces in place and sew with small, even stitches, checking alignment frequently. βœ— Pulling yarn too tight when drawing up loops for the special dcbp stitch can make the fabric too tight; keep a relaxed tension when drawing up loops so the stitch sits neatly. βœ— Not fastening off or weaving in ends securely may cause unraveling with wear; fasten off as instructed and weave in ends at the seams for a durable finish.

Bernat Baby's Booties Amigurumi Pattern

Create soft, stylish baby booties using Bernat Handicrafter Cotton or Bernat Satin yarn. This pattern guides you step-by-step through the cuff, foot and instep with clear round-by-round instructions so you can crochet a perfect pair for infants. Ideal for handmade gifts, shower presents, or a cozy keepsake for your little one.

Intermediate 2-3 Hours

Materials Needed for Bernat Baby's Booties Amigurumi Pattern

β€” Main Fabric

  • 01
    Bernat Handicrafter Cotton (50 g / 1.75 oz / 73 m / 80 yds)
  • 02
    Bernat Satin (100 g / 3.5 oz / 149 m / 163 yds)
  • 03
    Sizes: to fit infant 3 (6-12) mos
  • 04
    Yarn amounts noted on pattern: 50 (75-90) m OR 55 (85-100) yds (see size notes in pattern)
  • 05
    Gauge: 14 sc and 15 rows = 4 ins [10 cm]

β€” Tools Required

  • 01
    Crochet hook size 4 mm (U.S. G or 6) or size needed to obtain gauge
  • 02
    Yarn needle for sewing seams
  • 03
    Scissors
  • 04
    Stitch marker (optional)

Progress Tracker

0% Complete

Infos :

The instructions are written for smallest size. If changes are necessary for larger sizes the instructions will be written thus ( ).

β€” Cuff :

Round 1 :

Ch 16. 1 sc in 2nd ch from hook. 1 sc in each ch to end of ch. Turn. 15 sc.

Round 2 :

Ch 1. Working in back loops only, 1 sc in each sc across.

Info :

Rep last row until work from beg measures 6 (6ΒΌ-6Β½) ins [15 (16-16.5) cm], ending with a RS row. Do not turn.

β€” Foot :

Round 1 :

1st row: (RS). Ch 1. Work 23 (25-27) sc evenly along long edge of Cuff. Turn.

Round 2 :

Ch 1. 1 sc in each sc across. Fasten off.

β€” Instep :

Round 1 :

With RS of work facing, miss first 7 (8-9) sc. Join yarn with sl st to next sc. Ch 1. 1 sc in same sp as last sl st. 1 sc in each of next 8 sc. Turn. Leave rem sts unworked. 9 sc.

Round 2-4 :

Ch 1. 1 sc in each sc across. Turn.

Round 5 :

Ch 1. Draw up a loop in each of next 2 sts. Yoh and draw through all 3 loops on hook – sc2tog made. 1 sc in each of next 5 sts. Sc2tog over next 2 sts. 7 sts. Fasten off. Sew back seam.

β€” Foot :

Round 1 :

1st rnd: With RS of work facing, join yarn with sl st at center back. Ch 2 (counts as hdc). 1 hdc in each of next 6 (7-8) sts, 7 hdc down side of instep, 2 hdc in corner sc, 5 hdc across end of instep, 2 hdc in corner sc, 7 hdc along other side of instep, 1 hdc in each of next 7 (8-9) sts. Join with sl st in top of ch 2. 37 (39-41) hdc.

Round 2 :

2nd rnd: Ch 2 (counts as hdc). *Yoh and draw up a loop around post of next st at back of work inserting hook from right to left. (Yoh and draw through 2 loops on hook) twice – 1 dcbp made. Rep from * around. Join with sl st to top of ch 2.

Round 3 :

3rd rnd: As 2nd rnd.

Round 4 :

4th rnd: Ch 1. Sc2tog over first 2 sts. 1 sc in each of next 14 (15-16) sts. Sc2tog over next 2 sts. 1 sc in next st. Sc2tog over next 2 sts. 1 sc in each of next 14 (15-16) sts. Sc2tog over last 2 sts. Join with sl st to first st. 33 (35-37) sc.

Round 5 :

5th rnd: Ch 1. Sc2tog over first 2 sts. 1 sc in each of next 12 (13-14) sc. Sc2tog over next 2 sts. 1 sc in next sc. Sc2tog over next 2 sts. 1 sc in each of next 12 (13-14) sc. Sc2tog over last 2 sts. Join with sl st to first st. 29 (31-33) sts.

Round 6 :

6th rnd: Ch 1. Sc2tog over first 2 sts. 1 sc in each of next 10 (11-12) sc. Sc2tog over next 2 sts. 1 sc in next sc. Sc2tog over next 2 sts. 1 sc in each of next 10 (11-12) sc. Sc2tog over last 2 sts. Join with sl st to first st. 25 (27-29) sts.

Round 7 :

7th rnd: Ch 1. Sc2tog over first 2 sts. 1 sc in each of next 8 (9-10) sc. Sc2tog over next 2 sts. 1 sc in next sc. Sc2tog over next 2 sts. 1 sc in each of next 8 (9-10) sc. Sc2tog over last 2 sts. Join with sl st to first st. 21 (23-25) sts. Fasten off. Sew sole seam.

Assembly Instructions

  • Sew the back seam of the instep closed using whipstitch or mattress stitch, aligning edges neatly and fastening off securely.
  • Sew the sole seam closed along the bottom of the foot after final round, matching the edges and using small even stitches for a smooth finish.
  • Weave in all loose ends on the wrong side of the work and trim excess yarn to prevent unraveling and keep the inside tidy.
  • When joining yarn at the center back to start the sole rounds, ensure the RS (right side) of work is facing and join with a slip stitch as indicated to keep seam placement accurate.

Important Notes

  • πŸ’‘Check your gauge: 14 sc and 15 rows = 4 ins [10 cm] to ensure the booties fit as intended.
  • πŸ’‘Do not turn after finishing the cuff rows when instructed to end with a RS row; continuing orientation affects later joining.
  • πŸ’‘Leave remaining stitches unworked when instructed for the instep to keep the sole shape correct before sewing the back seam.
  • πŸ’‘Join yarn with RS facing at the center back when beginning the sole rounds to maintain proper seam placement and shaping.
  • πŸ’‘Fasten off and sew seams with small even stitches to create a smooth, comfortable inside for the baby.

These adorable baby booties are quick to make and perfect for gifting to new parents.🧢 Soft, wearable, and made with Bernat yarns for easy care and lovely texture.🧡 Handmade booties like these make charming keepsakes and thoughtful presents.✨

You ask,

we answer.

FAQs

What size will the finished booties fit?

The pattern is written to fit infant sizes 3 (6-12) months with exact stitch counts given for each size; final fit will depend on yarn and tension.

Can I use a different yarn weight for these booties?

Yes, you can substitute yarn, but your finished size will change; check your gauge and adjust hook size to match 14 sc and 15 rows = 4 ins [10 cm].

Do I need to be familiar with advanced stitches to make these booties?

This pattern is intermediate due to the back-post technique (dcbp) used; basic crochet knowledge plus following the written loop/dcbp instructions will help you succeed.

How long does it typically take to complete a pair?

Most crocheters finish a pair in around 2-3 hours, though time will vary with experience and the size you make.

How should I finish the seams to make them comfortable?

Sew seams with a yarn needle using small, even stitches and weave in ends on the wrong side for a smooth interior that is comfortable for the baby.