🧶 Beautiful ✨ Detailed 💝 Adorable

Baby Cow and Baby Bull Amigurumi Pattern

Baby Cow and Baby Bull Amigurumi Pattern
4.0★ Rating
5-7 Hours Time Needed
2.3K Made This
✂️

Intermediate Level

Ideal for those with basic crochet experience, featuring slightly more advanced stitches and techniques to expand your skills.

⏱️

Weekend Treat

Takes 5-7 hours, making it an enjoyable project to finish over a couple of days.

🧸

Cute Companion

An adorable friend to cherish, handcrafted with love to bring comfort and joy for years to come.

About This Baby Cow and Baby Bull Amigurumi Pattern

This pattern shows you how to crochet two plush baby bovines — a baby cow and a baby bull — sized about 24 cm tall. It uses plush velvet yarn for a soft, tactile finish and includes step-by-step round instructions for head, body, limbs, muzzle, ears, tail and assembly. You will also learn needle sculpting and simple finishing techniques to create expressive eyes and a well-shaped face. Clear photos guide tricky assembly steps so you can achieve professional-looking results.

Baby Cow and Baby Bull Amigurumi Pattern crochet pattern - detailed view of completed project

The pattern is organized round-by-round with stitch counts and helpful tips for stuffing, attaching parts, and creating the cotton tail tuft. Colors and yarn brands used are listed, but you can substitute similar plush yarns you already love.

Why You'll Love This Baby Cow and Baby Bull Amigurumi Pattern

I absolutely love this pattern because it turns soft plush yarn into instantly huggable characters with personality. I enjoy the combination of simple amigurumi shaping and small finishing details like the muzzle and needle sculpting that make each face unique. Sewing the layers of the ears and making the little cotton yarn tail are small steps that add big charm. I also love that the pattern is adaptable — you can personalize colors, eye styles, and tiny accessories to create your own special baby cow or bull.

Baby Cow and Baby Bull Amigurumi Pattern step 1 - construction progress Baby Cow and Baby Bull Amigurumi Pattern step 2 - assembly progress Baby Cow and Baby Bull Amigurumi Pattern step 3 - details and accessories Baby Cow and Baby Bull Amigurumi Pattern step 4 - final assembly and finishing

Switch Things Up

I love how easily you can customize this pattern: change the plush yarn colors to make a spotted cow, black bull, or pastel nursery friend.

Want a mini keychain version? Use a thinner yarn and smaller hook to scale the pattern down, or use a bulkier yarn and a larger hook for a chunky, cuddly toy.

I often swap the 16mm safety eyes for embroidered eyes for baby-safe toys, which gives a softer, more child-friendly finish.

Try different muzzle colors or add embroidered nostrils and a little smile to change the expression of your cow and bull characters.

Make outfits and accessories—tiny scarves, bows, or a little felt nappy—for seasonal or themed versions that make lovely gifts.

I sometimes add wire in limbs for posability; use thin craft wire and wrap it safely inside stuffing if you want poseable arms and legs.

For a farm-themed set, crochet additional small friends (chick, piglet) using the same plush yarn and slightly altered shapes to keep a consistent look.

Experiment with eyelash placements and needle-sculpting tension to change the personality — more sink creates sleepier eyes, less sink looks surprised.

Swap the tail tuft for a braided cotton tail or a pom-pom for a fun textural change that still reads as a cow tail.

I recommend testing color combos on a small swatch first so you can see how the plush yarn colors sit together before committing to the whole toy.

Common Mistakes & How to Fix Them

✗ Skipping stitch counts when changing color sections leads to mismatched rounds; always count after each round change and mark stitch boundaries. ✗ Understuffing the head and body makes the toy collapse over time; stuff gradually and firmly, adding more stuffing while closing the piece. ✗ Forgetting to change yarn at the correct round causes visible color joins; change yarn exactly at the stated round and weave in ends neatly. ✗ Not setting safety eyes before stuffing can be awkward and risky; place safety eyes at the indicated round (8th row) before stuffing the head. ✗ Crocheting too tightly with plush velvet yarn can make stitches hard to see; maintain relaxed tension and use the recommended 4mm hook for even fabric. ✗ Not securing the muzzle or ears firmly will cause shifting; baste and sew pieces securely and reinforce with hidden stitches if necessary.

Baby Cow and Baby Bull Amigurumi Pattern

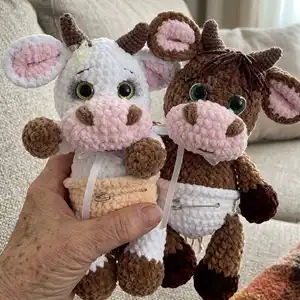
Make two adorable plush baby cows — a cow and a bull — with this friendly crochet pattern. You will work with plush velvet yarn and learn shaping, simple assembly, and needle sculpting to bring sweet expressions to life. The pattern includes full round-by-round instructions, materials, and helpful finishing steps so you can create a 24 cm (9.4 in) cuddly companion. Perfect as a heartfelt handmade gift or a charming nursery decoration.

Intermediate 5-7 Hours

Materials Needed for Baby Cow and Baby Bull Amigurumi Pattern

— Main Fabric

  • 01
    Plush velvet yarn brown (approx. 1 skein, e.g., Yarnart Dolce nr.765, 100g/120m per skein) for legs, arms, body and head
  • 02
    Plush velvet yarn white (approx. 1 skein, e.g., Himalaya Dolphin Baby nr.80301) for cow body/nappy
  • 03
    Plush velvet yarn pink (small amount, e.g., Himalaya Dolphin Baby nr.80303) for muzzle and inner ears
  • 04
    Plush velvet yarn peach (small amount, e.g., Himalaya Dolphin Baby nr.80333) for cow's nappy (optional)
  • 05
    Plush velvet yarn dark brown (small amount, e.g., Yarnart Dolce nr.775) for bull's arms and hooves
  • 06
    Cotton brown yarn (small amount) for horns (e.g., Alize Cotton Gold)
  • 07
    Cotton yarn for tail tuft (small amount) - cut into strips about 10 cm long

— Tools Required

  • 01
    4mm crochet hook for toys
  • 02
    2.25mm crochet hook for horns and cotton yarn work
  • 03
    Safety eyes 16mm (2 pieces)
  • 04
    Eyelashes for baby color (optional)
  • 05
    Soft polyester stuffing
  • 06
    Thin long needle and needle with a large eyelet
  • 07
    Stitch marker
  • 08
    Yarn cutter or sharp scissors
  • 09
    Pins for assembly (optional)

Progress Tracker

0% Complete

— Arm*2 :

Info :

Use 4mm crochet hook, dark brown and main brown colors yarn with dark brown color yarn

Round 1 :

2 ch. 6 Sc in the 2nd ch from the hook.

Round 2 :

6 inc (12)

Round 3 :

12 sc through back loop only

Round 4 :

(4 sc, 1 dec)*2 (10)

Info :

Change yarn to main color (brown)

Round 5-9 :

10 sc (5 rounds)

Round 10 :

(3 sc, 1 dec)*2 (8)

Info :

Stuff the arm. 4 sc through both sides across. Leave a little tail.

— Leg*2 :

Info :

Use 4mm crochet hook, dark brown and main brown colors yarn

Round 1 :

2 ch. 6 Sc in the 2nd ch from the hook.

Round 2 :

6 inc (12)

Round 3 :

(1 sc, 1 inc)*6 (18)

Round 4 :

18 sc through back loop only

Round 5 :

18 sc

Round 6 :

(1 sc, 1 dec)*6 (12)

Info :

Change yarn to main color (brown)

Round 7-11 :

12 sc (5 rounds)

Round 12 :

(4 sc, 1 dec)*2 (10)

Round 13 :

10 sc

Info :

Stuff the leg. 5 sc through both sides across. Leave a little tail.
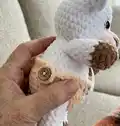
— Tail :

Info :

Use 4mm crochet hook, main brown color yarn and brown cotton yarn

Round 1 :

2 ch. 6 Sc in the 2nd ch from the hook.

Round 2-7 :

6 sc (6 rounds)

Info :

Do not stuff. 3 sc through both sides across. Leave a long tail

Info :

Cut the cotton yarn into strips about 10cm long.

Info :

Fold in half, using thinner crochet hook thread through the loop of the tail and thread it again into the thread loop. Well pull. Look pictures. At the end, using scissors make the ends straight

— Body :

Info :

Use 4mm crochet hook, white color and main brown colors yarn

Round 1 :

2 ch. 6 Sc in the 2nd ch from the hook.

Round 2 :

6 inc (12)

Round 3 :

(1 sc, 1 inc)*6 (18)

Round 4 :

(2 sc, 1 inc)*6 (24)

Round 5 :

(3 sc, 1 inc)*6 (30)

Round 6 :

(4 sc, 1 inc)*6 (36)

Round 7 :

5 sc with first leg, 12 sc, 5 sc with second leg, 14 sc (36)

Round 8 :

27 sc, 3 sc with the tail, 6 sc (36)

Round 9-10 :

36 sc (2 rounds)

Info :

Change yarn to main color (brown)

Round 11 :

36 sc through back loop only

Round 12 :

6 sc, 6 dec, 18 sc (30)

Round 13 :

(3 sc, 1 dec)*6 (24)

Round 14-15 :

24 sc (2 rounds)

Round 16 :

1 sc, 4 sc with first arm, 7 sc, 4 sc with second arm, 8 sc (24)

Round 17 :

(2 sc, 1 dec)*6 (18)

Round 18 :

(4 sc, 1 dec)*3 (15)

Info :

Fasten off. Good stuff the body.

Info :

With white color yarn 11rnd: 36 sc through front loop (for nappy section)

— Head :

Info :

Use 4mm crochet hook and main brown color yarn

Round 1 :

2 ch. 6 Sc in the 2nd ch from the hook.

Round 2 :

6 inc (12)

Round 3 :

(1 sc, 1 inc)*6 (18)

Round 4 :

(2 sc, 1 inc)*6 (24)

Round 5 :

(3 sc, 1 inc)*6 (30)

Round 6-8 :

30 sc (3 rounds)

Round 9 :

(4 sc, 1 inc)*6 (36)

Round 10 :

(5 sc, 1 inc)*6 (42)

Round 11-12 :

42 sc (2 rounds)

Round 13 :

(5 sc, 1 dec)*6 (36)

Round 14 :

(4 sc, 1 dec)*6 (30)

Round 15 :

(1 sc, 1 dec)*10 (20)

Round 16 :

(3 sc, 1 dec)*6 (16)

Info :

Set safety eyes in the 8th row in the range of 5sc. Good stuff the head.

— Muzzle :

Info :

Use 4mm crochet hook and rose color yarn. Crochet around the chain! We make oval

Round 1 :

8 ch. 1 sc in the 2nd ch from the hook, 1 sc, 1 sc, 1 sc, 1 sc, 1 sc, 3 sc to the last loop, 5 sc and 1 inc on other side of the chain (16)

Round 2 :

1 inc, 5 sc, 3 inc, 5 sc, 2 inc (22)

Round 3 :

1 sc, 1 inc, 5 sc, (1 sc, 1 inc)*3, 5 sc, (1 sc, 1 inc)*2 (28)

Round 4-5 :

28 sc (2 rounds)

Round 6 :

1 sc, 1 dec, 5 sc, (1 sc, 1 dec)*3, 5 sc, (1 sc, 1 dec)*2 (22)

Info :

Fasten off.

— Ear*2 :

Info :

Use 4mm crochet hook, main brown and pink colors yarn. One ear made from 2 layers of circle pieces.

With pink yarn - Round 1 :

2 ch. 6 Sc in the 2nd ch from the hook.

With pink yarn - Round 2 :

6 inc (12)

With pink yarn - Round 3 :

(1 sc, 1 inc)*6 (18)

With pink yarn - Round 4 :

(2 sc, 1 inc)*6 (24)

With pink yarn - Info :

Fasten off.

With main brown yarn - Round 1 :

2 ch. 6 Sc in the 2nd ch from the hook.

Round 2 :

6 inc (12)

Round 3 :

(1 sc, 1 inc)*6 (18)

Round 4 :

(2 sc, 1 inc)*6 (24)

Info :

Don't fasten and don't cut yarn.

Infos :

Stake both pink and brown pieces together with wrong-side on each other, continue to crochet the next round with brown color. 5rnd: 24 sc on both circle pieces (24)

Round 5 :

24 sc on both circle pieces (24)

Info :

Fold the ear and make 4s c through both layers together to give it a scooped appearance.

— Assembly and Finishing :

Info :

Sew the head to the body. Put more stuffing around the head and neck area as you are sewing together!!!

Info :

Sew muzzle to the head, using a little stuffing.

Info :

Sew ears to the head between 5 and 6 rows.

Needle Sculpting :

Insert the needle in the center of neck. Stitch out to right inner eye corner. I make a sewing stitch 2-3 loops long and pull the needle out to the center of the neck. Apply a little bit of tension on the thread, not much. The more you pull, the more the eye will sink back into the head. Repeat the same for the second eye.

Assembly Instructions

  • Sew the head to the body, adding extra stuffing around the neck as you sew to create a smooth join and stable connection.
  • Position and sew the arms between rounds 16 and 17 on the body, and secure with tight stitches so they do not shift during play.
  • Attach legs to the bottom of the body by aligning the leg tops with the leg placement round (round 7 placement). Sew firmly so the toy sits balanced.
  • Sew the muzzle to the head centered under the eyes using a little stuffing to preserve the oval shape and to keep it securely in place.
  • Layer and sew ear pieces (pink inner and brown outer) together, fold and sew 4 sc through both layers to shape, then attach ears to the head between rounds 5 and 6.
  • Attach the cotton yarn tail tuft by threading folded strips through the tail loop and knotting/tying as shown, then trim ends straight for the final tuft effect.

Important Notes

  • 💡Place safety eyes before stuffing the head (set safety eyes in the 8th row) to avoid difficulties and to ensure correct spacing.
  • 💡Use stitch markers to mark the first stitch of each round, especially when working back loop only (BLO) rounds and color changes.
  • 💡Stuff progressively and firmly, shaping as you go; overstuffing can distort shaping while under stuffing can flatten the toy.

This sweet Baby Cow & Baby Bull pattern makes a soft, huggable pair perfect for gifting or nursery decor. 🧶 Create two plush friends with reversible color options and a tiny tufted tail for charm. Whether you follow the exact colors or customize your own palette, these little bovines will bring smiles and cozy cuddles. 🐄✨

You ask,

we answer.

FAQs

What size will the finished piece be?

The finished amigurumi measures approximately 24 cm (9.44 inches) tall when using the recommended plush yarn and the 4mm hook.

Can I use different yarn weights for this pattern?

Yes, but the final size and texture will change; use an appropriate hook for the yarn you choose and expect a different finished scale.

Do I need prior crochet experience for this pattern?

This pattern is rated intermediate because it uses increases/decreases, back-loop rounds, color changes, and assembly; basic amigurumi experience is recommended.

How long does this project typically take to complete?

Most crocheters complete one toy in about 5-7 hours depending on experience, assembly time, and finishing details.

Where should I place the safety eyes?

Place the safety eyes in the 8th round of the head, positioned within a range of 5 single crochet stitches as shown in the pattern photos.