— Muzzle :
Info :
Make one with multicolor yarn and 1.5 mm crochet hook following the instructions. The marker goes along the back. You do not need the change position of the marker before you start joining the muzzle and the jaw.
Round 1 :
1) Make a MR, 7 sc into the ring.
Round 2 :
2) 2 sc in each st around (14)
Round 3 :
3) (sc, 2 sc in next st) * 7 (21)
Round 4 :
4) sc, 2 sc in next st, (2 sc, 2 sc in next st) * 6, sc (28)
Round 5 :
5) (3 sc, 2 sc in next st) * 7 (35)
Round 6 :
6) 2 sc, 2 sc in next st, (4 sc, 2 sc in next st) * 6, 2 sc (42)
Round 7 :
7) 3 sc, 2 sc in next st, (6 sc, 2 sc in next st) * 5, 3 sc (48)
Round 8 :
8) (7 sc, 2 sc in next st) * 6 (54)
Round 9 :
9) 4 sc, 2 sc in next st, (8 sc, 2 sc in next st) * 5, 4 sc (60)
Round 10 :
10) (9 sc, 2 sc in next st) * 6 (66)
Round 11 :
11) 5 sc, 2 sc in next st, (10 sc, 2 sc in next st) * 5, 5 sc (72)
Round 12 :
12) (11 sc, 2 sc in next st) * 6 (78)
Round 13 :
13) 6 sc, 2 sc in next st, (12 sc, 2 sc in next st) * 5, 6 sc (84)
Round 14 :
14) sc in each st around (84)
Round 15 :
15) (13 sc, 2 sc in next st) * 6 (90)
Round 16 :
16) sc in each st around (90)
Round 17 :
17) 7 sc, 2 sc in next st, (14 sc, 2 sc in next st) * 5, 7 sc (96)
Round 18 :
18) sc in each st around (96)
Round 19 :
19) 29 sc, 2 sc tog, 59 sc, 2 sc tog, 29 sc (119)
Round 20 :
20) 15 sc, 2 sc tog, 85 sc, 2 sc tog, 15 sc (117)
Round 21 :
21) 2 sc tog, 115 sc (116)
Round 22 :
22) 28 sc, 2 sc tog, 56 sc, 2 sc tog, 28 sc (114)
Round 23 :
23) 15 sc, 2 sc tog, 80 sc, 2 sc tog, 15 sc (112)
Round 24 :
24) 2 sc tog, 110 sc (111)
Round 25 :
25) 27 sc, 2 sc tog, 53 sc, 2 sc tog, 27 sc (109)
Round 26 :
26) 14 sc, 2 sc tog, 77 sc, 2 sc tog, 14 sc (107)
Round 27 :
27) 2 sc tog, 105 sc (106)
Round 28 :
28) 26 sc, 2 sc tog, 50 sc, 2 sc tog, 26 sc (104)
Round 29 :
29) 13 sc, 2 sc tog, 74 sc, 2 sc tog, 13 sc (102)
Info :
At this step you have to reinforce the jaw to make the fish keep shape and fix the teeth. If you crochet tightly enough, it is not necessary to make the wire frame. Cut a piece of wire as long as the outer contour of the jaw + 1 more cm at each end. With pliers, make small loops at the ends of the wire. Try the frame on to the body and fix it with pins.
Teeth preparation :
In order to make a toothy smile you have to make 2 sets of teeth. You can place teeth as you like. You can insert a wire inside the teeth to make them stronger and looking more interesting. Make teeth with 1.0 mm or 1.25 mm crochet hook (depending on the yarn you use) and white or gray yarn following the instructions given below. You can make as many teeth as you want.
Teeth - A - 2 teeth :
1) Make a MR, 6 sc into the ring. 2-3) sc in each st around (6) 4) (sc, 2 sc in next st) * 3 (9) 5-10) sc in each st around (9). Fasten off, weave in the end.
Teeth - B - 2 teeth :
1) Make a MR, 6 sc into the ring. 2-3) sc in each st around (6) 4) (sc, 2 sc in next st) * 3 (9) 5-8) sc in each st around (9). Fasten off, weave in the end.
Teeth - C - 2 teeth :
1) Make a MR, 6 sc into the ring. 2-3) sc in each st around (6) 4) (sc, 2 sc in next st) * 3 (9) 5-6) sc in each st around (9). Fasten off, weave in the end.
Teeth - D - 8/10 teeth :
2-4) sc in each st around (6). Fasten off, weave in the end.
— How to assemble the muzzle and the lower jaw :
Info :
Fold the lower jaw to place the increases in opposite corners.
Join step 1 :
1) 28 sc around the muzzle, then insert the hook into 29th st of the muzzle and between 1st and 2nd sts of the lower jaw (near the first increase), join the inner part of the lower jaw and the muzzle, make 72 sc inserting the hook through the sts of the muzzle and the jaw at the same time (you have to put the items RS facing each other and insert the hook from inside of the jaw), 29 sc around the muzzle till the marker (129).
Join step 2 :
2) 28 sc from the marker around the muzzle, insert the hook between 1st and 2nd sts near the increase of the lower jaw, 76 sc around the outer part of the lower jaw, 29 sc around the muzzle till the marker (133).
Continue outer contour :
Then continue working around the outer contour only (muzzle and the outer side of the lower jaw). 3) 2 sc in next st, 132 sc (134) 4) sc in each st around (134) 5) 2 sc in next st, 133 sc (135) 6-10) sc in each st around (135) 11) 2 sc tog, 133 sc (134) 12) (2 sc tog, 65 sc) * 2 (132) 13) 32 sc, 2 sc tog, 64 sc, 2 sc tog, 32 sc (130) 14) 16 sc, 2 sc tog, 94 sc, 2 sc tog, 16 sc (128)
Continue shaping :
15) (2 sc tog, 62 sc) * 2 (126) 16) 31 sc, 2 sc tog, 61 sc, 2 sc tog, 30 sc (124) 17) 15 sc, 2 sc tog, 90 sc, 2 sc tog, 15 sc (122) 18) 2 sc tog, 120 sc (121) 19) 29 sc, 2 sc tog, 59 sc, 2 sc tog, 29 sc (119) 20) 15 sc, 2 sc tog, 85 sc, 2 sc tog, 15 sc (117) 21) 2 sc tog, 115 sc (116) 22) 28 sc, 2 sc tog, 56 sc, 2 sc tog, 28 sc (114) 23) 15 sc, 2 sc tog, 80 sc, 2 sc tog, 15 sc (112) 24) 2 sc tog, 110 sc (111) 25) 27 sc, 2 sc tog, 53 sc, 2 sc tog, 27 sc (109) 26) 14 sc, 2 sc tog, 77 sc, 2 sc tog, 14 sc (107) 27) 2 sc tog, 105 sc (106) 28) 26 sc, 2 sc tog, 50 sc, 2 sc tog, 26 sc (104) 29) 13 sc, 2 sc tog, 74 sc, 2 sc tog, 13 sc (102)
Info :
At this step you have to reinforce the jaw to make the fish keep shape and fix the teeth. If you crochet tightly enough, it is not necessary to make the wire frame. Cut a piece of wire as long as the outer contour of the jaw + 1 more cm at each end. With pliers, make small loops at the ends of the wire. Try the frame on to the body and fix it with pins.
Assembly Instructions
- Insert wire frames into fins and tail: cut and bend wires so ends come out even, insert wire into finger-rays and wrap ends with plaster before seating inside the fin.
- Join the muzzle to the lower jaw by placing RS together; crochet 72 sc joining muzzle and inner jaw, then continue around outer contour to form the head shell, following counts in the pattern.
- Sew and position fins and tail: match labeled rays (A,B,C...) and join according to diagrams, pinning each fin and aligning increases before sewing or crocheting seams.
- Attach teeth sets to the jaw and reinforce with pins and small wire loops if desired; place teeth evenly and secure by sewing through base to the jaw framework.
- Fit the light bulb and wiring: make the lamp frame from wire placed in the fishing line stalk and secure to the body internal frame; test LED before final closing.
- Sew the lower jaw assembly to the body and secure the jaw frame with pins and strong stitches; weave in all ends and adjust stuffing for shape then close final opening.
Important Notes
- 💡Use stitch markers to keep track of your rounds and the marker position; change the marker position from time to time using shift sts to keep the center of the back aligned.
- 💡Stuff finger-rays lightly and stuff the body firmly but not too tight to maintain smooth shape; overstuffing can distort the pieces.
- 💡Do not insert wire before completing and shaping the fins or tail as advised; insert wire only when indicated to avoid twisting the piece.
- 💡Label rays and fingers (A, B, C, D, E) and use the appendix labels/tables to avoid mixing parts during assembly.
- 💡Weave in ends and fasten off securely after each part to prevent unraveling during assembly.
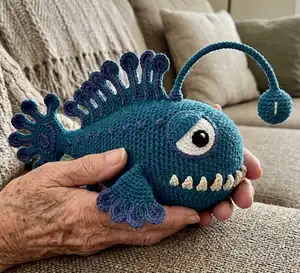
This quirky Anglerfish Sam makes a delightful handmade companion and conversation piece for any shelf or bedside. Whether you stitch him as a gift or a unique lamp, the combination of texture, beads and wired fins brings him to life. Enjoy the process, customize colors, and let Sam brighten your craft collection! 🧶✨